127.0.0.1:6379> LPUSH list one # 将一个值或多个值,插入到列表头部(左) (integer) 1 127.0.0.1:6379> LPUSH list two (integer) 2 127.0.0.1:6379> LPUSH list three (integer) 3
127.0.0.1:6379> exists list (integer) 0 127.0.0.1:6379> lset list 0 item # 如果不存在列表我们去更新就会报错 (error) ERR no such key 127.0.0.1:6379> LPUSH list value1 (integer) 1 127.0.0.1:6379> LRANGE list 0 0 1) "value1" 127.0.0.1:6379> LRANGE list 0 1 1) "value1" 127.0.0.1:6379> LSET list 0 item # 如果存在,更新当前下标的值 OK 127.0.0.1:6379> LRANGE list 0 0 1) "item" 127.0.0.1:6379> LSET list 1 other # 如果不存在则会报错 (error) ERR index out of range
127.0.0.1:6379> pfadd mykey a b c d e f g h i # 创建第一组元素 key (integer) 1 127.0.0.1:6379> pfadd mykey2 i j z x c v b n m (integer) 1 127.0.0.1:6379> pfcount mykey2 # 统计mykey2元素的基数数量 (integer) 9 127.0.0.1:6379> pfmerge mykey3 mykey mykey2 # 合并两组 mykey mykey2 => mykey3 并集 OK 127.0.0.1:6379> pfcount mykey3 # 统计并集中的元素数量 (integer) 15
127.0.0.1:6379> set money 100 OK 127.0.0.1:6379> set out 0 OK 127.0.0.1:6379> watch money # 监视 money 对象 OK 127.0.0.1:6379> multi # 事务正常结束,数据期间没有发生变动,这个时候就正常执行成功 OK 127.0.0.1:6379(TX)> DECRBY money 20 QUEUED 127.0.0.1:6379(TX)> INCRBY out 20 QUEUED 127.0.0.1:6379(TX)> exec 1) (integer) 80 2) (integer) 20
执行失败:
客户端1:
1 2 3 4 5 6 7 8 9 10 11 12 13
127.0.0.1:6379> watch money # 监视money OK 127.0.0.1:6379> multi OK 127.0.0.1:6379(TX)> DECRBY money 10 QUEUED 127.0.0.1:6379(TX)> INCRBY out 10 QUEUED 127.0.0.1:6379(TX)> exec# 执行之前,另外一个线程,修改了我们的值,这个时候,就会导致事务执行失败 (nil) 127.0.0.1:6379> get money "1000" 127.0.0.1:6379>
客户端2:
1 2 3 4 5
[fangyupeng@hadoop102 ~]$ redis-cli -p 6379 127.0.0.1:6379> get money "80" 127.0.0.1:6379> set money 1000 OK
127.0.0.1:6379> multi # 开启事务 OK 127.0.0.1:6379(TX)> set k1 v1 QUEUED 127.0.0.1:6379(TX)> set k2 v2 QUEUED 127.0.0.1:6379(TX)> get k2 QUEUED 127.0.0.1:6379(TX)> set k3 v3 QUEUED 127.0.0.1:6379(TX)> exec# 执行事务 1) OK 2) OK 3) "v2" 4) OK
1
放弃事务
1 2 3 4 5 6 7 8 9 10
127.0.0.1:6379(TX)> set k1 v1 QUEUED 127.0.0.1:6379(TX)> set k2 v2 QUEUED 127.0.0.1:6379(TX)> set k4 v4 QUEUED 127.0.0.1:6379(TX)> DISCARD OK 127.0.0.1:6379> get k4 (nil)
1
编译型异常(代码有问题,命令有错),事务中所有的命令都不会执行
1 2 3 4 5 6 7 8 9 10 11 12 13 14 15 16 17 18
127.0.0.1:6379> multi OK 127.0.0.1:6379(TX)> set k1 v1 QUEUED 127.0.0.1:6379(TX)> set k2 v2 QUEUED 127.0.0.1:6379(TX)> set k3 v3 QUEUED 127.0.0.1:6379(TX)> getset k3 # 错误的命令 (error) ERR wrong number of arguments for'getset'command 127.0.0.1:6379(TX)> set k4 v4 QUEUED 127.0.0.1:6379(TX)> set k5 v5 QUEUED 127.0.0.1:6379(TX)> exec# 所有的命令都不会执行 (error) EXECABORT Transaction discarded because of previous errors. 127.0.0.1:6379> get k5 (nil)
127.0.0.1:6379> set k1 "v1" OK 127.0.0.1:6379> multi # 开启事务 OK 127.0.0.1:6379(TX)> incr k1 # 失败 QUEUED 127.0.0.1:6379(TX)> set k2 v2 QUEUED 127.0.0.1:6379(TX)> set k3 v3 QUEUED 127.0.0.1:6379(TX)> get k3 QUEUED 127.0.0.1:6379(TX)> exec# 事务可以执行 1) (error) ERR value is not an integer or out of range 2) OK 3) OK 4) "v3" 127.0.0.1:6379> get k2 "v2" 127.0.0.1:6379> get k3 "v3" 127.0.0.1:6379> get k1 "v1"
/* * Copyright 2012-2020 the original author or authors. * * Licensed under the Apache License, Version 2.0 (the "License"); * you may not use this file except in compliance with the License. * You may obtain a copy of the License at * * https://www.apache.org/licenses/LICENSE-2.0 * * Unless required by applicable law or agreed to in writing, software * distributed under the License is distributed on an "AS IS" BASIS, * WITHOUT WARRANTIES OR CONDITIONS OF ANY KIND, either express or implied. * See the License for the specific language governing permissions and * limitations under the License. */
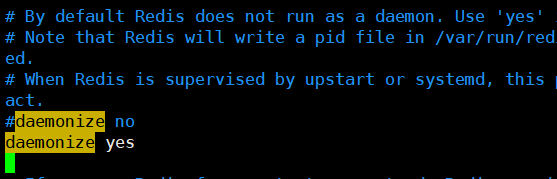
daemonize yes# 以守护进程的方式进行,默认是no,我们需要自己开启为yes pidfile /var/run/redis_6379.pid #如果以后台的方式运行,我们需要指定一个pid文件 # 日志 # Specify the server verbosity level. # This can be one of: # debug (a lot of information, useful for development/testing) # verbose (many rarely useful info, but not a mess like the debug level) # notice (moderately verbose, what you want in production probably) 生产模式 # warning (only very important / critical messages are logged) loglevel notice # 日志文件的通知等级 logfile "/usr/local/bin/klog"# 日志的文件位置名 databases 16 # 数据库的数量, 默认是16个数据库 always-show-logo no # 是否总显示logo
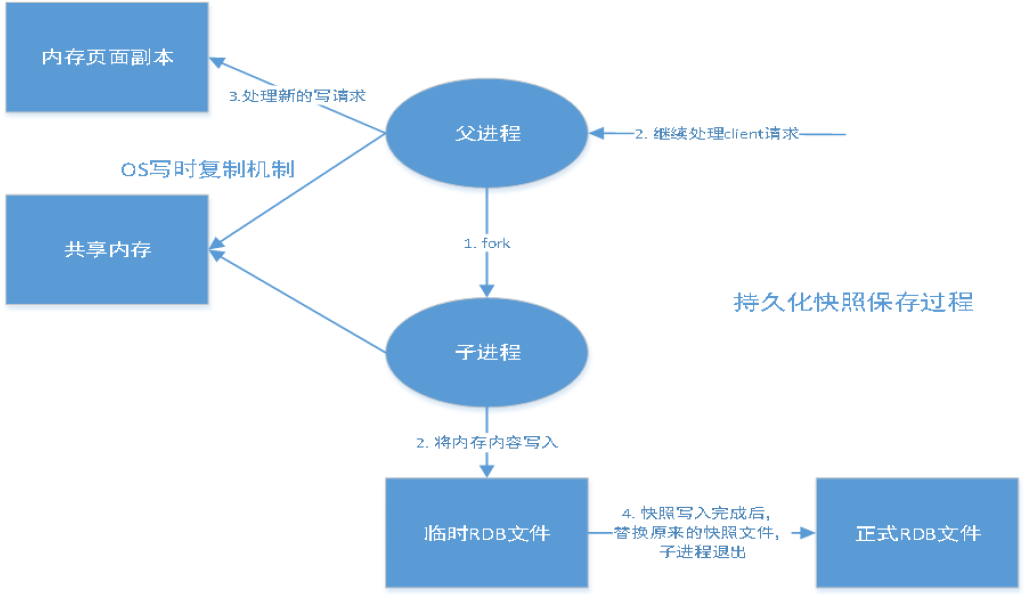
快照
持久化,在规定时间内,执行了多少次操作,则会持久化到文件,rdb.aof
redis是内存数据库,如果没有持久化,那么数据数据断电及失
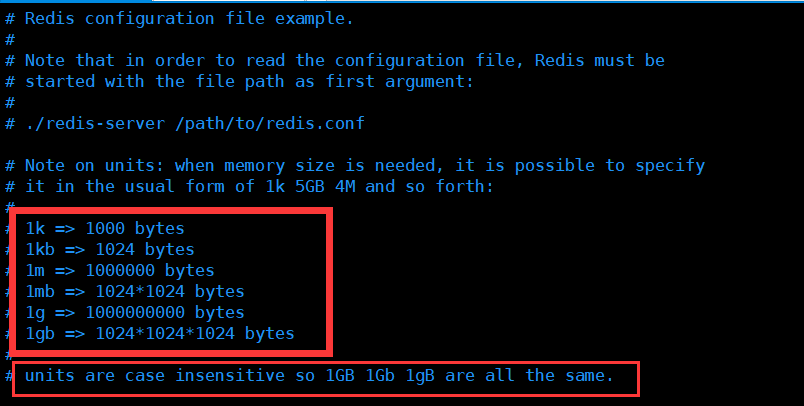
1 2 3 4 5 6 7 8 9 10 11
# 如果900s内,如果至少有1 key进行了修改,我们及进行持久化操作 save 900 1 # 如果300s内,如果至少有10 key进行了修改,我们及进行持久化操作 save 300 10 # 如果60s内,如果至少有10000 key进行了修改,我们及进行持久化操作 save 60 10000 stop-writes-on-bgsave-error yes# 持久化如果出错,是否需要继续工作 rdbcompression yes# 是否压缩rdb文件,需要消耗一些cpu rdbchecksum yes# 保存rdb文件的时候,进行错误的检查校验 #dir ./ # rdb 文件保存的目录,默认为启动服务时的当前路径,最好改成绝对路径 dir /usr/local/bin/krdb
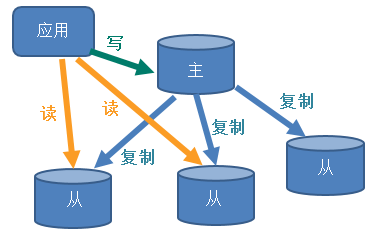
REPLICATION复制,主从复制
详见十九篇:Redis主从复制
SECURITY 安全
可以在这里设置redis的密码,默认是没有密码
1 2 3 4 5 6 7 8 9 10 11
# root 127.0.0.1:6379> ping PONG 127.0.0.1:6379> config get requirepass # 获取redis的密码 1) "requirepass" 2) "" 127.0.0.1:6379> config set requirepass "123456"# 设置redis的密码 OK 127.0.0.1:6379> config get requirepass 1) "requirepass" 2) "123456"
1 2 3 4 5 6 7 8 9 10
# localhost 127.0.0.1:6379> config get requirepass (error) NOAUTH Authentication required. 127.0.0.1:6379> ping (error) NOAUTH Authentication required. 127.0.0.1:6379> auth 123456 # 使用密码进行登录 OK 127.0.0.1:6379> config get requirepass 1) "requirepass" 2) "123456"
maxmemory <bytes> # redis配置最大内存容量 maxmemory-policy noeviction # 内存到达上限后的处理策略 1、volatile-lru -> Evict using approximated LRU(Least Recently Used), only keys with an expire set. # 只对设置了过期时间的key 进行LRU(默认值) 2、allkeys-lru -> Evict any key using approximated LRU. # 删除LRU算法的key 3、volatile-lfu -> Evict using approximated LFU(Least Frequently Used), only keys with an expire set. # 只对设置了过期时间的key 进行LFU 4、allkeys-lfu -> Evict any key using approximated LFU. # 删除LFU算法的key 5、volatile-random -> Remove a random key having an expire set. # 随机删除即将过期的key 6、allkeys-random -> Remove a random key, any key. # 随机删除 7、volatile-ttl -> Remove the key with the nearest expire time (minor TTL) # 删除即将过期的 8、noeviction -> Don't evict anything, just return an error on write operations. # 永不过期,返回错误 # LRU means Least Recently Used # LFU means Least Frequently Used
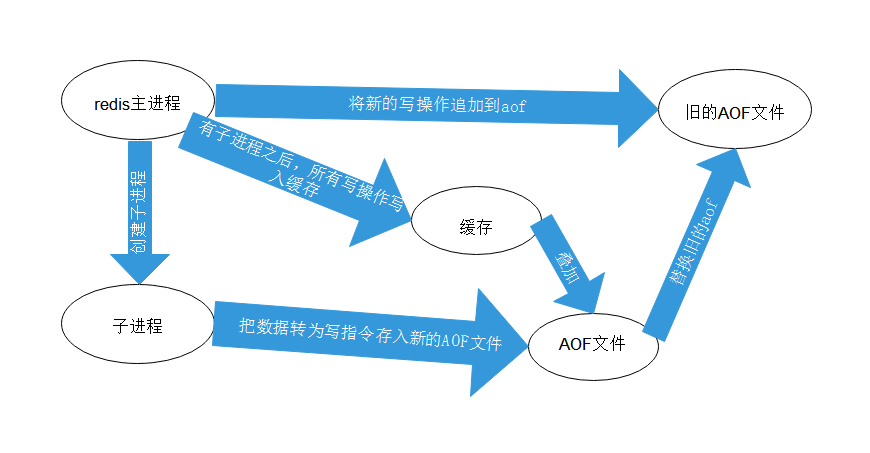
APPEND ONLY MODE aof模式
1 2 3 4 5 6 7
appendonly no # 默认是不开启aof模式,默认是是rdb方式持久化,在大部分所有的情况下,rdb够用 appendfilename "appendonly.aof"# 持久化的文件的名字
# *** IMPORTANT *** # # By default Sentinel will not be reachable from interfaces different than # localhost, either use the 'bind' directive to bind to a list of network # interfaces, or disable protected mode with "protected-mode no" by # adding it to this configuration file. # # Before doing that MAKE SURE the instance is protected from the outside # world via firewalling or other means. # # For example you may use one of the following: # # bind 127.0.0.1 192.168.1.1 # # protected-mode no
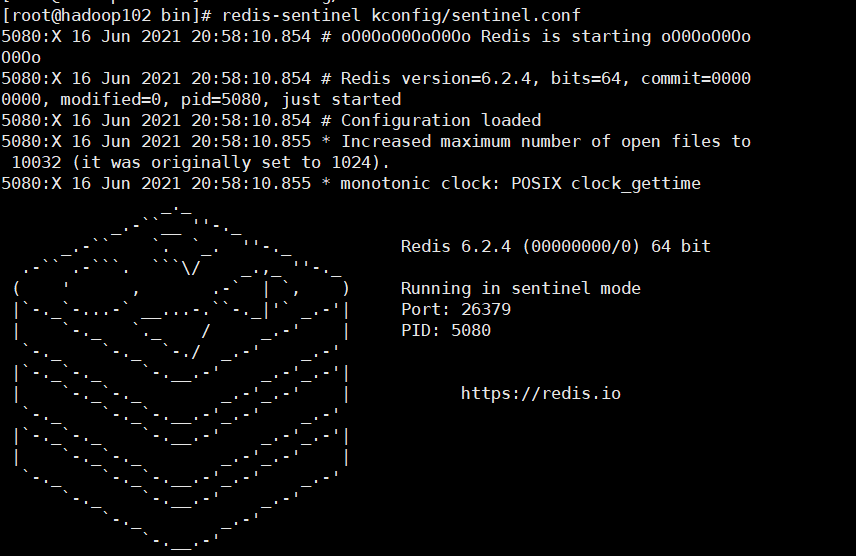
# port <sentinel-port> # The port that this sentinel instance will run on # 哨兵 sentimel 实例运行的端口 默认 26379 port 26379
# By default Redis Sentinel does not run as a daemon. Use 'yes' if you need it. # Note that Redis will write a pid file in /var/run/redis-sentinel.pid when # daemonized. daemonize no
# When running daemonized, Redis Sentinel writes a pid file in # /var/run/redis-sentinel.pid by default. You can specify a custom pid file # location here. pidfile /var/run/redis-sentinel.pid
# Specify the log file name. Also the empty string can be used to force # Sentinel to log on the standard output. Note that if you use standard # output for logging but daemonize, logs will be sent to /dev/null logfile ""
# sentinel announce-ip <ip> # sentinel announce-port <port> # # The above two configuration directives are useful in environments where, # because of NAT, Sentinel is reachable from outside via a non-local address. # # When announce-ip is provided, the Sentinel will claim the specified IP address # in HELLO messages used to gossip its presence, instead of auto-detecting the # local address as it usually does. # # Similarly when announce-port is provided and is valid and non-zero, Sentinel # will announce the specified TCP port. # # The two options don't need to be used together, if only announce-ip is # provided, the Sentinel will announce the specified IP and the server port # as specified by the "port" option. If only announce-port is provided, the # Sentinel will announce the auto-detected local IP and the specified port. # # Example: # # sentinel announce-ip 1.2.3.4
# dir <working-directory> # Every long running process should have a well-defined working directory. # For Redis Sentinel to chdir to /tmp at startup is the simplest thing # for the process to don't interfere with administrative tasks such as # unmounting filesystems. # 哨兵 sentinel的工作目录 dir /tmp
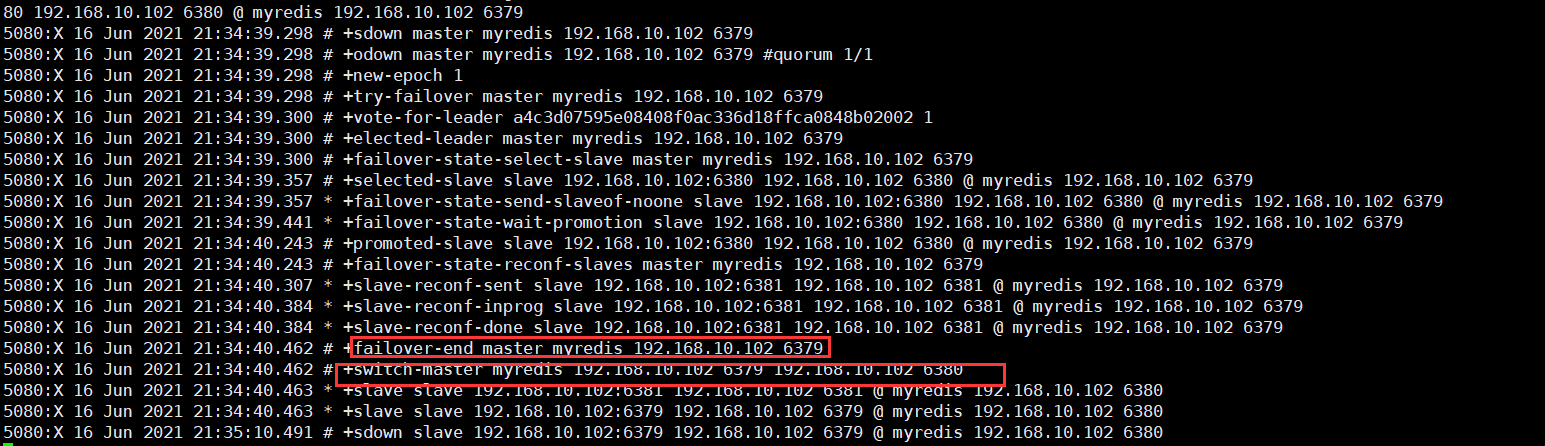
# sentinel monitor <master-name><ip><redis-port><quorum> # # Tells Sentinel to monitor this master, and to consider it in O_DOWN # (Objectively Down) state only if at least <quorum> sentinels agree. # # Note that whatever is the ODOWN quorum, a Sentinel will require to # be elected by the majority of the known Sentinels in order to # start a failover, so no failover can be performed in minority. # # Replicas are auto-discovered, so you don't need to specify replicas in # any way. Sentinel itself will rewrite this configuration file adding # the replicas using additional configuration options. # Also note that the configuration file is rewritten when a # replica is promoted to master. # # Note: master name should not include special characters or spaces. # The valid charset is A-z 0-9 and the three characters ".-_". sentinel monitor mymaster 127.0.0.1 6379 2
# sentinel auth-pass <master-name><password> # # Set the password to use to authenticate with the master and replicas. # Useful if there is a password set in the Redis instances to monitor. # # Note that the master password is also used for replicas, so it is not # possible to set a different password in masters and replicas instances # if you want to be able to monitor these instances with Sentinel. # # However you can have Redis instances without the authentication enabled # mixed with Redis instances requiring the authentication (as long as the # password set is the same for all the instances requiring the password) as # the AUTH command will have no effect in Redis instances with authentication # switched off. # # Example: # # sentinel auth-pass mymaster MySUPER--secret-0123passw0rd
# sentinel auth-user <master-name><username> # # This is useful in order to authenticate to instances having ACL capabilities, # that is, running Redis 6.0 or greater. When just auth-pass is provided the # Sentinel instance will authenticate to Redis using the old "AUTH <pass>" # method. When also an username is provided, it will use "AUTH <user><pass>". # In the Redis servers side, the ACL to provide just minimal access to # Sentinel instances, should be configured along the following lines: # # user sentinel-user >somepassword +client +subscribe +publish \ # +ping +info +multi +slaveof +config +client +exec on
# sentinel down-after-milliseconds <master-name><milliseconds> # # Number of milliseconds the master (or any attached replica or sentinel) should # be unreachable (as in, not acceptable reply to PING, continuously, for the # specified period) in order to consider it in S_DOWN state (Subjectively # Down). # # Default is 30 seconds. sentinel down-after-milliseconds mymaster 30000
# IMPORTANT NOTE: starting with Redis 6.2 ACL capability is supported for # Sentinel mode, please refer to the Redis website https://redis.io/topics/acl # for more details.
# Sentinel's ACL users are defined in the following format: # # user <username> ... acl rules ... # # For example: # # user worker +@admin +@connection ~* on >ffa9203c493aa99 # # For more information about ACL configuration please refer to the Redis # website at https://redis.io/topics/acl and redis server configuration # template redis.conf.
# ACL LOG # # The ACL Log tracks failed commands and authentication events associated # with ACLs. The ACL Log is useful to troubleshoot failed commands blocked # by ACLs. The ACL Log is stored in memory. You can reclaim memory with # ACL LOG RESET. Define the maximum entry length of the ACL Log below. acllog-max-len 128
# Using an external ACL file # # Instead of configuring users here in this file, it is possible to use # a stand-alone file just listing users. The two methods cannot be mixed: # if you configure users here and at the same time you activate the external # ACL file, the server will refuse to start. # # The format of the external ACL user file is exactly the same as the # format that is used inside redis.conf to describe users. # # aclfile /etc/redis/sentinel-users.acl
# requirepass <password> # # You can configure Sentinel itself to require a password, however when doing # so Sentinel will try to authenticate with the same password to all the # other Sentinels. So you need to configure all your Sentinels in a given # group with the same "requirepass" password. Check the following documentation # for more info: https://redis.io/topics/sentinel # # IMPORTANT NOTE: starting with Redis 6.2 "requirepass" is a compatibility # layer on top of the ACL system. The option effect will be just setting # the password for the default user. Clients will still authenticate using # AUTH <password> as usually, or more explicitly with AUTH default <password> # if they follow the new protocol: both will work. # # New config files are advised to use separate authentication control for # incoming connections (via ACL), and for outgoing connections (via # sentinel-user and sentinel-pass) # # The requirepass is not compatable with aclfile option and the ACL LOAD # command, these will cause requirepass to be ignored.
# sentinel sentinel-user <username> # # You can configure Sentinel to authenticate with other Sentinels with specific # user name.
# sentinel sentinel-pass <password> # # The password for Sentinel to authenticate with other Sentinels. If sentinel-user # is not configured, Sentinel will use 'default' user with sentinel-pass to authenticate.
# sentinel parallel-syncs <master-name><numreplicas> # # How many replicas we can reconfigure to point to the new replica simultaneously # during the failover. Use a low number if you use the replicas to serve query # to avoid that all the replicas will be unreachable at about the same # time while performing the synchronization with the master. sentinel parallel-syncs mymaster 1
# sentinel failover-timeout <master-name><milliseconds> # # Specifies the failover timeout in milliseconds. It is used in many ways: # # - The time needed to re-start a failover after a previous failover was # already tried against the same master by a given Sentinel, is two # times the failover timeout. # # - The time needed for a replica replicating to a wrong master according # to a Sentinel current configuration, to be forced to replicate # with the right master, is exactly the failover timeout (counting since # the moment a Sentinel detected the misconfiguration). # # - The time needed to cancel a failover that is already in progress but # did not produced any configuration change (SLAVEOF NO ONE yet not # acknowledged by the promoted replica). # # - The maximum time a failover in progress waits for all the replicas to be # reconfigured as replicas of the new master. However even after this time # the replicas will be reconfigured by the Sentinels anyway, but not with # the exact parallel-syncs progression as specified. # # Default is 3 minutes. sentinel failover-timeout mymaster 180000
# SCRIPTS EXECUTION # # sentinel notification-script and sentinel reconfig-script are used in order # to configure scripts that are called to notify the system administrator # or to reconfigure clients after a failover. The scripts are executed # with the following rules for error handling: # # If script exits with "1" the execution is retried later (up to a maximum # number of times currently set to 10). # # If script exits with "2" (or an higher value) the script execution is # not retried. # # If script terminates because it receives a signal the behavior is the same # as exit code 1. # # A script has a maximum running time of 60 seconds. After this limit is # reached the script is terminated with a SIGKILL and the execution retried.
# NOTIFICATION SCRIPT # # sentinel notification-script <master-name><script-path> # # Call the specified notification script for any sentinel event that is # generated in the WARNING level (for instance -sdown, -odown, and so forth). # This script should notify the system administrator via email, SMS, or any # other messaging system, that there is something wrong with the monitored # Redis systems. # # The script is called with just two arguments: the first is the event type # and the second the event description. # # The script must exist and be executable in order for sentinel to start if # this option is provided. # # Example: # # sentinel notification-script mymaster /var/redis/notify.sh
# CLIENTS RECONFIGURATION SCRIPT # # sentinel client-reconfig-script <master-name><script-path> # # When the master changed because of a failover a script can be called in # order to perform application-specific tasks to notify the clients that the # configuration has changed and the master is at a different address. # # The following arguments are passed to the script: # # <master-name><role><state><from-ip><from-port><to-ip><to-port> # # <state> is currently always "failover" # <role> is either "leader" or "observer" # # The arguments from-ip, from-port, to-ip, to-port are used to communicate # the old address of the master and the new address of the elected replica # (now a master). # # This script should be resistant to multiple invocations. # # Example: # # sentinel client-reconfig-script mymaster /var/redis/reconfig.sh
# SECURITY # # By default SENTINEL SET will not be able to change the notification-script # and client-reconfig-script at runtime. This avoids a trivial security issue # where clients can set the script to anything and trigger a failover in order # to get the program executed.
sentinel deny-scripts-reconfig yes
# REDIS COMMANDS RENAMING # # Sometimes the Redis server has certain commands, that are needed for Sentinel # to work correctly, renamed to unguessable strings. This is often the case # of CONFIG and SLAVEOF in the context of providers that provide Redis as # a service, and don't want the customers to reconfigure the instances outside # of the administration console. # # In such case it is possible to tell Sentinel to use different command names # instead of the normal ones. For example if the master "mymaster", and the # associated replicas, have "CONFIG" all renamed to "GUESSME", I could use: # # SENTINEL rename-command mymaster CONFIG GUESSME # # After such configuration is set, every time Sentinel would use CONFIG it will # use GUESSME instead. Note that there is no actual need to respect the command # case, so writing "config guessme" is the same in the example above. # # SENTINEL SET can also be used in order to perform this configuration at runtime. # # In order to set a command back to its original name (undo the renaming), it # is possible to just rename a command to itself: # # SENTINEL rename-command mymaster CONFIG CONFIG
# HOSTNAMES SUPPORT # # Normally Sentinel uses only IP addresses and requires SENTINEL MONITOR # to specify an IP address. Also, it requires the Redis replica-announce-ip # keyword to specify only IP addresses. # # You may enable hostnames support by enabling resolve-hostnames. Note # that you must make sure your DNS is configured properly and that DNS # resolution does not introduce very long delays. # SENTINEL resolve-hostnames no
# When resolve-hostnames is enabled, Sentinel still uses IP addresses # when exposing instances to users, configuration files, etc. If you want # to retain the hostnames when announced, enable announce-hostnames below. # SENTINEL announce-hostnames no