一、简介
简介:
MongoDB是一种NOSQL(Not Only Sql)数据库
数据表 ->JDBC读取->POJO(VO、PO)->控制层转化为JSON数据->客户端
| No | 关系型数据库 | 非关系型数据库 |
|---|---|---|
| 1 | 数据库 | 数据库(类似于MySQL) |
| 2 | 表 | 集合 |
| 3 | 行 | 文档 |
| 4 | 列 | 成员 |
| 5 | 主键 | Object ID(自动维护) |
在整个行业之中,MongoDB数据库是发展最好的一个NoSQL数据库,因为它与Node.JS捆绑在一起了,也就是如果你要从事Node.JS开发,那么一定要使用MongDB,而Node.JS(基于javaScript)在国内最成功的应用 –taobao
MongoDB之所以能够更好的发展也取决于:面向集合的存储过程、模式自由(无模式)、方便的进行数据的存储扩充、
支持索引、支持短暂数据保留、具有完整的数据状态监控、基于BSON应用
业务应用场景:
High performace - 对数据库并发读写的需求
Huge Storage - 对海量数据的高效率存储和访问的需求
High Scalablity && High Avaliablity - 对数据库的高扩展性和高可用性的需求
二、安装与配置
windows
进入bin目录打开cmd配置db:
先创建data/db目录存放数据,再手动命令行配置:
1 | monogd --dbpath ..\data\db |
或
b编写/config/mongod.conf
1 | #The directoy where the mongod instance stores its data.Default Value is "\data\db" on windows. |
第一种:
1 | mongod -f ../config/mongd.conf |
第二种:
1 | mongod --config ../config/mongod.conf |
Linux
创建data和log目录,配置指定该db目录和log日志文件路径
配置/usr/local/mongodb/single/mongod.conf
1 | systemLog: |
配置完成后启动:
1 | mongodb-4.2.15]# bin/mongod -f ./single/mongod.conf |
提示:
1 | forked process: 208809 |
登录数据库
1 | /bin/mongo |
三、数据库的创建与删除
创建:
1 | use articledb |
删除:
1 | db.dropDatabase() |
查看当前数据库
1 | db |
四、集合操作
查看集合
1 | show collections |
五、文档操作
插入:
插入单个文档
1 | db.comment.insert({"article":"10000","content":"今天天气真好","userid":"1001","status":null}) |
插入多条文档
1 | db.comment.insertMany( |
还可以使用
1 | try{ |
查询:
1 | db.comment.find() |
代参查询满足条件,可能不止一条
带一个参数
1 | db.comment.find({userid:"1003"}) |
带多个参数
1 | db.comment.find({article:"10000"},{userid:"1003"}) |
查询一条
1 | db.comment.findOne({userid:"1002"}) |
更新:
覆盖更新,json对象会更新覆盖(会失去没有修改过的json对象)
1 | db.comment.update({_id:ObjectId("61221f645f7003e989379e40")}, {status:"1"}) |
比如:
1 | { "_id" : ObjectId("61221f645f7003e989379e40"), "article" : "10000", "content" : "今天天气真好", "userid" : "1001", "status" : null } |
结果:
1 | { "_id" : ObjectId("61221f645f7003e989379e40"), "status" : "1" } |
非覆盖更新(原json对象保持不变)
1 | db.comment.update({_id:ObjectId("61221f645f7003e989379e41")}, {$set:{status:"1"}}) |
比如:
1 | { "_id" : ObjectId("61221f645f7003e989379e41"), "article" : "10000", "content" : "今天天气真好", "userid" : "1002", "status" : null } |
结果:
1 | { "_id" : ObjectId("61221f645f7003e989379e41"), "article" : "10000", "content" : "今天天气真好", "userid" : "1002", "status" : "1" } |
如果查询结果有多个,想把它们都修改了,参数后面跟上一个json对象 {multi: true} ,表明全部修改,默认只修改第一条
根据id自增字段
1 | db.comment.update({_id:"612376cde9acd86e0584f8cd"},{$inc:{likenum:NumberInt(1)}}) |
删除:
查询到满足条件的都删除
1 | db.comment.remove({userid:"1002"}) |
六、文档分页查询
统计查询:
返回查询的条数
1 | db.comment.count() |
分页列表查询:
返回查询的前三条数据
1 | db.comment.find().limit(3) |
跳过前两条数据,返回查询的三条数据
1 | db.comment.find().limit(3).skip(2) |
排序查询:
对某一成员进行排序
1.升序:{userid:1}
2.降序:{userid:-1}
单个排序
1 | db.comment.find().sort({userid:1}) |
多个排序
1 | db.comment.find().sort({userid:1},status:"-1") |
七、文档的更多查询
模糊查询/正则表达式复杂查询:
db,collection.find(field:/正则表达式/)
1 | db.comment.find({content:/天气/}) |
比较查询:
db.集合名称.find({“field”:{$gt: value }}) //大于
db.集合名称.find({“field”:{$lt: value }}) //大于
db.集合名称.find({“field”:{$gte: value }}) //大于等于
db.集合名称.find({“field”:{$lte: value }}) //小于等于
db.集合名称.find({“field”:{$ne: value }}) //不等于
包含:
db.集合名称.find({userid:{$in:[“1003”,”1004”]}})
不包含
db.集合名称.find({userid:{$nin:[“1003”,”1004”]}})
条件查询:
and:和
1 | db.集合名称.find({$and: [ |
or:或
1 | db.集合名称.find({$or: [ |
八、索引管理操作
创建索引:
单字段:
1 | db.comment.createIndex({userid:1}) |
多字段索引:
1 | db.comment.createIndex({userid:1,content:-1}) |
获取索引:
1 | db.comment.getIndexes() |
移除索引:
按照规则:
1 | db.comment.dropIndex({userid:1}) |
按照name:
1 | db.comment.dropIndex("userid_1_content_-1") |
移除所有索引,除了默认索引
1 | db.comment.dropIndexes() |
九、索引的使用
执行计划:
1 | db.comment.find({userid:"1003"}).explain() |
没有使用索引:集合扫描
1 | "winningPlan" : { |
使用索引:索引扫描、再从集合抓取
1 | "winningPlan" : { |
涵盖的查询:
不去集合查询,而直接查询索引返回,数据从索引拿到
1 | db.comment.find({userid:"1003"},{userid:1,_id:0}) |
十、findBy属性字段分页查询
继承接口findBy属性方法,从而调用框架方法查询分页
dao接口:
1 | public interface CommentRepository extends MongoRepository<Comment, String> { |
service实现:
1 |
|
page的索引从0开始,size是页面大小
1 |
|
十一、mongoTemplate实现点赞
1 |
|
1 |
|
十二、副本集
副本集三个角色:
主要成员(Primary):主要接收所有写操作,就是主节点。
副本成员(Replicate):从主节点通过复制操作以维护相同的数据集,即备份数据,不可写操作,但可以读操作(需要配置),是默认的一种从节点类型。
仲裁者(Arbiter):不保留任何数据的副本,只具有投票选举作用,当然也可以将仲裁服务器维护为副本集的一部分,即副本成员同时也可以是仲裁者,也是一种从节点类型。
副本集的创建:
副本集架构目标:一主一副本一仲裁
(1)首先先做安全认证
1 | openssl rand -base64 90 -out /etc/mongodb/mongodb-keyfile |
主节点:
1 | mkdir -p /usr/local/mongodb-4.2.15/replica_sets/myrs_27017/log \ & |
27017(mongod.conf):
1 | #SystemLog Options |
启动:
1 | /usr/local/mongodb-4.2.15/bin/mongod -f /usr/local/mongodb-4.2.15/replica_sets/myrs_27017/mongod.conf |
副本节点:
1 | mkdir -p /usr/local/mongodb-4.2.15/replica_sets/myrs_27018/log \ & |
27018(mongod.conf):
1 | #SystemLog Options |
启动:
1 | /usr/local/mongob-4.2.15/bin/mongod -f /usr/local/mongodb-4.2.15/replica_sets/myrs_27018/mongod.conf |
仲裁节点:
1 | mkdir -p /usr/local/mongodb-4.2.15/replica_sets/myrs_27019/log \ & |
27019(mongod.conf):
1 | #SystemLog Options |
启动:
1 | /usr/local/mongodb-4.2.15/bin/mongod -f /usr/local/mongodb-4.2.15/replica_sets/myrs_27019/mongod.conf |
初始化副本集:
客户端登录:
1 | ./mongo --host=172.30.77.41 --port=27017 |
1 | > rs.initiate() |
切记,其他节点不要初始化,或者
1 | config= |
1 | rs.conf() |
建立角色和账号, 用于管理副本集
1 | use admin |
1 | db.auth("root","root") #验证身份才能使用命令 |
1 | db.getUsers() |
说明:
- “_id”:“myrs”:副本集的配置数据存储的主键值,默认就是副本集的名字
- “members”:副本集成员数组,此时只有一个“host”:“172.30.77.41”,该成员不是仲裁节点:“arbiterOnly”:false,优先级(权重值):”priority”:1
- “setting”:副本集的参数配置
1 | rs.status() |
查看节点的状态
添加副本从节点:
注意添加其他节点时,要被添加的节点必须未初始化,否则将会报错Received heartbeat from member with the same,id值一样,副本集中节点之间的id值不能相同,具有唯一性,否则导致混乱,所有报错,初始化会默认为0,故不能初始化
1 | rs.add("172.30.77.41:27018") |
添加仲裁节点:
1 | rs.addArb("172.30.77.41:27019") |
读写操作:
主节点可以读写操作:
1 | db.comment.insert({"articleid":"1001","content":"今天天气真好阳光明媚","userid":"1001","nickname":"Rose","createdatetime":"new Date()"}) |
1 | db.comment.find() |
从节点只能读操作:
先承认是副本集中的从节点
1 | rs.slaveOk() |
1 | show dbs |
现在就实现了读写分离,主节点读写操作,从节点读操作
如果需要取消作为从节点的读操作:
1 | //缺省默认为true |
仲裁节点不会同步数据,不能读写操作,只能选举
主节点选举原则:
- 主节点故障
- 主节点网络不可达(默认心跳10秒)
- 人工干预(rs.stepDown(600))
选举规则:
- 票数大多数,票数相同时数据新的选举为主节点
- 节点优先级(权重)
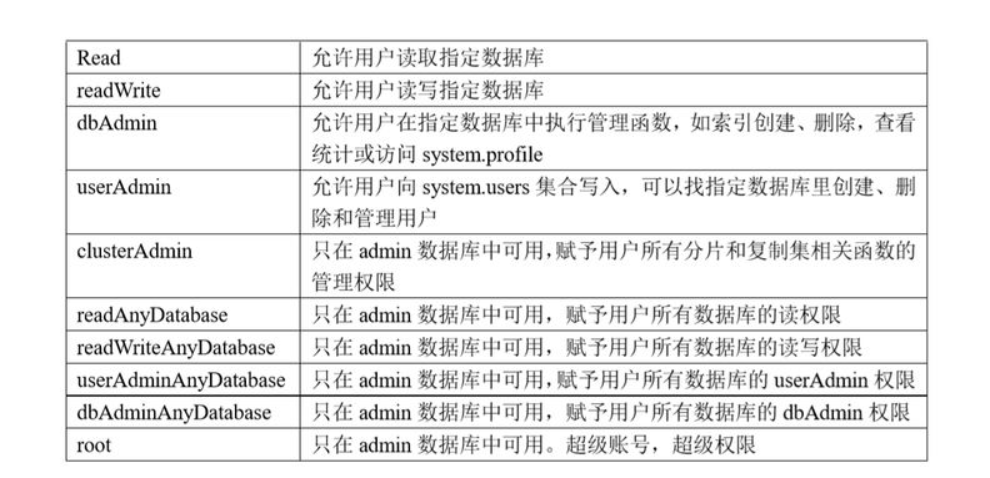
十三、用户角色权限