一、Java 线程 1.创建和运行线程
直接使用Thread开启线程
1 2 3 4 5 6 Thread t = new Thread () { public void run () { } };
例如:
1 2 3 4 5 6 7 8 9 10 11 t.start(); Thread t1 = new Thread ("t1" ) { @Override public void run () { log.debug("hello" ); } }; t1.start();
输出:
1 19 :19 :00 [t1] c.ThreadStarter - hello
使用Runnable配合Thread
1
2
3
4
5
6
7
8
9
Runnable runnable = new Runnable () { public void run () { } }; Thread t = new Thread ( runnable );t.start()
例如:
1 2 3 4 5 6 7 8 9 10 Runnable task2 = new Runnable () { @Override public void run () { log.debug("hello" ); } }; Thread t2 = new Thread (task2, "t2" );t2.start();
输出:
1 19:19:00 [t2] c.ThreadStarter - hello
Java 8 以后可以使用 lambda 精简代码
1
2
3
4
Runnable task2 = () -> log.debug("hello" );Thread t2 = new Thread (task2, "t2" );t2.start();
Thread与Runnable的关系:
(1)用Runable更容易与线程池高级API配合
(2)配合Runnable让任务类脱离了Thread继承体系,更灵活
FutureTask 能够接收 Callable 类型的参数,用来处理有返回结果的情况
1 2 3 4 5 6 7 8 9 10 FutureTask<Integer> task3 = new FutureTask <>(() -> { log.debug("hello" ); return 100 ; }); new Thread (task3, "t3" ).start();Integer result = task3.get();log.debug("结果是:{}" , result);
输出
1
2
19:22:27 [t3] c.ThreadStarter - hello 19:22:27 [main] c.ThreadStarter - 结果是:100
2.观察多个线程同时运行 主要是理解
3.查看进程线程的方法 windows
任务管理器可以查看进程和线程数,也可以用来杀死进
tasklist 查看进程
taskkill 杀死进程
linux
ps -fe 查看所有进程
ps -fT -p 查看某个进程(PID)的所有线程
kill 杀死进程
top 按大写 H 切换是否显示线程
top -H -p 查看某个进程(PID)的所有线程
Java
jps 命令查看所有 Java 进程
jstack 查看某个 Java 进程(PID)的所有线程状态
jconsole 来查看某个 Java 进程中线程的运行情况(图形界面)
需要以如下方式运行你的 java 类1 java -Djava.rmi.server.hostname=`ip地址` -Dcom.sun.management.jmxremote -Dcom.sun.management.jmxremote.port=`连接端口` -Dcom.sun.management.jmxremote.ssl=是否安全连接 -Dcom.sun.management.jmxremote.authenticate=是否认证 java类
修改 /etc/hosts 文件将 127.0.0.1 映射至主机名
如果要认证访问,还需要做如下步骤
复制 jmxremote.password 文件
修改 jmxremote.password 和 jmxremote.access 文件的权限为 600 即文件所有者可读写
连接时填入 controlRole(用户名),R&D(密码)
4.栈与栈帧 Java Virtual Machine Stacks (Java 虚拟机栈)
每个栈由多个栈帧(Frame)组成,对应着每次方法调用时所占用的内存
每个线程只能有一个活动栈帧,对应着当前正在执行的那个方法
5.线程上下文切换(Thread Context Switch) 因为以下一些原因导致 cpu 不再执行当前的线程,转而执行另一个线程的代码
当 Context Switch 发生时,需要由操作系统保存当前线程的状态,并恢复另一个线程的状态,Java 中对应的概念
状态包括程序计数器、虚拟机栈中每个栈帧的信息,如局部变量、操作数栈、返回地址等
Context Switch 频繁发生会影响性能
6.常见方法
方法名
static
功能说明
注意
start()
启动一个新线 程,在新的线程 运行 run 方法 中的代码,线程之间并行
start 方法只是让线程进入就绪,里面代码不一定立刻 运行(CPU 的时间片还没分给它)。每个线程对象的 start方法只能调用一次,如果调用了多次会出现 IllegalThreadStateException
run()
新线程启动后会 调用的方法,线程之间串行
如果在构造 Thread 对象时传递了 Runnable 参数,则 线程启动后会调用 Runnable 中的 run 方法,否则默 认不执行任何操作。但可以创建 Thread 的子类对象, 来覆盖默认行为
join()
等待线程运行结束
join(long n)
等待线程运行结 束,最多等待 n 毫秒
getId()
获取线程长整型 的 id
id 唯一
getName()
获取线程名
setName(String)
修改线程名
getPriority()
获取线程优先级
setPriority(int)
修改线程优先级
java中规定线程优先级是1~10 的整数,较大的优先级 能提高该线程被 CPU 调度的机率
getState()
获取线程状态
Java 中线程状态是用 6 个 enum 表示,分别为: NEW, RUNNABLE, BLOCKED, WAITING, TIMED_WAITING, TERMINATED
isInterrupted()
判断是否被打 断,
不会清除 打断标记
isAlive()
线程是否存活 (还没有运行完 毕)
interrupt()
打断线程
如果被打断线程正在 sleep,wait,join 会导致被打断 的线程抛出 InterruptedException,并清除 ;如果打断的正在运行的线程,不会清除 ;park 的线程被打断,也会设置 打断标记,不会清除
interrupted()
static
判断当前线程是 否被打断
会清除 打断标记
currentThread()
static
获取当前正在执 行的线程
sleep(long n)
static
让当前执行的线 程休眠n毫秒, 休眠时让出 cpu 的时间片给其它 线程
yield()
static
提示线程调度器 让出当前线程对 CPU的使用
主要是为了测试和调试
6.1 start 与 run 调用run 1 2 3 4 5 6 7 8 9 10 11 public static void main (String[] args) { Thread t1 = new Thread ("t1" ) { @Override public void run () { log.debug(Thread.currentThread().getName()); FileReader.read(Constants.MP4_FULL_PATH); } }; t1.run(); log.debug("do other things ..." ); }
输出
1 2 3 4 19:39:14 [main] c.TestStart - main 19:39:14 [main] c.FileReader - read [1.mp4] start ... 19:39:18 [main] c.FileReader - read [1.mp4] end ... cost: 4227 ms 19:39:18 [main] c.TestStart - do other things ...
程序仍在 main 线程运行, FileReader.read()方法调用还是同步的
调用 start 将上述代码的 t1.run() 改为
输出
1 2 3 4 5 19 : 39 : 14 [main] c.TestStart - main19 : 39 : 14 [main] c.FileReader - read [1 .mp4] start ...19 : 39 : 18 [main] c.FileReader - read [1 .mp4] end ... cost: 4227 ms19 : 39 : 18 [main] c.TestStart - do other things ...t1.start();
程序在 t1 线程运行, FileReader.read() 方法调用是异步的
小结
直接调用 run 是在主线程中执行了 run,没有启动新的线程
使用 start 是启动新的线程,通过新的线程间接执行 run 中的代码
6.2 sleep 与 yield sleep
调用 sleep 会让当前线程从 Running 进入 Timed Waiting 状态(阻塞)
其它线程可以使用 interrupt 方法打断正在睡眠的线程,这时 sleep 方法会抛出 InterruptedException
睡眠结束后的线程未必会立刻得到执行
建议用 TimeUnit 的 sleep 代替 Thread 的 sleep 来获得更好的可读性
yield
调用 yield 会让当前线程从 Running 进入 Runnable 就绪状态,然后调度执行其它线程
具体的实现依赖于操作系统的任务调度器
线程优先级
线程优先级会提示(hint)调度器优先调度该线程,但它仅仅是一个提示,调度器可以忽略它
如果 cpu 比较忙,那么优先级高的线程会获得更多的时间片,但 cpu 闲时,优先级几乎没作用
1 2 3 4 5 6 7 8 9 10 11 12 13 14 15 16 17 18 19 Runnable task1 = () -> { int count = 0 ; for (;;) { System.out.println("---->1 " + count++); } }; Runnable task2 = () -> { int count = 0 ; for (;;) { System.out.println(" ---->2 " + count++); } }; Thread t1 = new Thread (task1, "t1" );Thread t2 = new Thread (task2, "t2" );t1.start(); t2.start();
6.3 join方法 为什么需要 join 下面的代码执行,打印 r 是什么?
1 2 3 4 5 6 7 8 9 10 11 12 13 14 15 16 static int r = 0 ;public static void main (String[] args) throws InterruptedException { test1(); } private static void test1 () throws InterruptedException { log.debug("开始" ); Thread t1 = new Thread (() -> { log.debug("开始" ); sleep(1 ); log.debug("结束" ); r = 10 ; }); t1.start(); log.debug("结果为:{}" , r); log.debug("结束" ); }
分析
解决方法
用 sleep 行不行?为什么?
用 join,加在 t1.start() 之后即可
等待多个结果 问,下面代码 cost 大约多少秒?
1 2 3 4 5 6 7 8 9 10 11 12 13 14 15 16 17 18 19 20 21 22 static int r1 = 0 ;static int r2 = 0 ;public static void main (String[] args) throws InterruptedException {test2(); } private static void test2 () throws InterruptedException { Thread t1 = new Thread (() -> { sleep(1 ); r1 = 10 ; }); Thread t2 = new Thread (() -> { sleep(2 ); r2 = 20 ; }); long start = System.currentTimeMillis(); t1.start(); t2.start(); t1.join(); t2.join(); long end = System.currentTimeMillis(); log.debug("r1: {} r2: {} cost: {}" , r1, r2, end - start); }
分析如下
第一个 join:等 待 t1 时, t2 并没有停止, 而在运行
第二个 join:1s 后, 执行到此, t2 也运行了 1s, 因此也只需再等待 1s
如果颠倒两个 join 呢?
1 20:45:43.239 [main] c.TestJoin - r1: 10 r2: 20 cost: 2005
有时效的 join 等够时间
1 2 3 4 5 6 7 8 9 10 11 12 13 14 15 16 17 static int r1 = 0 ;static int r2 = 0 ;public static void main (String[] args) throws InterruptedException { test3(); } public static void test3 () throws InterruptedException { Thread t1 = new Thread (() -> { sleep(1 ); r1 = 10 ; }); long start = System.currentTimeMillis(); t1.start(); t1.join(1500 ); long end = System.currentTimeMillis(); log.debug("r1: {} r2: {} cost: {}" , r1, r2, end - start); }
输出
1 20:48:01.320 [main] c.TestJoin - r1: 10 r2: 0 cost: 1010
没等够时间
1 2 3 4 5 6 7 8 9 10 11 12 13 14 15 16 17 static int r1 = 0 ;static int r2 = 0 ;public static void main (String[] args) throws InterruptedException { test3(); } public static void test3 () throws InterruptedException { Thread t1 = new Thread (() -> { sleep(2 ); r1 = 10 ; }); long start = System.currentTimeMillis(); t1.start(); t1.join(1500 ); long end = System.currentTimeMillis(); log.debug("r1: {} r2: {} cost: {}" , r1, r2, end - start); }
输出
1 20:52:15.623 [main] c.TestJoin - r1: 0 r2: 0 cost: 1502
6.4 interrupt 方法 打断 sleep,wait,join 的线程 这几个方法都会让线程进入阻塞状态
1 2 3 4 5 6 7 8 9 10 11 12 13 14 15 16 17 18 19 20 Thread t1 = new Thread (()-> { try { Thread.currentThread().wait(); } catch (InterruptedException e) { e.printStackTrace(); } }, "t1" ); t1.start(); sleep(0.5 ); t1.interrupt(); log.debug(" 打断状态: {}" , t1.isInterrupted());
输出
sleep:
1 2 3 4 5 6 7 8 java.lang.InterruptedException: sleep interrupted at java.lang.Thread.sleep(Native Method) at java.lang.Thread.sleep(Thread.java: 340 ) at java.util.concurrent.TimeUnit.sleep(TimeUnit.java: 386 ) at cn.itcast.n2.util.Sleeper.sleep(Sleeper.java: 8 ) at cn.itcast.n4.TestInterrupt.lambda $test 1$3 (TestInterrupt.java: 59 ) at java.lang.Thread.run(Thread.java: 745 ) 21 : 18 : 10.374 [main] c.TestInterrupt - 打断状态: false
wait:
1 2 3 4 5 6 Exception in thread "t1" java.lang.IllegalMonitorStateException at java.lang.Object.wait(Native Method) at java.lang.Object.wait(Object.java: 502 ) at cn.itcast.test.Test.lambda $main$0 (Test.java: 30 ) at java.lang.Thread.run(Thread.java: 748 ) 15 : 37 : 32.974 c.Test [main] - 打断状态: false
join:
1 2 3 4 5 6 7 java.lang.InterruptedException at java.lang.Object.wait(Native Method) at java.lang.Thread.join(Thread.java: 1252 ) at java.lang.Thread.join(Thread.java: 1326 ) at cn.itcast.test.Test.lambda $main$0 (Test.java: 25 ) at java.lang.Thread.run(Thread.java: 748 ) 15 : 46 : 22.178 c.Test [main] - 打断状态: false
打断正常运行的线程 打断正常运行的线程, 不会清空打断状态
1 2 3 4 5 6 7 8 9 10 11 12 13 14 15 16 private static void test2 () throws InterruptedException { Thread t2 = new Thread (()->{ while (true ) { Thread current = Thread.currentThread(); boolean interrupted = current.isInterrupted(); if (interrupted) { log.debug(" 打断状态: {}" , interrupted); break ; } } }, "t2" ); t2.start(); sleep(0.5 ); t2.interrupt(); }
输出
1 20:57:37.964 [t2] c.TestInterrupt - 打断状态: true
打断 park 线程 打断 park 线程, 不会清空打断状态
1 2 3 4 5 6 7 8 9 10 11 private static void test3 () throws InterruptedException { Thread t1 = new Thread (() -> { log.debug("park..." ); LockSupport.park(); log.debug("unpark..." ); log.debug("打断状态:{}" , Thread.currentThread().isInterrupted()); }, "t1" ); t1.start(); sleep(0.5 ); t1.interrupt(); }
输出
1 2 3 21:11:52.795 [t1] c.TestInterrupt - park... 21:11:53.295 [t1] c.TestInterrupt - unpark... 21:11:53.295 [t1] c.TestInterrupt - 打断状态:true
如果打断标记已经是 true, 则 park 会失效
1 2 3 4 5 6 7 8 9 10 11 12 13 14 15 16 17 18 private static void test4 () { Thread t1 = new Thread (() -> { for (int i = 0 ; i < 5 ; i++) { log.debug("park..." ); LockSupport.park(); log.debug("打断状态:{}" , Thread.currentThread().isInterrupted()); } Thread.interrupted(); log.debug("打断状态:{}" , Thread.currentThread().isInterrupted()); log.debug("park..." ); LockSupport.park(); log.debug("打断状态:{}" , Thread.currentThread().isInterrupted()); }); t1.start(); sleep(1 ); t1.interrupt(); }
输出
1 2 3 4 5 6 7 8 9 10 11 12 13 15 : 54 : 57.684 c.Test [Thread-0 ] - park...15 : 54 : 58.692 c.Test [Thread-0 ] - 打断状态:true 15 : 54 : 58.696 c.Test [Thread-0 ] - park...15 : 54 : 58.696 c.Test [Thread-0 ] - 打断状态:true 15 : 54 : 58.696 c.Test [Thread-0 ] - park...15 : 54 : 58.696 c.Test [Thread-0 ] - 打断状态:true 15 : 54 : 58.696 c.Test [Thread-0 ] - park...15 : 54 : 58.696 c.Test [Thread-0 ] - 打断状态:true 15 : 54 : 58.696 c.Test [Thread-0 ] - park...15 : 54 : 58.696 c.Test [Thread-0 ] - 打断状态:true 15 : 54 : 58.696 c.Test [Thread-0 ] - 打断状态:false 15 : 54 : 58.696 c.Test [Thread-0 ] - park...
提示
总结:sleep、join、wait 状态的线程 使用 interrupt() 会清除打断标记 Thread.currentThread().isInterrupted())
处于park和 run 的线程,使用 interrupt()不会清除打断标记 Thread.currentThread().isInterrupted())
park线程 调用 interrupt()后,该线程后面再使用的 park会失效,需要使用 Thread.interrupted() 恢复park 为有效
6.5 不推荐的方法 还有一些不推荐使用的方法,这些方法已过时,容易破坏同步代码块,造成线程死锁
方法名
static
功能说明
stop()
停止线程运行
suspend()
挂起(暂停)线程运行
resume()
恢复线程运行
7. 主线程和守护线程 默认情况下,Java 进程需要等待所有线程都运行结束,才会结束。有一种特殊的线程叫做守护线程,只要其它非守
1 2 3 4 5 6 7 8 9 10 11 log.debug("开始运行..." ); Thread t1 = new Thread (() -> { log.debug("开始运行..." ); sleep(2 ); log.debug("运行结束..." ); }, "daemon" ); t1.setDaemon(true ); t1.start(); sleep(1 ); log.debug("运行结束..." );
输出
1 2 3 08:26:38.123 [main] c.TestDaemon - 开始运行... 08:26:38.213 [daemon] c.TestDaemon - 开始运行... 08:26:39.215 [main] c.TestDaemon - 运行结束...
注意
垃圾回收器线程就是一种守护线程
Tomcat 中的 Acceptor 和 Poller 线程都是守护线程,所以 Tomcat 接收到 shutdown 命令后,不会等
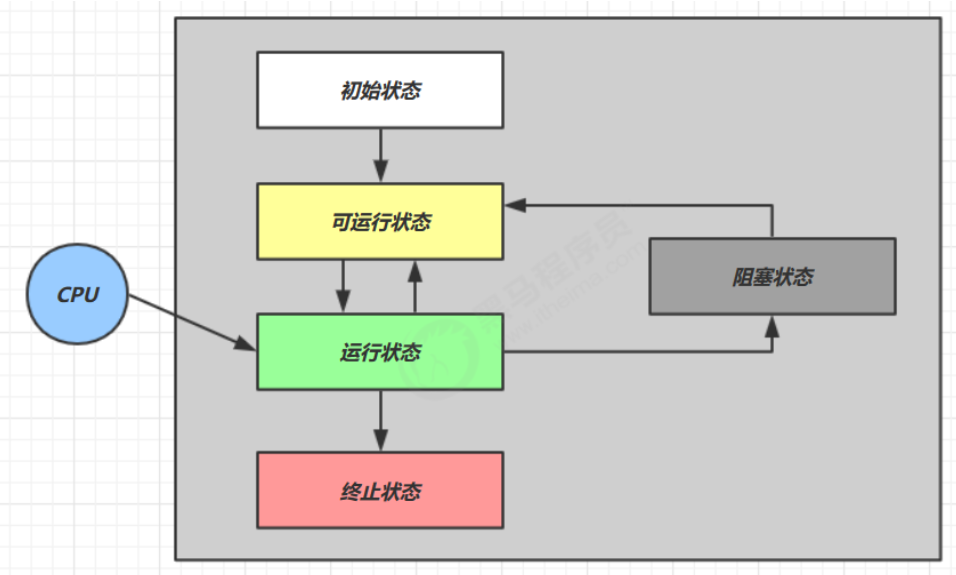
8. 五种状态 这是从 操作系统 层面来描述的
【初始状态】仅是在语言层面创建了线程对象,还未与操作系统线程关联
【可运行状态】(就绪状态)指该线程已经被创建(与操作系统线程关联),以由 CPU 调度执行
【运行状态】指获取了 CPU 时间片运行中的状态
【阻塞状态】
【终止状态】表示线程已经执行完毕,生命周期已经结束,不会再转换为其它状态
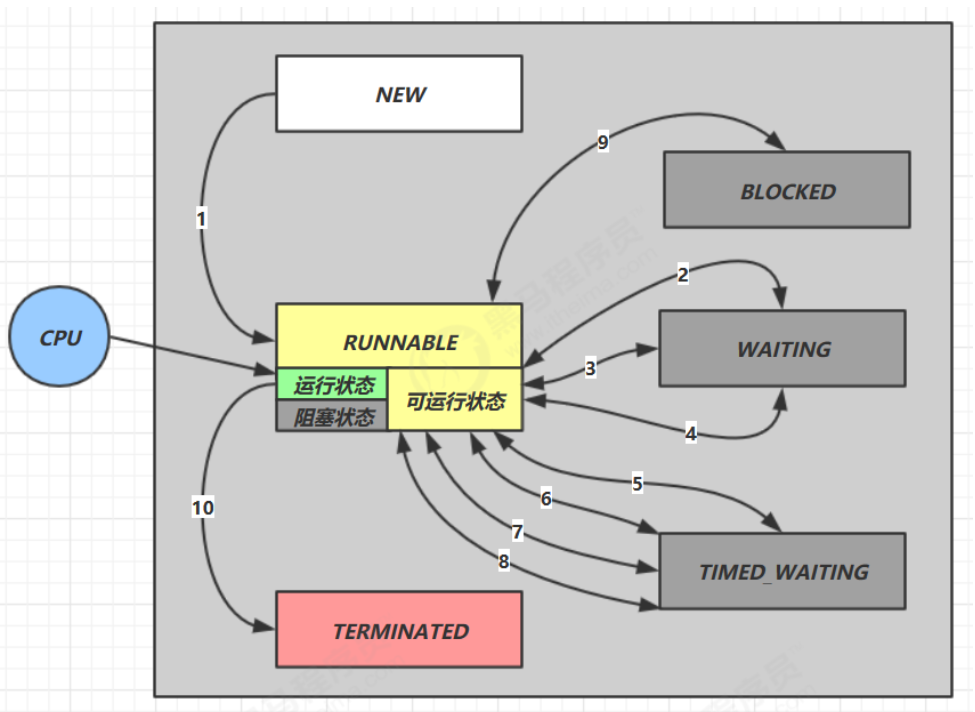
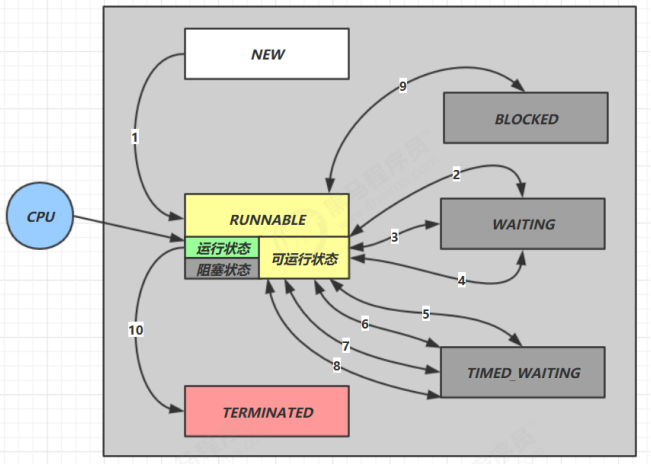
9. 六种状态 这是从 Java API 层面来描述的
NEW 线程刚被创建,但是还没有调用 start() 方法RUNNABLE 当调用了 start() 方法之后,注意,Java API 层面的 RUNNABLE 状态涵盖了 操作系统 层面的BLOCKED , WAITING , TIMED_WAITING 都是 Java API 层面对【阻塞状态】的细分,后面会在状态转换一节TERMINATED 当线程代码运行结束
二、共享模型之管程 1. 共享带来的问题 1.1 临界区 Critical Section
一个程序运行多个线程本身是没有问题的
问题出在多个线程访问共享资源(1)多个线程读 共享资源 其实也没有问题共享资源 读写操作时发生指令交错,就会出现问题
一段代码块内如果存在对共享资源 的多线程读写操作,称这段代码块为**临界区
1 2 3 4 5 6 7 8 9 10 11 12 13 static int counter = 0 ;static void increment () { counter++; } static void decrement () { counter--; }
1.2 竞态条件 Race Condition 多个线程在临界区内执行,由于代码的执行序列不同 而导致结果无法预测,称之为发生了竞态条件
2. synchronized解决方案 2.1 解决方案 为了避免临界区的竞态条件发生,有多种手段可以达到目的。
阻塞式的解决方案:synchronized,Lock
非阻塞式的解决方案:原子变量
2.2 synchronized 使用的是阻塞式的解决方案:synchronized,即俗称的【对象锁】,它采用互斥的方式让同一
注意
虽然 java 中互斥和同步都可以采用 synchronized 关键字来完成,但它们还是有区别的:
互斥是保证临界区的竞态条件发生,同一时刻只能有一个线程执行临界区代码
同步是由于线程执行的先后、顺序不同、需要一个线程等待其它线程运行到某个点
语法
1 2 3 4 synchronized (对象) { 临界区 }
解决
1 2 3 4 5 6 7 8 9 10 11 12 13 14 15 16 17 18 19 20 21 22 23 static int counter = 0 ;static final Object room = new Object ();public static void main (String[] args) throws InterruptedException { Thread t1 = new Thread (() -> { for (int i = 0 ; i < 5000 ; i++) { synchronized (room) { counter++; } } }, "t1" ); Thread t2 = new Thread (() -> { for (int i = 0 ; i < 5000 ; i++) { synchronized (room) { counter--; } } }, "t2" ); t1.start(); t2.start(); t1.join(); t2.join(); log.debug("{}" ,counter); }
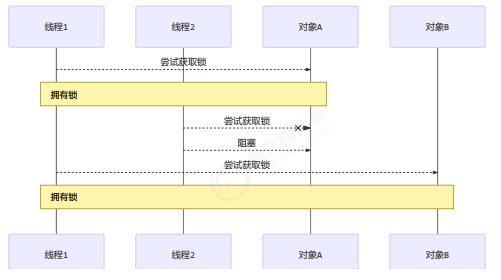
你可以做这样的类比:
synchronized(对象) 中的对象,可以想象为一个房间(room),有唯一入口(门)房间只能一次进入一人当线程 t1 执行到 synchronized(room) 时就好比 t1 进入了这个房间,并锁住了门拿走了钥匙,在门内执行count++ 代码
这时候如果 t2 也运行到了 synchronized(room) 时,它发现门被锁住了,只能在门外等待,发生了上下文切
这中间即使 t1 的 cpu 时间片不幸用完,被踢出了门外(不要错误理解为锁住了对象就能一直执行下去哦),
当 t1 执行完 synchronized{} 块内的代码,这时候才会从 obj 房间出来并解开门上的锁,唤醒 t2 线程把钥count-- 代码
2.3 思考 synchronized 实际是用对象锁保证了临界区内代码的原子性,临界区内的代码对外是不可分割的,不会被线程切
如果把 synchronized(obj) 放在 for 循环的外面,如何理解?– 原子性
如果 t1 synchronized(obj1) 而 t2 synchronized(obj2) 会怎样运作?– 锁对象
如果 t1 synchronized(obj) 而 t2 没有加会怎么样?如何理解?– 锁对象
3. 方法上的synchronized 注意锁的不是方法,而是对象
1 2 3 4 5 6 7 8 9 10 11 class Test { public synchronized void test () { } } class Test { public void test () { synchronized (this ) { } } }
1 2 3 4 5 6 7 8 9 10 11 class Test { public synchronized static void test () { } } class Test { public static void test () { synchronized (Test.class) { } } }
3.1 不加 synchronized 的方法 不加 synchronzied 的方法就好比不遵守规则的人,不去老实排队(好比翻窗户进去的)
3.2 所谓的“线程八锁” 其实就是考察 synchronized 锁住的是哪个对象
线程八锁的重点:
非静态方法的默认锁是this,静态方法的默认锁是class
某一时刻内,只能有一个线程有锁,无论几个方法
情况1:12 或 21
1 2 3 4 5 6 7 8 9 10 11 12 13 14 15 @Slf4j(topic = "c.Number") class Number { public synchronized void a () { log.debug("1" ); } public synchronized void b () { log.debug("2" ); } } public static void main (String[] args) { Number n1 = new Number (); new Thread (()->{ n1.a(); }).start(); new Thread (()->{ n1.b(); }).start(); }
情况2:1s后12,或 2 1s后 1
1 2 3 4 5 6 7 8 9 10 11 12 13 14 15 16 @Slf4j(topic = "c.Number") class Number { public synchronized void a () { sleep(1 ); log.debug("1" ); } public synchronized void b () { log.debug("2" ); } } public static void main (String[] args) { Number n1 = new Number (); new Thread (()->{ n1.a(); }).start(); new Thread (()->{ n1.b(); }).start(); }
情况3:3 1s 12 或 23 1s 1 或 32 1s 1
1 2 3 4 5 6 7 8 9 10 11 12 13 14 15 16 17 18 19 20 @Slf4j(topic = "c.Number") class Number { public synchronized void a () { sleep(1 ); log.debug("1" ); } public synchronized void b () { log.debug("2" ); } public void c () { log.debug("3" ); } } public static void main (String[] args) { Number n1 = new Number (); new Thread (()->{ n1.a(); }).start(); new Thread (()->{ n1.b(); }).start(); new Thread (()->{ n1.c(); }).start(); }
情况4:2 1s 后 1
1 2 3 4 5 6 7 8 9 10 11 12 13 14 15 16 17 @Slf4j(topic = "c.Number") class Number { public synchronized void a () { sleep(1 ); log.debug("1" ); } public synchronized void b () { log.debug("2" ); } } public static void main (String[] args) { Number n1 = new Number (); Number n2 = new Number (); new Thread (()->{ n1.a(); }).start(); new Thread (()->{ n2.b(); }).start(); }
情况5:2 1s 后 1
1 2 3 4 5 6 7 8 9 10 11 12 13 14 15 16 @Slf4j(topic = "c.Number") class Number { public static synchronized void a () { sleep(1 ); log.debug("1" ); } public synchronized void b () { log.debug("2" ); } } public static void main (String[] args) { Number n1 = new Number (); new Thread (()->{ n1.a(); }).start(); new Thread (()->{ n1.b(); }).start(); }
情况6:1s 后12, 或 2 1s后 1
1 2 3 4 5 6 7 8 9 10 11 12 13 14 15 16 @Slf4j(topic = "c.Number") class Number { public static synchronized void a () { sleep(1 ); log.debug("1" ); } public static synchronized void b () { log.debug("2" ); } } public static void main (String[] args) { Number n1 = new Number (); new Thread (()->{ n1.a(); }).start(); new Thread (()->{ n1.b(); }).start(); }
情况7:2 1s 后 1
1 2 3 4 5 6 7 8 9 10 11 12 13 14 15 16 17 @Slf4j(topic = "c.Number") class Number { public static synchronized void a () { sleep(1 ); log.debug("1" ); } public synchronized void b () { log.debug("2" ); } } public static void main (String[] args) { Number n1 = new Number (); Number n2 = new Number (); new Thread (()->{ n1.a(); }).start(); new Thread (()->{ n2.b(); }).start(); }
情况8:1s 后12, 或 2 1s后 1
1 2 3 4 5 6 7 8 9 10 11 12 13 14 15 16 17 @Slf4j(topic = "c.Number") class Number { public static synchronized void a () { sleep(1 ); log.debug("1" ); } public static synchronized void b () { log.debug("2" ); } } public static void main (String[] args) { Number n1 = new Number (); Number n2 = new Number (); new Thread (()->{ n1.a(); }).start(); new Thread (()->{ n2.b(); }).start(); }
4. 变量的线程安全分析 4.1 成员变量和静态变量是否线程安全?
如果它们没有共享,则线程安全
如果它们被共享了,根据它们的状态是否能够改变,又分两种情况
如果只有读操作,则线程安全
如果有读写操作,则这段代码是临界区,需要考虑线程安全
4.2 局部变量是否线程安全?
局部变量是线程安全的
但局部变量引用的对象则未必
如果该对象没有逃离方法的作用访问,它是线程安全的
如果该对象逃离方法的作用范围,需要考虑线程安全
4.3 局部变量线程安全分析 1 2 3 4 public static void test1 () {int i = 10 ;i++; }
每个线程调用 test1() 方法时局部变量 i,会在每个线程的栈帧内存中被创建多份,因此不存在共享
1 2 3 4 5 6 7 8 9 10 11 12 13 14 15 16 public static void test1 () ;descriptor: ()V flags: ACC_PUBLIC, ACC_STATIC Code: stack=1 , locals=1 , args_size=0 0 : bipush 10 2 : istore_03 : iinc 0 , 1 6 : return LineNumberTable: line 10 : 0 line 11 : 3 line 12 : 6 LocalVariableTable: Start Length Slot Name Signature 3 4 0 i I
如图
局部变量的引用稍有不同
先看一个成员变量的例子
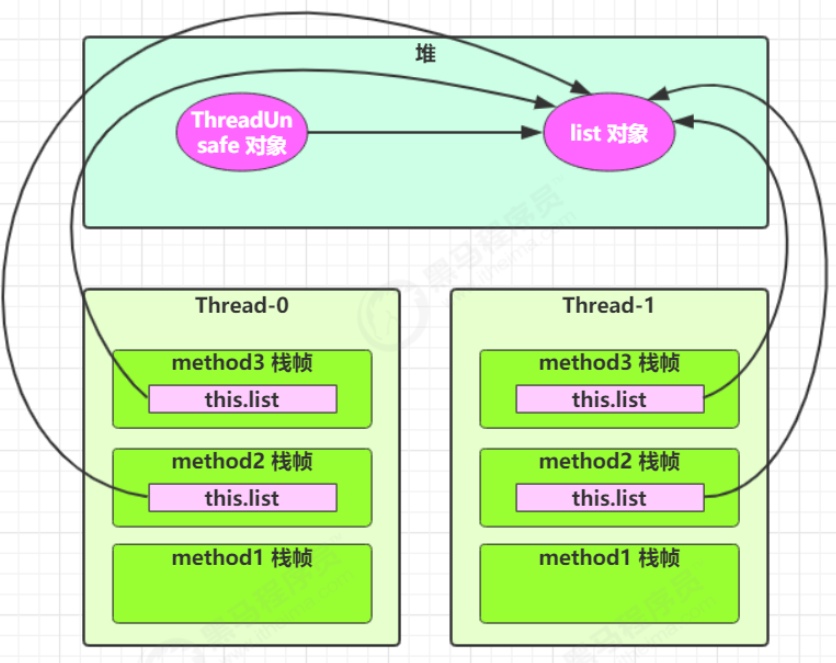
1 2 3 4 5 6 7 8 9 10 11 12 13 14 15 16 17 18 19 20 21 22 class ThreadUnsafe { ArrayList<String> list = new ArrayList <>(); public void method1 (int loopNumber) { for (int i = 0 ; i < loopNumber; i++) { method2(); method3(); } } private void method2 () { list.add("1" ); } private void method3 () { list.remove(0 ); } }
执行
1 2 3 4 5 6 7 8 9 10 static final int THREAD_NUMBER = 2 ;static final int LOOP_NUMBER = 200 ;public static void main (String[] args) { ThreadUnsafe test = new ThreadUnsafe (); for (int i = 0 ; i < THREAD_NUMBER; i++) { new Thread (() -> { test.method1(LOOP_NUMBER); }, "Thread" + i).start(); } }
其中一种情况是,如果线程2 还未 add,线程1 remove 就会报错:
1 2 3 4 5 6 7 Exception in thread "Thread1" java.lang.IndexOutOfBoundsException: Index: 0 , Size: 0 at java.util.ArrayList.rangeCheck(ArrayList.java:657 ) at java.util.ArrayList.remove(ArrayList.java:496 ) at cn.itcast.n6.ThreadUnsafe.method3(TestThreadSafe.java:35 ) at cn.itcast.n6.ThreadUnsafe.method1(TestThreadSafe.java:26 ) at cn.itcast.n6.TestThreadSafe.lambda$main$0 (TestThreadSafe.java:14 ) at java.lang.Thread.run(Thread.java:748 )
分析:
无论哪个线程中的 method2 引用的都是同一个对象中的 list 成员变量
method3 与 method2 分析相同
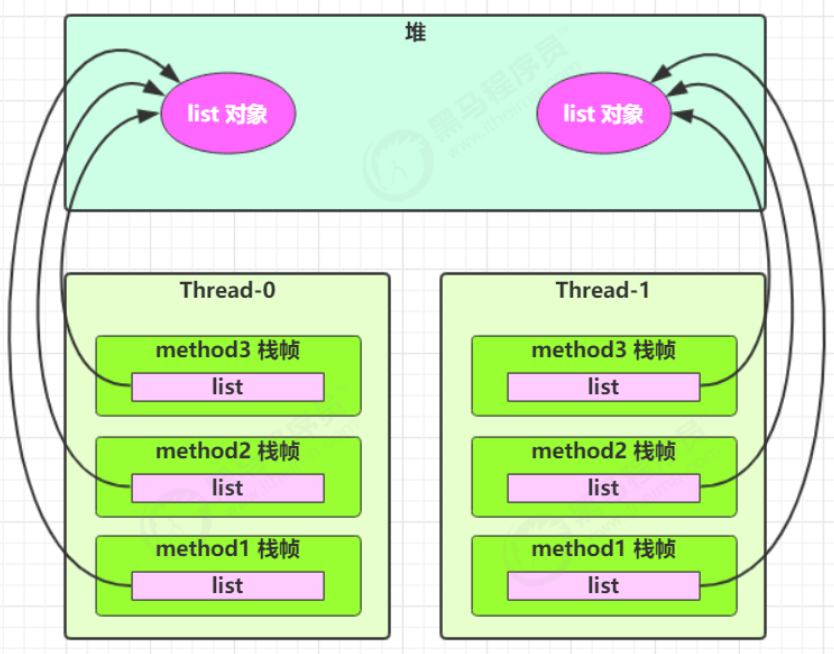
将 list 修改为局部变量
1 2 3 4 5 6 7 8 9 10 11 12 13 14 15 16 17 18 19 class ThreadSafe { public final void method1 (int loopNumber) { ArrayList<String> list = new ArrayList <>(); for (int i = 0 ; i < loopNumber; i++) { method2(list); method3(list); } } private void method2 (ArrayList<String> list) { list.add("1" ); } private void method3 (ArrayList<String> list) { list.remove(0 ); } }
那么就不会有上述问题了
分析:
list 是局部变量,每个线程调用时会创建其不同实例,没有共享
而 method2 的参数是从 method1 中传递过来的,与 method1 中引用同一个对象
method3 的参数分析与 method2 相同
方法访问修饰符带来的思考,如果把 method2 和 method3 的方法修改为 public 会不会带来线程安全问题?
情况1:有其它线程调用 method2 和 method3
情况2:在 情况1 的基础上,为 ThreadSafe 类添加子类,子类覆盖 method2 或 method3 方法,即
1 2 3 4 5 6 7 8 9 10 11 12 13 14 15 16 17 18 19 20 21 22 23 24 25 26 27 28 29 class ThreadSafe { public final void method1 (int loopNumber) { ArrayList<String> list = new ArrayList <>(); for (int i = 0 ; i < loopNumber; i++) { method2(list); method3(list); } } private void method2 (ArrayList<String> list) { list.add("1" ); } private void method3 (ArrayList<String> list) { list.remove(0 ); } } class ThreadSafeSubClass extends ThreadSafe { @Override public void method3 (ArrayList<String> list) { new Thread (() -> { list.remove(0 ); }).start(); } }
4.4 常见线程安全类
String
Integer
StringBuffer
Random
Vector
Hashtable
java.util.concurrent 包下的类
这里说它们是线程安全的是指,多个线程调用它们同一个实例的某个方法时,是线程安全的。也可以理解为
1 2 3 4 5 6 7 8 Hashtable table = new Hashtable ();new Thread (()->{ table.put("key" , "value1" ); }).start(); new Thread (()->{ table.put("key" , "value2" ); }).start();
它们的每个方法是原子的
但注意 它们多个方法的组合不是原子的,见后面分析
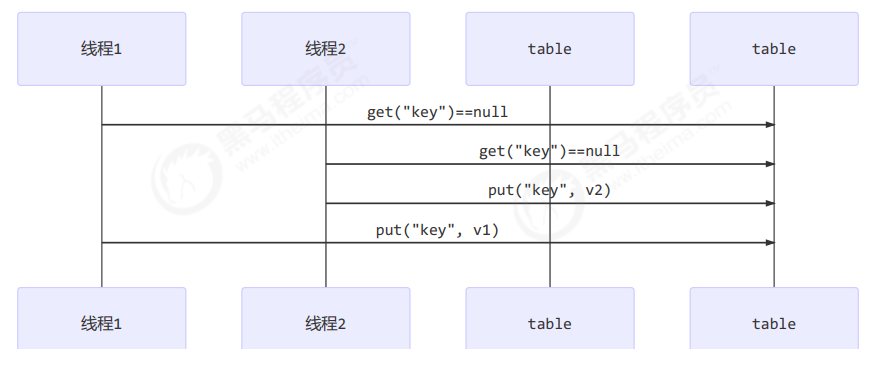
线程安全类方法的组合 分析下面代码是否线程安全?
1 2 3 4 5 Hashtable table = new Hashtable ();if ( table.get("key" ) == null ) {table.put("key" , value); }
不可变类线程安全性 String、Integer 等都是不可变类,因为其内部的状态不可以改变,因此它们的方法都是线程安全的
1 2 3 4 5 6 7 8 9 10 11 12 13 public class Immutable { private int value = 0 ; public Immutable (int value) { this .value = value; } public int getValue () { return this .value; } }
如果想增加一个增加的方法呢?
1 2 3 4 5 6 7 8 9 10 11 12 13 14 15 16 public class Immutable { private int value = 0 ; public Immutable (int value) { this .value = value; } public int getValue () { return this .value; } public Immutable add (int v) { return new Immutable (this .value + v); } }
实例分析
1 2 3 4 5 6 7 8 9 10 11 12 13 14 15 16 public class MyServlet extends HttpServlet { Map<String,Object> map = new HashMap <>(); String S1 = "..." ; final String S2 = "..." ; Date D1 = new Date (); final Date D2 = new Date (); public void doGet (HttpServletRequest request, HttpServletResponse response) { } }
例2:
1 2 3 4 5 6 7 8 9 10 11 12 13 14 15 16 17 public class MyServlet extends HttpServlet { private UserService userService = new UserServiceImpl (); public void doGet (HttpServletRequest request, HttpServletResponse response) { userService.update(...); } } public class UserServiceImpl implements UserService { private int count = 0 ; public void update () { count++; } }
例3:
1 2 3 4 5 6 7 8 9 10 11 12 13 14 15 16 17 18 @Aspect @Component public class MyAspect { private long start = 0L ; @Before("execution(* *(..))") public void before () { start = System.nanoTime(); } @After("execution(* *(..))") public void after () { long end = System.nanoTime(); System.out.println("cost time:" + (end-start)); } }
例4:
1 2 3 4 5 6 7 8 9 10 11 12 13 14 15 16 17 18 19 20 21 22 23 24 25 26 27 28 public class MyServlet extends HttpServlet { private UserService userService = new UserServiceImpl (); public void doGet (HttpServletRequest request, HttpServletResponse response) { userService.update(...); } } public class UserServiceImpl implements UserService { private UserDao userDao = new UserDaoImpl (); public void update () { userDao.update(); } } public class UserDaoImpl implements UserDao { public void update () { String sql = "update user set password = ? where username = ?" ; try (Connection conn = DriverManager.getConnection("" ,"" ,"" )){ } catch (Exception e) { } } }
例5:
1 2 3 4 5 6 7 8 9 10 11 12 13 14 15 16 17 18 19 20 21 22 23 24 25 26 27 28 public class MyServlet extends HttpServlet { private UserService userService = new UserServiceImpl (); public void doGet (HttpServletRequest request, HttpServletResponse response) { userService.update(...); } } public class UserServiceImpl implements UserService { private UserDao userDao = new UserDaoImpl (); public void update () { userDao.update(); } } public class UserDaoImpl implements UserDao { private Connection conn = null ; public void update () throws SQLException { String sql = "update user set password = ? where username = ?" ; conn = DriverManager.getConnection("" ,"" ,"" ); conn.close(); } }
例6:
1 2 3 4 5 6 7 8 9 10 11 12 13 14 15 16 17 18 19 20 21 22 23 24 25 26 public class MyServlet extends HttpServlet { private UserService userService = new UserServiceImpl (); public void doGet (HttpServletRequest request, HttpServletResponse response) { userService.update(...); } } public class UserServiceImpl implements UserService { public void update () { UserDao userDao = new UserDaoImpl (); userDao.update(); } } public class UserDaoImpl implements UserDao { private Connection = null ; public void update () throws SQLException { String sql = "update user set password = ? where username = ?" ; conn = DriverManager.getConnection("" ,"" ,"" ); conn.close(); } }
例7:
1 2 3 4 5 6 7 8 9 10 11 12 13 public abstract class Test { public void bar () { SimpleDateFormat sdf = new SimpleDateFormat ("yyyy-MM-dd HH:mm:ss" ); foo(sdf); } public abstract foo (SimpleDateFormat sdf) ; public static void main (String[] args) { new Test ().bar(); } }
其中 foo 的行为是不确定的,可能导致不安全的发生,被称之为外星方法
1 2 3 4 5 6 7 8 9 10 11 12 13 14 15 public void foo (SimpleDateFormat sdf) { String dateStr = "1999-10-11 00:00:00" ; for (int i = 0 ; i < 20 ; i++) { new Thread (() -> { try { sdf.parse(dateStr); } catch (ParseException e) { e.printStackTrace(); } }).start(); } }
请比较 JDK 中 String 类的实现
例8:
1 2 3 4 5 6 7 8 9 10 11 12 13 14 15 16 17 18 19 20 21 22 23 24 25 26 private static Integer i = 0 ;public static void main (String[] args) throws InterruptedException { List<Thread> list = new ArrayList <>(); for (int j = 0 ; j < 2 ; j++) { Thread thread = new Thread (() -> { for (int k = 0 ; k < 5000 ; k++) { synchronized (i) { i++; } } }, "" + j); list.add(thread); } list.stream().forEach(t -> t.start()); list.stream().forEach(t -> { try { t.join(); } catch (InterruptedException e) { e.printStackTrace(); } }); log.debug("{}" , i); }
5. 习题 5.1 卖票练习 测试下面代码是否存在线程安全问题,并尝试改正
1 2 3 4 5 6 7 8 9 10 11 12 13 14 15 16 17 18 19 20 21 22 23 24 25 26 27 28 29 30 31 32 33 34 35 36 37 38 39 40 41 42 43 44 45 46 47 48 49 50 51 52 53 public class ExerciseSell { public static void main (String[] args) { TicketWindow ticketWindow = new TicketWindow (2000 ); List<Thread> list = new ArrayList <>(); List<Integer> sellCount = new Vector <>(); for (int i = 0 ; i < 2000 ; i++) { Thread t = new Thread (() -> { int count = ticketWindow.sell(randomAmount()); sellCount.add(count); }); list.add(t); t.start(); } list.forEach((t) -> { try { t.join(); } catch (InterruptedException e) { e.printStackTrace(); } }); log.debug("selled count:{}" ,sellCount.stream().mapToInt(c -> c).sum()); log.debug("remainder count:{}" , ticketWindow.getCount()); } static Random random = new Random (); public static int randomAmount () { return random.nextInt(5 ) + 1 ; } } class TicketWindow { private int count; public TicketWindow (int count) { this .count = count; } public int getCount () { return count; } public int sell (int amount) { if (this .count >= amount) { this .count -= amount; return amount; } else { return 0 ; } } }
另外,用下面的代码行不行,为什么?
1 List<Integer> sellCount = new ArrayList <>();
测试脚本
1 for /L %n in (1 ,1 ,10 ) do java -cp ".;D:\Users\Administrator\.m2\repository\ch\qos\logback\1.2.3\logback-classic-1.2.3.jar;D:\Users\Administrator\.m2\repository\ch\qos\logback\logbackcore\1.2.3\logback-core-1.2.3.jar;D:\Users\Administrator\.m2\repository\org\slf4j\slf4japi\1.7.25\slf4j-api-1.7.25.jar" cn.itcast.n4.exercise.ExerciseSell
5.2 转账练习 测试下面代码是否存在线程安全问题,并尝试改正
1 2 3 4 5 6 7 8 9 10 11 12 13 14 15 16 17 18 19 20 21 22 23 24 25 26 27 28 29 30 31 32 33 34 35 36 37 38 39 40 41 42 43 44 45 46 public class ExerciseTransfer { public static void main (String[] args) throws InterruptedException { Account a = new Account (1000 ); Account b = new Account (1000 ); Thread t1 = new Thread (() -> { for (int i = 0 ; i < 1000 ; i++) { a.transfer(b, randomAmount()); } }, "t1" ); Thread t2 = new Thread (() -> { for (int i = 0 ; i < 1000 ; i++) { b.transfer(a, randomAmount()); } }, "t2" ); t1.start(); t2.start(); t1.join(); t2.join(); log.debug("total:{}" ,(a.getMoney() + b.getMoney())); } static Random random = new Random (); public static int randomAmount () { return random.nextInt(100 ) +1 ; } } class Account { private int money; public Account (int money) { this .money = money; } public int getMoney () { return money; } public void setMoney (int money) { this .money = money; } public void transfer (Account target, int amount) { if (this .money > amount) { this .setMoney(this .getMoney() - amount); target.setMoney(target.getMoney() + amount); } } }
这样改正行不行,为什么?
1 2 3 4 5 6 public synchronized void transfer (Account target, int amount) { if (this .money > amount) { this .setMoney(this .getMoney() - amount); target.setMoney(target.getMoney() + amount); } }
6. Monitor 概念 6.1 Java 对象头 以 32 位虚拟机为例
普通对象
1 2 3 4 5 |--------------------------------------------------------------| | Object Header (64 bits) | |------------------------------------|-------------------------| | Mark Word (32 bits) | Klass Word (32 bits) | |------------------------------------|-------------------------|
数组对象
1 2 3 4 5 |---------------------------------------------------------------------------------| | Object Header (96 bits) | |--------------------------------|-----------------------|------------------------| | Mark Word (32bits) | Klass Word (32bits) | array length (32bits) | |--------------------------------|-----------------------|------------------------|
其中 Mark Word 结构为
1 2 3 4 5 6 7 8 9 10 11 12 13 |-------------------------------------------------------|--------------------| | Mark Word (32 bits) | State | |-------------------------------------------------------|--------------------| | hashcode:25 | age:4 | biased_lock:0 | 01 | Normal | |-------------------------------------------------------|--------------------| | thread:23 | epoch:2 | age:4 | biased_lock:1 | 01 | Biased | |-------------------------------------------------------|--------------------| | ptr_to_lock_record:30 | 00 | Lightweight Locked | |-------------------------------------------------------|--------------------| | ptr_to_heavyweight_monitor:30 | 10 | Heavyweight Locked | |-------------------------------------------------------|--------------------| | | 11 | Marked for GC | |-------------------------------------------------------|--------------------|
64 位虚拟机 Mark Word
1 2 3 4 5 6 7 8 9 10 11 12 13 |--------------------------------------------------------------------|--------------------| | Mark Word (64 bits) | State | |--------------------------------------------------------------------|--------------------| | unused:25 | hashcode:31 | unused:1 | age:4 | biased_lock:0 | 01 | Normal | |--------------------------------------------------------------------|--------------------| | thread:54 | epoch:2 | unused:1 | age:4 | biased_lock:1 | 01 | Biased | |--------------------------------------------------------------------|--------------------| | ptr_to_lock_record:62 | 00 | Lightweight Locked | |--------------------------------------------------------------------|--------------------| | ptr_to_heavyweight_monitor:62 | 10 | Heavyweight Locked | |--------------------------------------------------------------------|--------------------| | | 11 | Marked for GC | |--------------------------------------------------------------------|--------------------|
参考资料
https://stackoverflow.com/questions/26357186/what-is-in-java-object-header
6.2 原理之 Monitor(锁) Monitor 被翻译为监视器 或管程
每个 Java 对象都可以关联一个 Monitor 对象,如果使用 synchronized 给对象上锁(重量级)之后,该对象头的Mark Word 中就被设置指向 Monitor 对象的指针
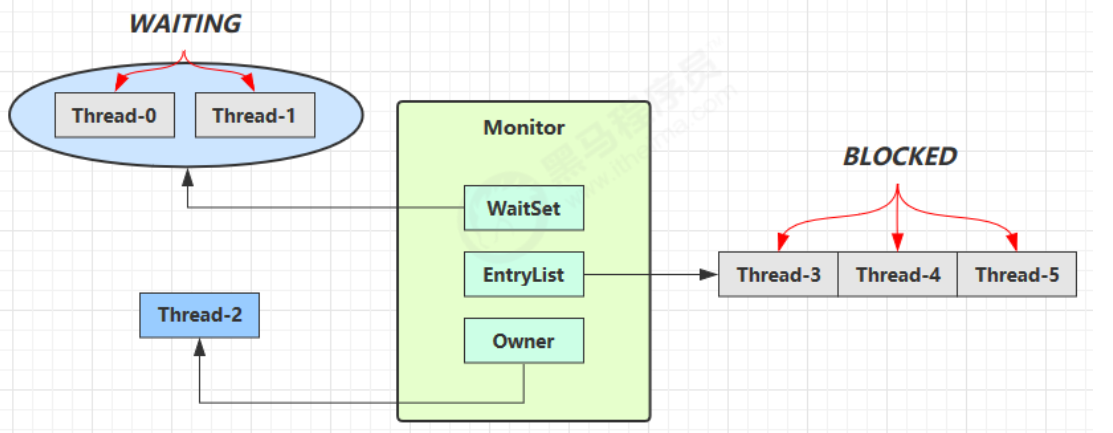
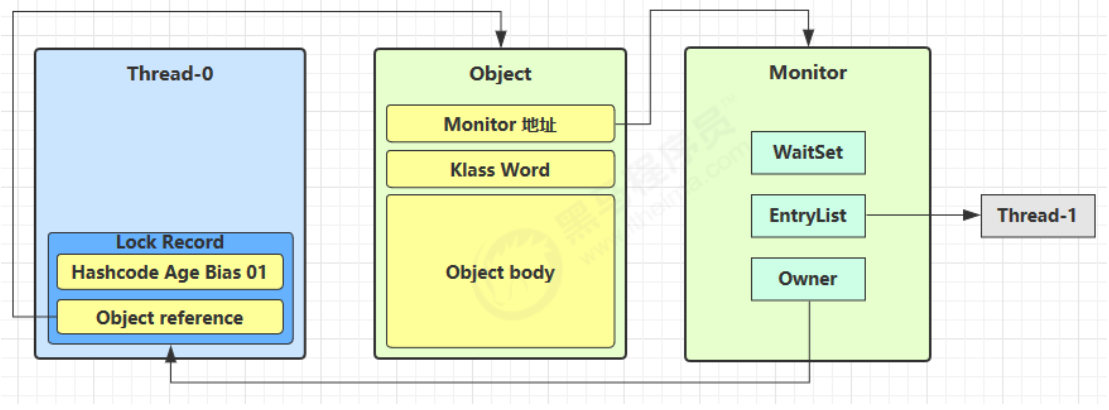
Monitor 结构如下
刚开始 Monitor 中 Owner 为 null
当 Thread-2 执行 synchronized(obj) 就会将 Monitor 的所有者 Owner 置为 Thread-2,Monitor中只能有一个 Owner
在 Thread-2 上锁的过程中,如果 Thread-3,Thread-4,Thread-5 也来执行 synchronized(obj),就会进入EntryList BLOCKED
Thread-2 执行完同步代码块的内容,然后唤醒 EntryList 中等待的线程来竞争锁,竞争的时是非公平的
图中 WaitSet 中的 Thread-0,Thread-1 是之前获得过锁,但条件不满足进入 WAITING 状态的线程,后面讲wait-notify 时会分析
注意:
synchronized 必须是进入同一个对象的 monitor 才有上述的效果
6.3 原理之 synchronized 1 2 3 4 5 6 7 static final Object lock = new Object ();static int counter = 0 ;public static void main (String[] args) { synchronized (lock) { counter++; } }
对应的字节码为
1 2 3 4 5 6 7 8 9 10 11 12 13 14 15 16 17 18 19 20 21 22 23 24 25 26 27 28 29 30 31 32 33 34 35 36 37 38 39 40 41 public static void main (java.lang.String[]) ;descriptor: ([Ljava/lang/String;)V flags: ACC_PUBLIC, ACC_STATIC Code: stack=2 , locals=3 , args_size=1 0 : getstatic #2 3 : dup4 : astore_1 5 : monitorenter 6 : getstatic #3 9 : iconst_1 10 : iadd 11 : putstatic #3 14 : aload_1 15 : monitorexit 16 : goto 24 19 : astore_2 20 : aload_1 21 : monitorexit 22 : aload_2 23 : athrow 24 : return Exception table: from to target type 6 16 19 any19 22 19 anyLineNumberTable: line 8 : 0 line 9 : 6 line 10 : 14 line 11 : 24 LocalVariableTable: Start Length Slot Name Signature 0 25 0 args [Ljava/lang/String;StackMapTable: number_of_entries = 2 frame_type = 255 offset_delta = 19 locals = [ class "[Ljava/lang/String;" , class java /lang/Object ] stack = [ class java /lang/Throwable ] frame_type = 250 offset_delta = 4
注意
方法级别的 synchronized 不会在字节码指令中有所体现
6.4 小故事 故事角色
老王 - JVM
小南 - 线程
小女 - 线程
房间 - 对象
房间门上 - 防盗锁 - Monitor
房间门上 - 小南书包 - 轻量级锁
房间门上 - 刻上小南大名 - 偏向锁
批量重刻名 - 一个类的偏向锁撤销到达 20 阈值
不能刻名字 - 批量撤销该类对象的偏向锁,设置该类不可偏向
小南要使用房间保证计算不被其它人干扰(原子性),最初,他用的是防盗锁,当上下文切换时,锁住门。这样,
但是,很多情况下没人跟他来竞争房间的使用权。小女是要用房间,但使用的时间上是错开的,小南白天用,小女
小南和小女商量了一下,约定不锁门了,而是谁用房间,谁把自己的书包挂在门口,但他们的书包样式都一样,因
后来,小女回老家了,很长一段时间都不会用这个房间。小南每次还是挂书包,翻书包,虽然比锁门省事了,但仍
于是,小南干脆在门上刻上了自己的名字:【小南专属房间,其它人勿用】,下次来用房间时,只要名字还在,那
同学们都放假回老家了,小南就膨胀了,在 20 个房间刻上了自己的名字,想进哪个进哪个。后来他自己放假回老
后来,刻名的现象越来越频繁,老王受不了了:算了,这些房间都不能刻名了,只能挂书包
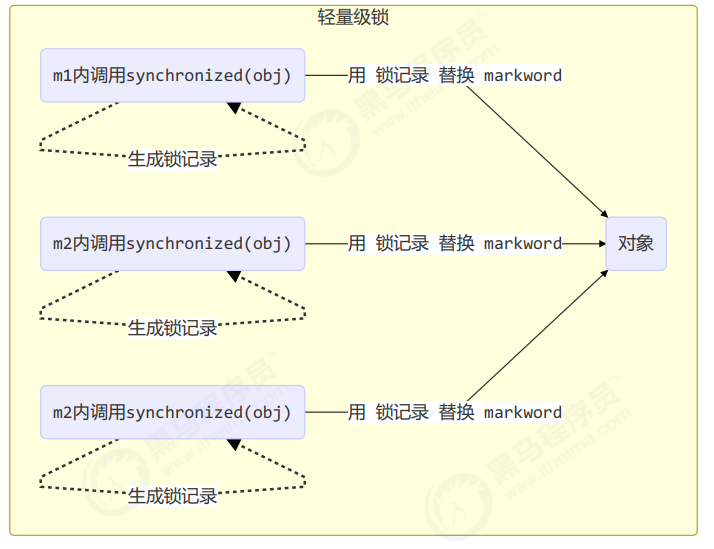
6.5 原理之 synchronized 进阶 轻量级锁 轻量即锁的使用场景,如果一个对象虽然有多线程访问,但多线程访问的时间是错开的 (也就是没有竞争),那么可以使用轻量级锁来优化。
轻量级锁对使用者是透明的,即语法依然是 synchronized
假设有两个方法同步块,利用同一个对象加锁
1 2 3 4 5 6 7 8 9 10 11 12 static final Object obj = new Object ();public static void method1 () { synchronized ( obj ) { method2(); } } public static void method2 () { synchronized ( obj ) { } }
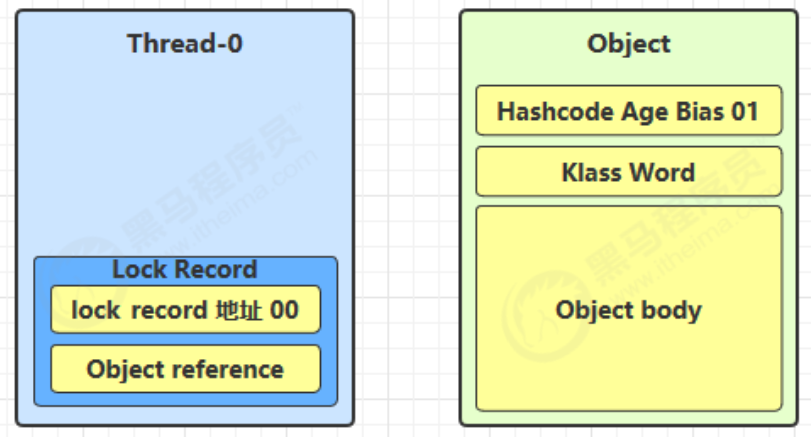
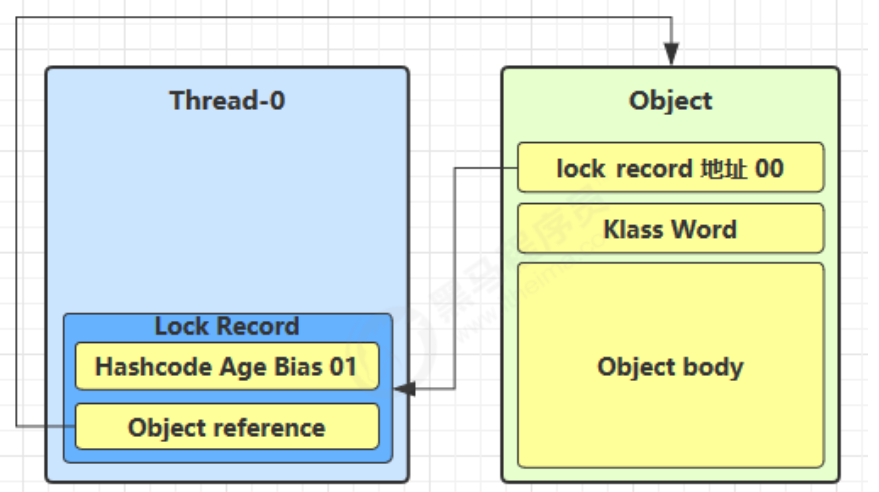
创建锁记录 (Lock Record),对象,每个线程的栈帧都包含一个锁记录的结构,内部可以存储锁对象的 Mark Word
让锁记录中 Object reference 指向锁对象,并尝试用 cas 替换 Object 的 Mark Word,将 Mark Word 的值存入锁记录
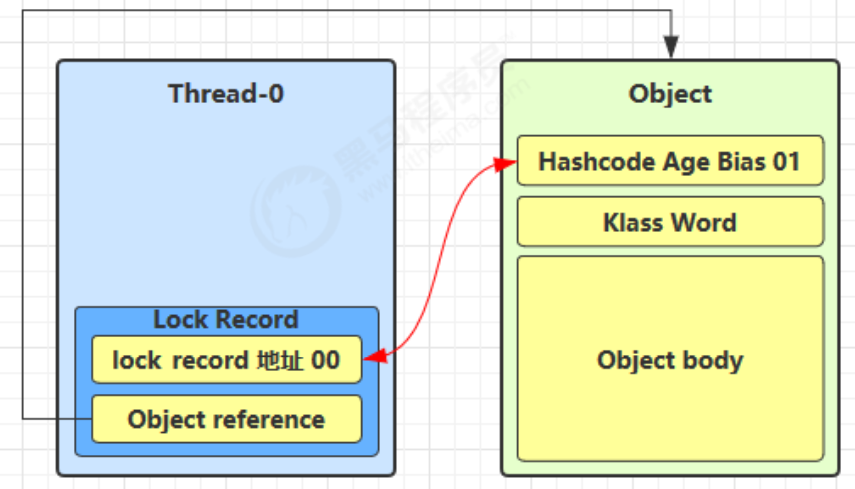
如果 cas 替换成功,对象头中存储了 锁记录地址和状态 00 ,表示由该线程给对象加锁,这时图示如下
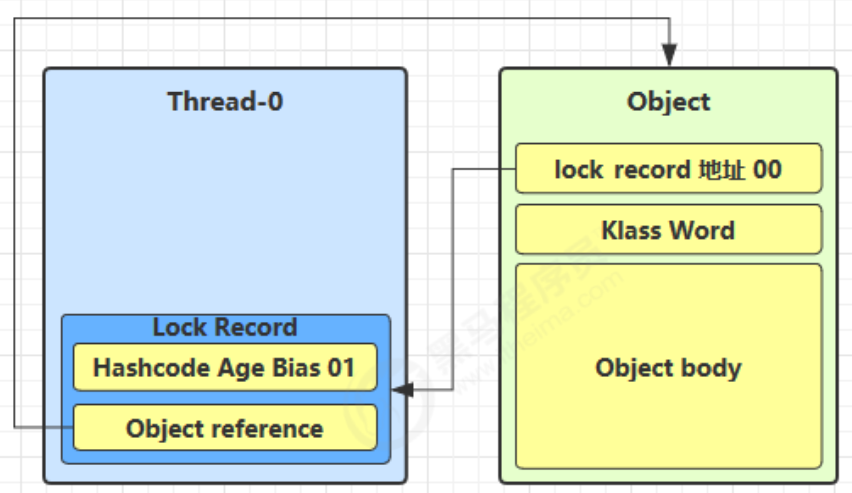
当退出 synchronized 代码块(解锁时)锁记录的值不为 null,这时使用 cas 将 Mark Word 的值恢复给对象头
成功,则解锁成功
失败,说明轻量级锁进行了锁膨胀或已经升级为重量级锁,进入重量级锁解锁流程
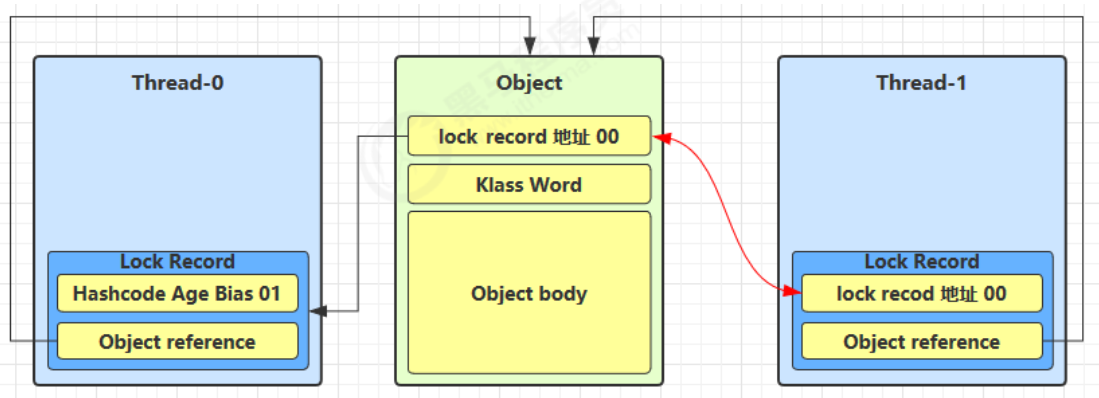
锁膨胀 如果在尝试加轻量级锁的过程中,CAS 操作无法成功,这时一种情况就是有其它线程为此对象加上了轻量级锁(有竞争),这时需要进行锁膨胀,将轻量级锁变为重量级锁
1 2 3 4 5 6 static Object obj = new Object (); public static void method1 () { synchronized ( obj ) { } }
当 Thread-1 进行轻量级加锁时,Thread-0 已经对该对象加了轻量级锁
自旋优化 重量级锁竞争的时候,还可以使用自旋来进行优化,如果当前线程自旋成功(即这时候持锁线程已经退出了同步块,释放了锁),这时当前线程就可以避免阻塞。
自旋重试成功的情况
线程 1 (core 1 上)
对象 Mark
线程 2 (core 2 上)
-
10(重量锁)
-
访问同步块,获取 monitor
10(重量锁)重量锁指针
-
成功(加锁)
10(重量锁)重量锁指针
-
执行同步块
10(重量锁)重量锁指针
-
执行同步块
10(重量锁)重量锁指针
访问同步块,获取 monitor
执行同步块
10(重量锁)重量锁指针
自旋重试
执行完毕
10(重量锁)重量锁指针
自旋重试
成功(解锁)
01(无锁)
自旋重试
-
10(重量锁)重量锁指针
成功(加锁)
-
10(重量锁)重量锁指针
执行同步块
-
…
…
自旋重试失败的情况
线程 1(core 1 上)
对象 Mark
线程 2(core 2 上)
-
10(重量锁)
-
访问同步块,获取 monitor
10(重量锁)重量锁指针
-
成功(加锁)
10(重量锁)重量锁指针
-
执行同步块
10(重量锁)重量锁指针
-
执行同步块
10(重量锁)重量锁指针
访问同步块,获取 monitor
执行同步块
10(重量锁)重量锁指针
自旋重试
执行同步块
10(重量锁)重量锁指针
自旋重试
执行同步块
10(重量锁)重量锁指针
自旋重试
执行同步块
10(重量锁)重量锁指针
阻塞
-
…
…
自旋会占用 CPU 时间,单核 CPU 自旋就是浪费,多核 CPU 自旋才能发挥优势。
在 Java 6 之后自旋锁是自适应的,比如对象刚刚的一次自旋操作成功过,那么认为这次自旋成功的可能性会高,就多自旋几次;反之,就少自旋甚至不自旋,总之,比较智能。
Java 7 之后不能控制是否开启自旋功能
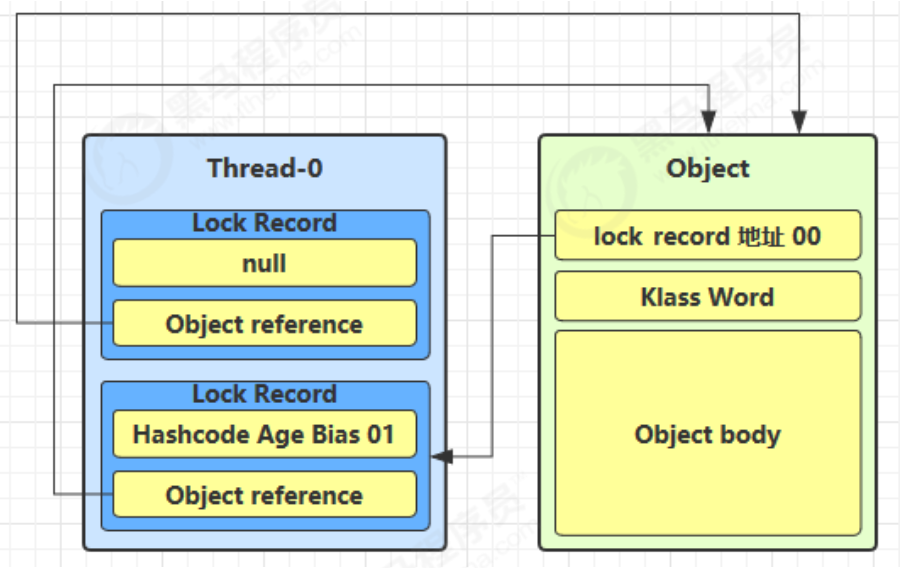
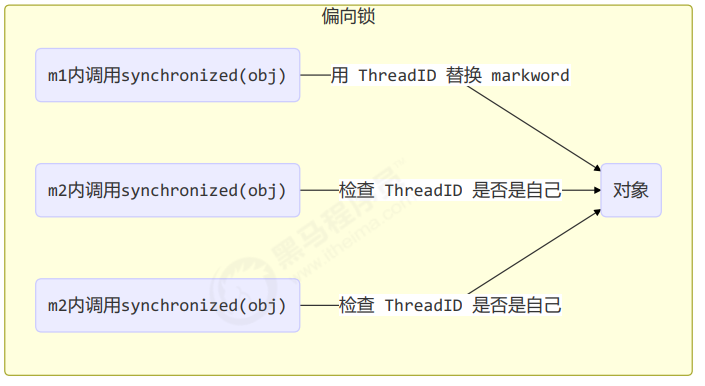
偏向锁 轻量级锁在没有竞争时(就自己这个线程),每次重入仍然需要执行 CAS 操作。
Java 6 中引入了偏向锁来做进一步优化:只有第一次使用 CAS 将线程 ID 设置到对象的 Mark Word 头,之后发现这个线程 ID 是自己的就表示没有竞争,不用重新 CAS。以后只要不发生竞争,这个对象就归该线程所有
例如:
1 2 3 4 5 6 7 8 9 10 11 12 13 14 15 16 17 18 19 20 static final Object obj = new Object ();public static void m1 () { synchronized ( obj ) { m2(); } } public static void m2 () { synchronized ( obj ) { m3(); } } public static void m3 () { synchronized ( obj ) { } }
偏向状态 回忆一下对象头格式
1 2 3 4 5 6 7 8 9 10 11 12 13 |-------------------------------------------------------------------- |--------------------| 64 bits) | State | |-------------------------------------------------------------------- |--------------------| unused: 25 | hashcode:31 | unused: 1 | age:4 | biased_lock: 0 | 01 | Normal |-------------------- || thread:54 | epoch: 2 | unused:1 | age: 4 | biased_lock:1 | 01 | Biased | |-------------------------------------------------------------------- |--------------------| ptr_to_lock_record: 62 | 00 | Lightweight Locked |-------------------- || ptr_to_heavyweight_monitor:62 | 10 | Heavyweight Locked | |-------------------------------------------------------------------- |--------------------| 11 | Marked for GC |-------------------- |
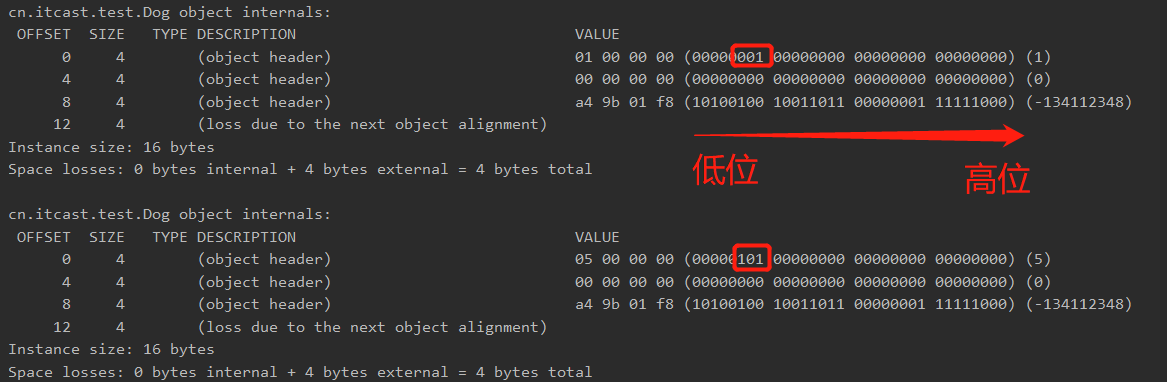
一个对象创建时:
如果开启了偏向锁(默认开启),那么对象创建后,markword 值为 0x05 即最后 3 位为 101,这时它的thread、epoch、age 都为 0
偏向锁是默认是延迟的,不会在程序启动时立即生效,如果想避免延迟,可以加 VM 参数 -XX:BiasedLockingStartupDelay=0 来禁用延迟
如果没有开启偏向锁,那么对象创建后,markword 值为 0x01 即最后 3 位为 001,这时它的 hashcode、age 都为 0,第一次用到 hashcode 时才会赋值
1) 测试延迟特性
1 2 3 4 5 6 7 8 9 10 11 Dog d = new Dog ();ClassLayout classLayout = ClassLayout.parseInstance(d);System.out.println(classLayout.toPrintable()); Thread.sleep(3000 ); System.out.println(ClassLayout.parseInstance(new Dog ()).toPrintable());
由于偏向锁是有延迟的,直接 给对象加锁是 看不到 偏向锁 效果的,可以使用Thread.sleep(4000),或者 开启禁用 偏向锁延迟 -XX:BiasedLockingStartupDelay=0
2) 测试偏向锁
利用 jol 第三方工具来查看对象头信息(注意这里我扩展了 jol 让它输出更为简洁)
1 2 3 4 5 <dependency > <groupId > org.openjdk.jol</groupId > <artifactId > jol-core</artifactId > <version > 0.9</version > </dependency >
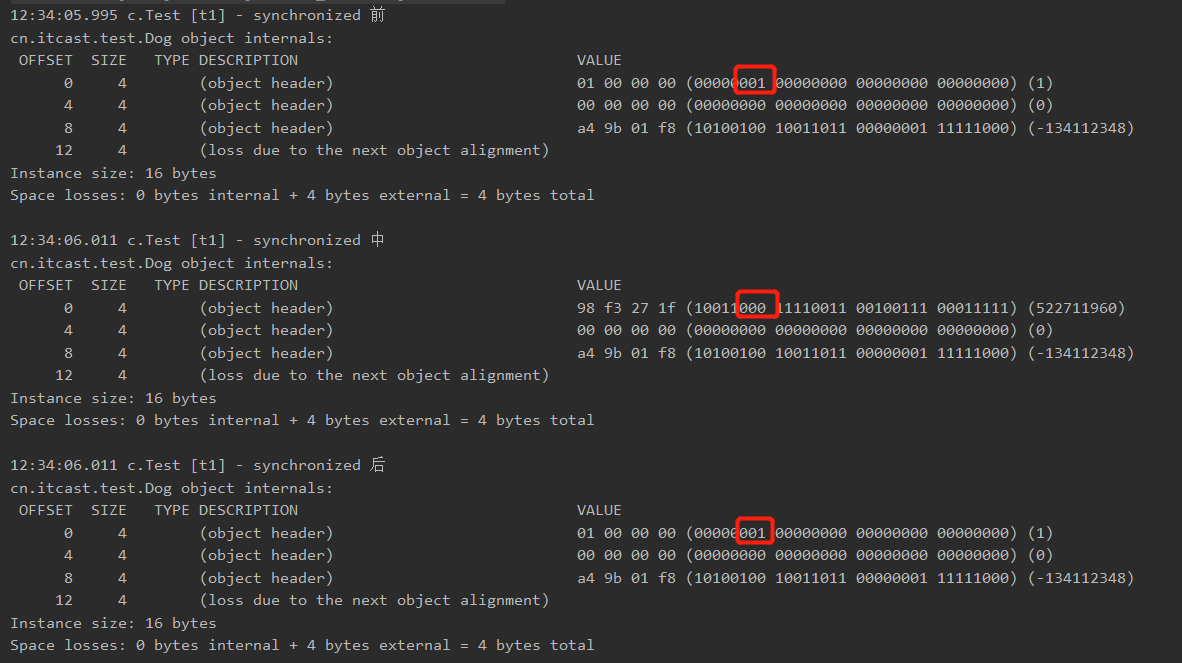
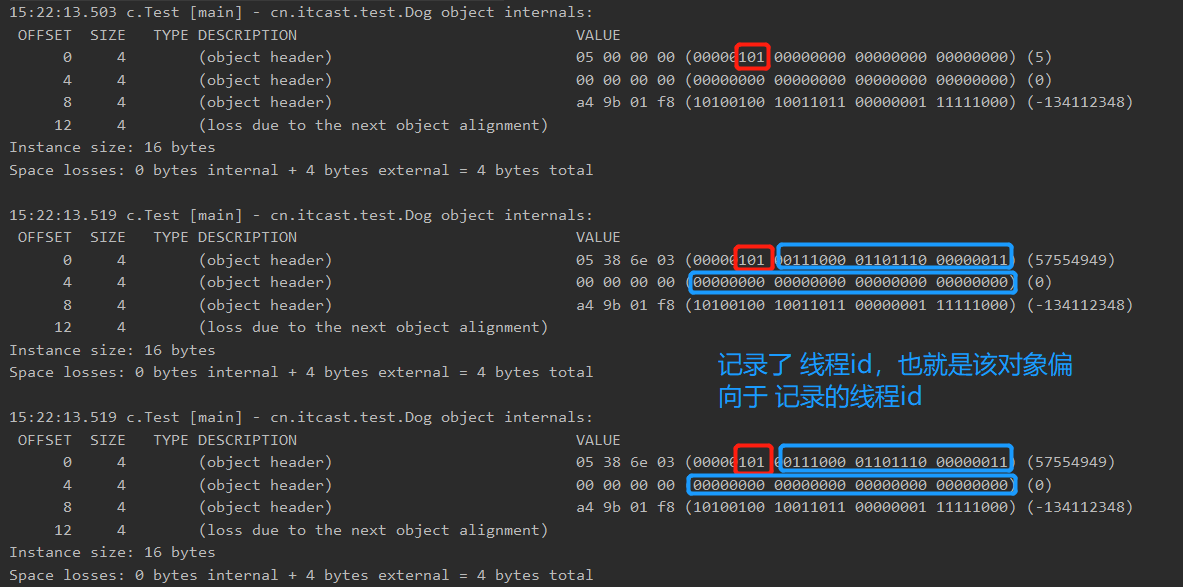
1 2 3 4 5 6 7 8 9 10 11 12 13 14 15 16 17 18 19 20 21 Thread.sleep(4000 ); Dog d = new Dog ();ClassLayout classLayout = ClassLayout.parseInstance(d);new Thread (() -> { log.debug("synchronized 前" ); System.out.println(classLayout.toPrintable()); synchronized (d) { log.debug("synchronized 中" ); System.out.println(classLayout.toPrintable()); } log.debug("synchronized 后" ); System.out.println(classLayout.toPrintable()); }, "t1" ).start();
有了偏向锁后
1 2 3 4 5 6 7 8 9 10 11 12 13 14 15 16 17 18 19 20 21 Thread.sleep(4000 ); Dog d = new Dog ();ClassLayout classLayout = ClassLayout.parseInstance(d);new Thread (() -> { log.debug("synchronized 前" ); System.out.println(classLayout.toPrintable()); synchronized (d) { log.debug("synchronized 中" ); System.out.println(classLayout.toPrintable()); } log.debug("synchronized 后" ); System.out.println(classLayout.toPrintable()); }, "t1" ).start();
观察偏向锁与没有偏向锁导致重入锁的差异
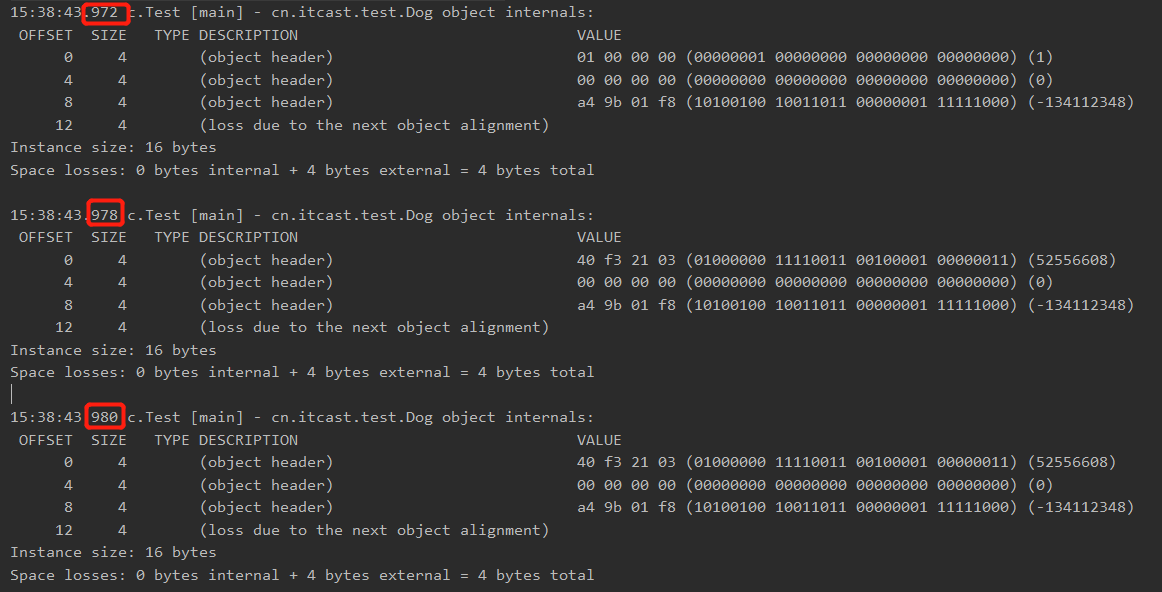
1 2 3 4 5 6 7 8 9 10 11 12 13 Thread.sleep(4000 ); Dog d = new Dog ();log.debug(ClassLayout.parseInstance(d).toPrintable()); synchronized (d) { log.debug(ClassLayout.parseInstance(d).toPrintable()); } synchronized (d) { log.debug(ClassLayout.parseInstance(d).toPrintable()); }
没有偏向锁,需要锁重入CAS
1 2 3 4 5 6 7 8 9 10 Dog d = new Dog ();log.debug(ClassLayout.parseInstance(d).toPrintable()); synchronized (d) { log.debug(ClassLayout.parseInstance(d).toPrintable()); } synchronized (d) { log.debug(ClassLayout.parseInstance(d).toPrintable()); }
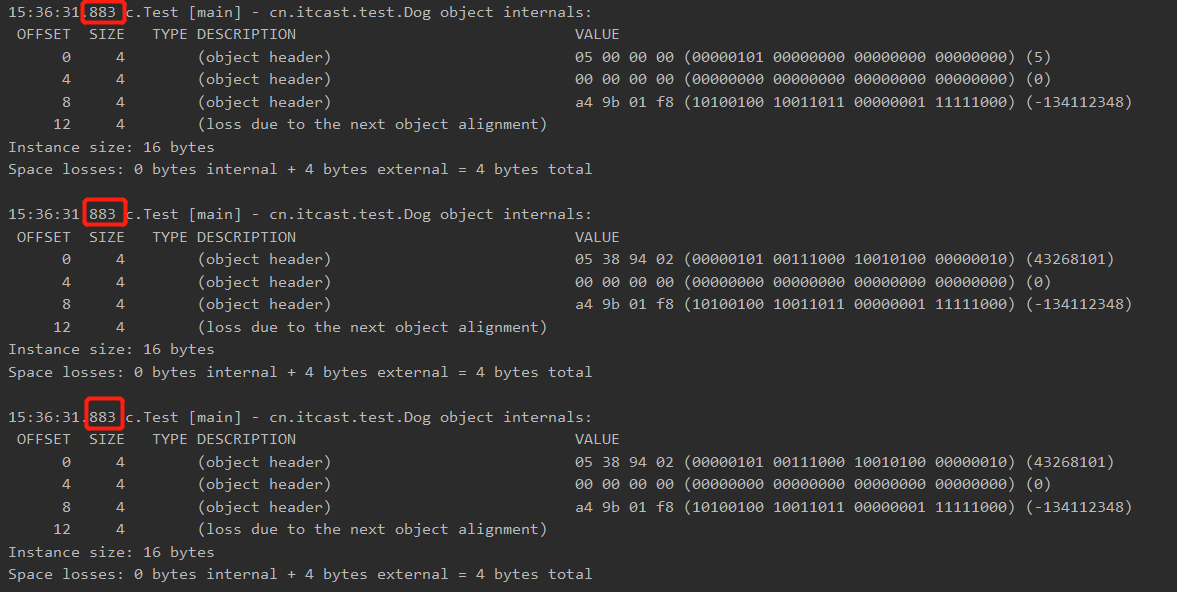
撤销 - 调用对象 hashCode 调用了对象的 hashCode,但偏向锁的对象 MarkWord 中存储的是线程 id,如果调用 hashCode 会导致偏向锁被撤销
轻量级锁会在锁记录中记录 hashCode
重量级锁会在 Monitor 中记录 hashCode
在调用 hashCode 后使用偏向锁,记得去掉 -XX:-UseBiasedLocking (禁用偏向锁)
1 2 3 4 5 6 7 8 9 10 11 12 Thread.sleep(4000 ); Dog d = new Dog ();d.hashCode(); log.debug(ClassLayout.parseInstance(d).toPrintable()); synchronized (d) { log.debug(ClassLayout.parseInstance(d).toPrintable()); } log.debug(ClassLayout.parseInstance(d).toPrintable());
输出
1 2 3 4 5 6 7 11:22:10.386 c.TestBiased [main] - 调用 hashCode:1778535015 11:22:10.391 c.TestBiased [t1] - synchronized 前 00000000 00000000 00000000 01101010 00000010 01001010 01100111 00000001 11:22:10.393 c.TestBiased [t1] - synchronized 中 00000000 00000000 00000000 00000000 00100000 11000011 11110011 01101000 11:22:10.393 c.TestBiased [t1] - synchronized 后 00000000 00000000 00000000 01101010 00000010 01001010 01100111 00000001
撤销 - 其他线程使用对象 当有其它线程使用偏向锁对象时,会将偏向锁升级为轻量级锁
1 2 3 4 5 6 7 8 9 10 11 12 13 14 15 16 17 18 19 20 21 22 23 24 25 26 27 28 29 30 31 32 33 34 private static void test2 () throws InterruptedException { Dog d = new Dog (); Thread t1 = new Thread (() -> { synchronized (d) { log.debug(ClassLayout.parseInstance(d).toPrintableSimple(true )); } synchronized (TestBiased.class) { TestBiased.class.notify(); } }, "t1" ); t1.start(); Thread t2 = new Thread (() -> { synchronized (TestBiased.class) { try { TestBiased.class.wait(); } catch (InterruptedException e) { e.printStackTrace(); } } log.debug(ClassLayout.parseInstance(d).toPrintableSimple(true )); synchronized (d) { log.debug(ClassLayout.parseInstance(d).toPrintableSimple(true )); } log.debug(ClassLayout.parseInstance(d).toPrintableSimple(true )); }, "t2" ); t2.start(); }
输出
1 2 3 4 [t1] - 00000000 00000000 00000000 00000000 00011111 01000001 00010000 00000101 [t2] - 00000000 00000000 00000000 00000000 00011111 01000001 00010000 00000101 [t2] - 00000000 00000000 00000000 00000000 00011111 10110101 11110000 01000000 由于是偏向锁,撤销锁再 CAS [t2] - 00000000 00000000 00000000 00000000 00000000 00000000 00000000 00000001 不可偏向
撤销 - 调用wait/notify 1 2 3 4 5 6 7 8 9 10 11 12 13 14 15 16 17 18 19 20 21 22 23 24 25 26 27 public static void main (String[] args) throws InterruptedException { Dog d = new Dog (); Thread t1 = new Thread (() -> { log.debug(ClassLayout.parseInstance(d).toPrintableSimple(true )); synchronized (d) { log.debug(ClassLayout.parseInstance(d).toPrintableSimple(true )); try { d.wait(); } catch (InterruptedException e) { e.printStackTrace(); } log.debug(ClassLayout.parseInstance(d).toPrintableSimple(true )); } }, "t1" ); t1.start(); new Thread (() -> { try { Thread.sleep(6000 ); } catch (InterruptedException e) { e.printStackTrace(); } synchronized (d) { log.debug("notify" ); d.notify(); } }, "t2" ).start(); }
1 2 3 4 [t1] - 00000000 00000000 00000000 00000000 00000000 00000000 00000000 00000101 [t1] - 00000000 00000000 00000000 00000000 00011111 10110011 11111000 00000101 [t2] - notify [t1] - 00000000 00000000 00000000 00000000 00011100 11010100 00001101 11001010
批量重偏向 如果对象虽然被多个线程访问,但没有竞争,这时偏向了线程 T1 的对象仍有机会重新偏向 T2,重偏向会重置对象的 Thread ID
当撤销偏向锁阈值超过 20 次后,jvm 会这样觉得,我是不是偏向错了呢,于是会在给这些对象加锁时重新偏向至加锁线程
只会偏一次,如果又有一个线程 加锁,它不会在 锁阈值 超过20 次 重偏向,不过在 40 次之后会撤销 偏向锁,升级为 轻量锁 CAS
1 2 3 4 5 6 7 8 9 10 11 12 13 14 15 16 17 18 19 20 21 22 23 24 25 26 27 28 29 30 31 32 33 34 35 36 37 private static void test3 () throws InterruptedException { Vector<Dog> list = new Vector <>(); Thread t1 = new Thread (() -> { for (int i = 0 ; i < 30 ; i++) { Dog d = new Dog (); list.add(d); synchronized (d) { log.debug(i + "\t" + ClassLayout.parseInstance(d).toPrintableSimple(true )); } } synchronized (list) { list.notify(); } }, "t1" ); t1.start(); Thread t2 = new Thread (() -> { synchronized (list) { try { list.wait(); } catch (InterruptedException e) { e.printStackTrace(); } } log.debug("===============> " ); for (int i = 0 ; i < 30 ; i++) { Dog d = list.get(i); log.debug(i + "\t" + ClassLayout.parseInstance(d).toPrintableSimple(true )); synchronized (d) { log.debug(i + "\t" + ClassLayout.parseInstance(d).toPrintableSimple(true )); } log.debug(i + "\t" + ClassLayout.parseInstance(d).toPrintableSimple(true )); } }, "t2" ); t2.start(); }
输出
1 2 3 4 5 6 7 8 9 10 11 12 13 14 15 16 17 18 19 20 21 22 23 24 25 26 27 28 29 30 31 32 33 34 35 36 37 38 39 40 41 42 43 44 45 46 47 48 49 50 51 52 53 54 55 56 57 58 59 60 61 62 63 64 65 66 67 68 69 70 71 72 73 74 75 76 77 78 79 80 81 82 83 84 85 86 87 88 89 90 91 92 93 94 95 96 97 98 99 100 101 102 103 104 105 106 107 108 109 110 111 112 113 114 115 116 117 118 119 120 121 [t1] - 0 00000000 00000000 00000000 00000000 00011111 11110011 11100000 00000101 [t1] - 1 00000000 00000000 00000000 00000000 00011111 11110011 11100000 00000101 [t1] - 2 00000000 00000000 00000000 00000000 00011111 11110011 11100000 00000101 [t1] - 3 00000000 00000000 00000000 00000000 00011111 11110011 11100000 00000101 [t1] - 4 00000000 00000000 00000000 00000000 00011111 11110011 11100000 00000101 [t1] - 5 00000000 00000000 00000000 00000000 00011111 11110011 11100000 00000101 [t1] - 6 00000000 00000000 00000000 00000000 00011111 11110011 11100000 00000101 [t1] - 7 00000000 00000000 00000000 00000000 00011111 11110011 11100000 00000101 [t1] - 8 00000000 00000000 00000000 00000000 00011111 11110011 11100000 00000101 [t1] - 9 00000000 00000000 00000000 00000000 00011111 11110011 11100000 00000101 [t1] - 10 00000000 00000000 00000000 00000000 00011111 11110011 11100000 00000101 [t1] - 11 00000000 00000000 00000000 00000000 00011111 11110011 11100000 00000101 [t1] - 12 00000000 00000000 00000000 00000000 00011111 11110011 11100000 00000101 [t1] - 13 00000000 00000000 00000000 00000000 00011111 11110011 11100000 00000101 [t1] - 14 00000000 00000000 00000000 00000000 00011111 11110011 11100000 00000101 [t1] - 15 00000000 00000000 00000000 00000000 00011111 11110011 11100000 00000101 [t1] - 16 00000000 00000000 00000000 00000000 00011111 11110011 11100000 00000101 [t1] - 17 00000000 00000000 00000000 00000000 00011111 11110011 11100000 00000101 [t1] - 18 00000000 00000000 00000000 00000000 00011111 11110011 11100000 00000101 [t1] - 19 00000000 00000000 00000000 00000000 00011111 11110011 11100000 00000101 [t1] - 20 00000000 00000000 00000000 00000000 00011111 11110011 11100000 00000101 [t1] - 21 00000000 00000000 00000000 00000000 00011111 11110011 11100000 00000101 [t1] - 22 00000000 00000000 00000000 00000000 00011111 11110011 11100000 00000101 [t1] - 23 00000000 00000000 00000000 00000000 00011111 11110011 11100000 00000101 [t1] - 24 00000000 00000000 00000000 00000000 00011111 11110011 11100000 00000101 [t1] - 25 00000000 00000000 00000000 00000000 00011111 11110011 11100000 00000101 [t1] - 26 00000000 00000000 00000000 00000000 00011111 11110011 11100000 00000101 [t1] - 27 00000000 00000000 00000000 00000000 00011111 11110011 11100000 00000101 [t1] - 28 00000000 00000000 00000000 00000000 00011111 11110011 11100000 00000101 [t1] - 29 00000000 00000000 00000000 00000000 00011111 11110011 11100000 00000101 [t2] - ===============> [t2] - 0 00000000 00000000 00000000 00000000 00011111 11110011 11100000 00000101 [t2] - 0 00000000 00000000 00000000 00000000 00100000 01011000 11110111 00000000 [t2] - 0 00000000 00000000 00000000 00000000 00000000 00000000 00000000 00000001 [t2] - 1 00000000 00000000 00000000 00000000 00011111 11110011 11100000 00000101 [t2] - 1 00000000 00000000 00000000 00000000 00100000 01011000 11110111 00000000 [t2] - 1 00000000 00000000 00000000 00000000 00000000 00000000 00000000 00000001 [t2] - 2 00000000 00000000 00000000 00000000 00011111 11110011 11100000 00000101 [t2] - 2 00000000 00000000 00000000 00000000 00100000 01011000 11110111 00000000 [t2] - 2 00000000 00000000 00000000 00000000 00000000 00000000 00000000 00000001 [t2] - 3 00000000 00000000 00000000 00000000 00011111 11110011 11100000 00000101 [t2] - 3 00000000 00000000 00000000 00000000 00100000 01011000 11110111 00000000 [t2] - 3 00000000 00000000 00000000 00000000 00000000 00000000 00000000 00000001 [t2] - 4 00000000 00000000 00000000 00000000 00011111 11110011 11100000 00000101 [t2] - 4 00000000 00000000 00000000 00000000 00100000 01011000 11110111 00000000 [t2] - 4 00000000 00000000 00000000 00000000 00000000 00000000 00000000 00000001 [t2] - 5 00000000 00000000 00000000 00000000 00011111 11110011 11100000 00000101 [t2] - 5 00000000 00000000 00000000 00000000 00100000 01011000 11110111 00000000 [t2] - 5 00000000 00000000 00000000 00000000 00000000 00000000 00000000 00000001 [t2] - 6 00000000 00000000 00000000 00000000 00011111 11110011 11100000 00000101 [t2] - 6 00000000 00000000 00000000 00000000 00100000 01011000 11110111 00000000 [t2] - 6 00000000 00000000 00000000 00000000 00000000 00000000 00000000 00000001 [t2] - 7 00000000 00000000 00000000 00000000 00011111 11110011 11100000 00000101 [t2] - 7 00000000 00000000 00000000 00000000 00100000 01011000 11110111 00000000 [t2] - 7 00000000 00000000 00000000 00000000 00000000 00000000 00000000 00000001 [t2] - 8 00000000 00000000 00000000 00000000 00011111 11110011 11100000 00000101 [t2] - 8 00000000 00000000 00000000 00000000 00100000 01011000 11110111 00000000 [t2] - 8 00000000 00000000 00000000 00000000 00000000 00000000 00000000 00000001 [t2] - 9 00000000 00000000 00000000 00000000 00011111 11110011 11100000 00000101 [t2] - 9 00000000 00000000 00000000 00000000 00100000 01011000 11110111 00000000 [t2] - 9 00000000 00000000 00000000 00000000 00000000 00000000 00000000 00000001 [t2] - 10 00000000 00000000 00000000 00000000 00011111 11110011 11100000 00000101 [t2] - 10 00000000 00000000 00000000 00000000 00100000 01011000 11110111 00000000 [t2] - 10 00000000 00000000 00000000 00000000 00000000 00000000 00000000 00000001 [t2] - 11 00000000 00000000 00000000 00000000 00011111 11110011 11100000 00000101 [t2] - 11 00000000 00000000 00000000 00000000 00100000 01011000 11110111 00000000 [t2] - 11 00000000 00000000 00000000 00000000 00000000 00000000 00000000 00000001 [t2] - 12 00000000 00000000 00000000 00000000 00011111 11110011 11100000 00000101 [t2] - 12 00000000 00000000 00000000 00000000 00100000 01011000 11110111 00000000 [t2] - 12 00000000 00000000 00000000 00000000 00000000 00000000 00000000 00000001 [t2] - 13 00000000 00000000 00000000 00000000 00011111 11110011 11100000 00000101 [t2] - 13 00000000 00000000 00000000 00000000 00100000 01011000 11110111 00000000 [t2] - 13 00000000 00000000 00000000 00000000 00000000 00000000 00000000 00000001 [t2] - 14 00000000 00000000 00000000 00000000 00011111 11110011 11100000 00000101 [t2] - 14 00000000 00000000 00000000 00000000 00100000 01011000 11110111 00000000 [t2] - 14 00000000 00000000 00000000 00000000 00000000 00000000 00000000 00000001 [t2] - 15 00000000 00000000 00000000 00000000 00011111 11110011 11100000 00000101 [t2] - 15 00000000 00000000 00000000 00000000 00100000 01011000 11110111 00000000 [t2] - 15 00000000 00000000 00000000 00000000 00000000 00000000 00000000 00000001 [t2] - 16 00000000 00000000 00000000 00000000 00011111 11110011 11100000 00000101 [t2] - 16 00000000 00000000 00000000 00000000 00100000 01011000 11110111 00000000 [t2] - 16 00000000 00000000 00000000 00000000 00000000 00000000 00000000 00000001 [t2] - 17 00000000 00000000 00000000 00000000 00011111 11110011 11100000 00000101 [t2] - 17 00000000 00000000 00000000 00000000 00100000 01011000 11110111 00000000 [t2] - 17 00000000 00000000 00000000 00000000 00000000 00000000 00000000 00000001 [t2] - 18 00000000 00000000 00000000 00000000 00011111 11110011 11100000 00000101 [t2] - 18 00000000 00000000 00000000 00000000 00100000 01011000 11110111 00000000 [t2] - 18 00000000 00000000 00000000 00000000 00000000 00000000 00000000 00000001 [t2] - 19 00000000 00000000 00000000 00000000 00011111 11110011 11100000 00000101 [t2] - 19 00000000 00000000 00000000 00000000 00011111 11110011 11110001 00000101 [t2] - 19 00000000 00000000 00000000 00000000 00011111 11110011 11110001 00000101 [t2] - 20 00000000 00000000 00000000 00000000 00011111 11110011 11100000 00000101 [t2] - 20 00000000 00000000 00000000 00000000 00011111 11110011 11110001 00000101 [t2] - 20 00000000 00000000 00000000 00000000 00011111 11110011 11110001 00000101 [t2] - 21 00000000 00000000 00000000 00000000 00011111 11110011 11100000 00000101 [t2] - 21 00000000 00000000 00000000 00000000 00011111 11110011 11110001 00000101 [t2] - 21 00000000 00000000 00000000 00000000 00011111 11110011 11110001 00000101 [t2] - 22 00000000 00000000 00000000 00000000 00011111 11110011 11100000 00000101 [t2] - 22 00000000 00000000 00000000 00000000 00011111 11110011 11110001 00000101 [t2] - 22 00000000 00000000 00000000 00000000 00011111 11110011 11110001 00000101 [t2] - 23 00000000 00000000 00000000 00000000 00011111 11110011 11100000 00000101 [t2] - 23 00000000 00000000 00000000 00000000 00011111 11110011 11110001 00000101 [t2] - 23 00000000 00000000 00000000 00000000 00011111 11110011 11110001 00000101 [t2] - 24 00000000 00000000 00000000 00000000 00011111 11110011 11100000 00000101 [t2] - 24 00000000 00000000 00000000 00000000 00011111 11110011 11110001 00000101 [t2] - 24 00000000 00000000 00000000 00000000 00011111 11110011 11110001 00000101 [t2] - 25 00000000 00000000 00000000 00000000 00011111 11110011 11100000 00000101 [t2] - 25 00000000 00000000 00000000 00000000 00011111 11110011 11110001 00000101 [t2] - 25 00000000 00000000 00000000 00000000 00011111 11110011 11110001 00000101 [t2] - 26 00000000 00000000 00000000 00000000 00011111 11110011 11100000 00000101 [t2] - 26 00000000 00000000 00000000 00000000 00011111 11110011 11110001 00000101 [t2] - 26 00000000 00000000 00000000 00000000 00011111 11110011 11110001 00000101 [t2] - 27 00000000 00000000 00000000 00000000 00011111 11110011 11100000 00000101 [t2] - 27 00000000 00000000 00000000 00000000 00011111 11110011 11110001 00000101 [t2] - 27 00000000 00000000 00000000 00000000 00011111 11110011 11110001 00000101 [t2] - 28 00000000 00000000 00000000 00000000 00011111 11110011 11100000 00000101 [t2] - 28 00000000 00000000 00000000 00000000 00011111 11110011 11110001 00000101 [t2] - 28 00000000 00000000 00000000 00000000 00011111 11110011 11110001 00000101 [t2] - 29 00000000 00000000 00000000 00000000 00011111 11110011 11100000 00000101 [t2] - 29 00000000 00000000 00000000 00000000 00011111 11110011 11110001 00000101 [t2] - 29 00000000 00000000 00000000 00000000 00011111 11110011 11110001 00000101
批量撤销 当撤销偏向锁阈值超过 40 次后,jvm 会这样觉得,自己确实偏向错了,根本就不该偏向。于是整个类的所有对象都会变为不可偏向的,新建的对象也是不可偏向的
1 2 3 4 5 6 7 8 9 10 11 12 13 14 15 16 17 18 19 20 21 22 23 24 25 26 27 28 29 30 31 32 33 34 35 36 37 38 39 40 41 42 43 44 45 static Thread t1,t2,t3;private static void test4 () throws InterruptedException { Vector<Dog> list = new Vector <>(); int loopNumber = 39 ; t1 = new Thread (() -> { for (int i = 0 ; i < loopNumber; i++) { Dog d = new Dog (); list.add(d); synchronized (d) { log.debug(i + "\t" + ClassLayout.parseInstance(d).toPrintableSimple(true )); } } LockSupport.unpark(t2); }, "t1" ); t1.start(); t2 = new Thread (() -> { LockSupport.park(); log.debug("===============> " ); for (int i = 0 ; i < loopNumber; i++) { Dog d = list.get(i); log.debug(i + "\t" + ClassLayout.parseInstance(d).toPrintableSimple(true )); synchronized (d) { log.debug(i + "\t" + ClassLayout.parseInstance(d).toPrintableSimple(true )); } log.debug(i + "\t" + ClassLayout.parseInstance(d).toPrintableSimple(true )); } LockSupport.unpark(t3); }, "t2" ); t2.start(); t3 = new Thread (() -> { LockSupport.park(); log.debug("===============> " ); for (int i = 0 ; i < loopNumber; i++) { Dog d = list.get(i); log.debug(i + "\t" + ClassLayout.parseInstance(d).toPrintableSimple(true )); synchronized (d) { log.debug(i + "\t" + ClassLayout.parseInstance(d).toPrintableSimple(true )); } log.debug(i + "\t" + ClassLayout.parseInstance(d).toPrintableSimple(true )); } }, "t3" ); t3.start(); t3.join(); log.debug(ClassLayout.parseInstance(new Dog ()).toPrintableSimple(true )); }
参考资料https://github.com/farmerjohngit/myblog/issues/12 https://www.cnblogs.com/LemonFive/p/11246086.html https://www.cnblogs.com/LemonFive/p/11248248.html 偏向锁论文
锁消除 锁消除
1 2 3 4 5 6 7 8 9 10 11 12 13 14 15 16 17 18 19 @Fork(1) @BenchmarkMode(Mode.AverageTime) @Warmup(iterations=3) @Measurement(iterations=5) @OutputTimeUnit(TimeUnit.NANOSECONDS) public class MyBenchmark { static int x = 0 ; @Benchmark public void a () throws Exception { x++; } @Benchmark public void b () throws Exception { Object o = new Object (); synchronized (o) { x++; } } }
java -jar benchmarks.jar
1 2 3 Benchmark Mode Samples Score Score error Units c.i.MyBenchmark.a avgt 5 1.542 0.056 ns/op c.i.MyBenchmark.b avgt 5 1.518 0.091 ns/op
java -XX:-EliminateLocks -jar benchmarks.jar
1 2 3 Benchmark Mode Samples Score Score error Units c.i.MyBenchmark.a avgt 5 1.507 0.108 ns/op c.i.MyBenchmark.b avgt 5 16.976 1.572 ns/op
锁粗化
对相同对象多次加锁,导致线程发生多次重入,可以使用锁粗化方式来优化,这不同于之前讲的细分锁的粒度。
7. wait notify 7.1 小故事 - 为什么需要 wait
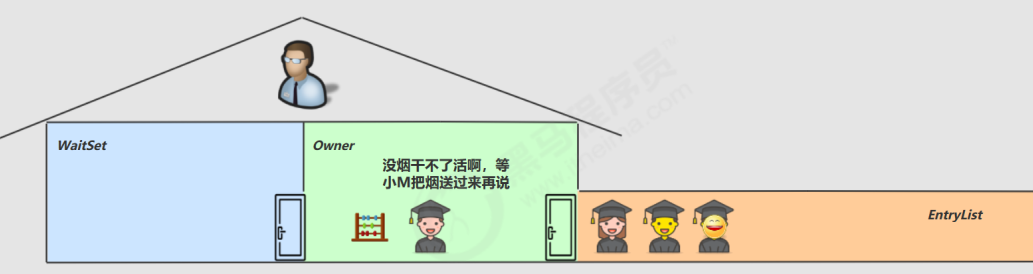
由于条件不满足,小南不能继续进行计算
但小南如果一直占用着锁,其它人就得一直阻塞,效率太低
于是老王单开了一间休息室(调用 wait 方法),让小南到休息室(WaitSet)等着去了,但这时锁释放开,其它人可以由老王随机安排进屋
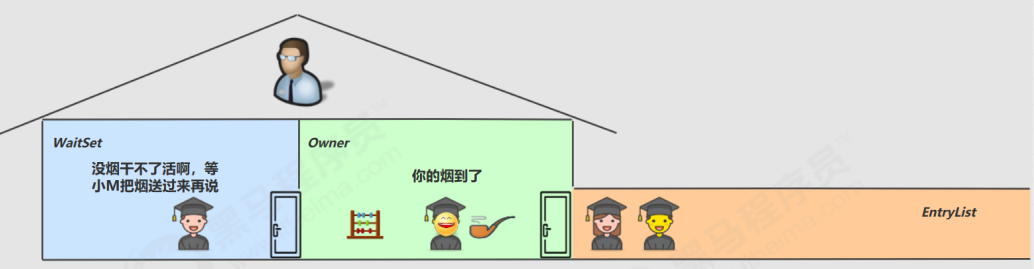
直到小M将烟送来,大叫一声 [ 你的烟到了 ] (调用 notify 方法)
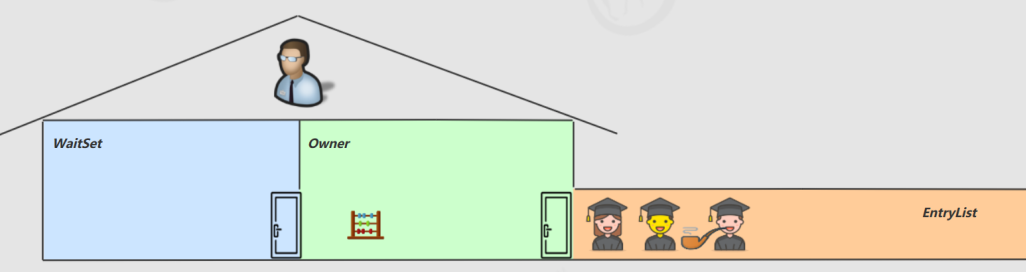
小南于是可以离开休息室,重新进入竞争锁的队列
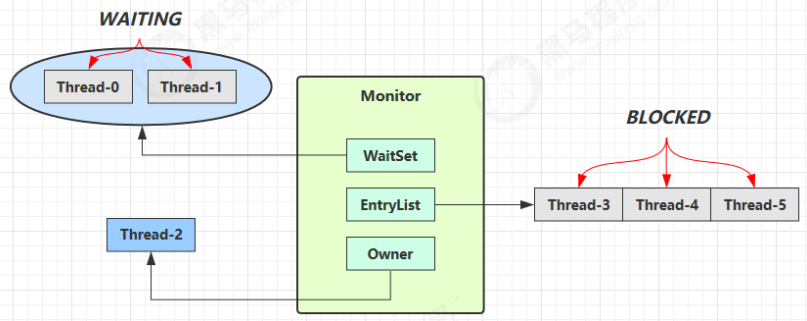
7.2 原理之 wait / notify
Owner 线程发现条件不满足,调用 wait 方法,即可进入 WaitSet 变为 WAITING 状态
BLOCKED 和 WAITING 的线程都处于阻塞状态,不占用 CPU 时间片
BLOCKED 线程会在 Owner 线程释放锁时唤醒
WAITING 线程会在 Owner 线程调用 notify 或 notifyAll 时唤醒,但唤醒后并不意味者立刻获得锁,仍需进入EntryList 重新竞争
7.3 API 介绍
obj.wait() 让进入 object 监视器的线程到 waitSet 等待obj.notify() 在 object 上正在 waitSet 等待的线程中挑一个唤醒obj.notifyAll() 让 object 上正在 waitSet 等待的线程全部唤醒
它们都是线程之间进行协作的手段,都属于 Object 对象的方法。必须获得此对象的锁,才能调用这几个方法
1 2 3 4 5 6 7 8 9 10 11 12 13 14 15 16 17 18 19 20 21 22 23 24 25 26 27 28 29 30 31 32 33 34 35 final static Object obj = new Object ();public static void main (String[] args) { new Thread (() -> { synchronized (obj) { log.debug("执行...." ); try { obj.wait(); } catch (InterruptedException e) { e.printStackTrace(); } log.debug("其它代码...." ); } }).start(); new Thread (() -> { synchronized (obj) { log.debug("执行...." ); try { obj.wait(); } catch (InterruptedException e) { e.printStackTrace(); } log.debug("其它代码...." ); } }).start(); sleep(2 ); log.debug("唤醒 obj 上其它线程" ); synchronized (obj) { obj.notify(); } }
notify 的一种结果
1 2 3 4 20 : 00 : 53.096 [Thread-0 ] c.TestWaitNotify - 执行....20 : 00 : 53.099 [Thread-1 ] c.TestWaitNotify - 执行....20 : 00 : 55.096 [main] c.TestWaitNotify - 唤醒 obj 上其它线程20 : 00 : 55.096 [Thread-0 ] c.TestWaitNotify - 其它代码....
notifyAll 的结果
1 2 3 4 5 19 : 58 : 15.457 [Thread-0 ] c.TestWaitNotify - 执行....19 : 58 : 15.460 [Thread-1 ] c.TestWaitNotify - 执行....19 : 58 : 17.456 [main] c.TestWaitNotify - 唤醒 obj 上其它线程19 : 58 : 17.456 [Thread-1 ] c.TestWaitNotify - 其它代码....19 : 58 : 17.456 [Thread-0 ] c.TestWaitNotify - 其它代码....
wait() 方法会释放对象的锁,进入 WaitSet 等待区,从而让其他线程就机会获取对象的锁。无限制等待,直到
wait(long n) 有时限的等待, 到 n 毫秒后结束等待,或是被 notify
8. wait notify 正确姿势 开始之前先看看
8.1 sleep(long n) 和 wait(long n) 的区别
sleep 是 Thread 方法,而 wait 是 Object 的方法 sleep 不需要强制和 synchronized 配合使用,但 wait 需要和 synchronized 一起用 sleep 在睡眠的同时,不会释放对象锁的,但 wait 在等待的时候会释放对象锁 它们状态 TIMED_WAITING
step1 1 2 3 static final Object room = new Object ();static boolean hasCigarette = false ;static boolean hasTakeout = false ;
思考下面的解决方案好不好,为什么?
1 2 3 4 5 6 7 8 9 10 11 12 13 14 15 16 17 18 19 20 21 22 23 24 25 26 new Thread (() -> { synchronized (room) { log.debug("有烟没?[{}]" , hasCigarette); if (!hasCigarette) { log.debug("没烟,先歇会!" ); sleep(2 ); } log.debug("有烟没?[{}]" , hasCigarette); if (hasCigarette) { log.debug("可以开始干活了" ); } } }, "小南" ).start(); for (int i = 0 ; i < 5 ; i++) { new Thread (() -> { synchronized (room) { log.debug("可以开始干活了" ); } }, "其它人" ).start(); } sleep(1 ); new Thread (() -> { hasCigarette = true ; log.debug("烟到了噢!" ); }, "送烟的" ).start();
输出
1 2 3 4 5 6 7 8 9 10 20 : 49 : 49.883 [小南] c.TestCorrectPosture - 有烟没?[false ]20 : 49 : 49.887 [小南] c.TestCorrectPosture - 没烟,先歇会!20 : 49 : 50.882 [送烟的] c.TestCorrectPosture - 烟到了噢!20 : 49 : 51.887 [小南] c.TestCorrectPosture - 有烟没?[true ]20 : 49 : 51.887 [小南] c.TestCorrectPosture - 可以开始干活了20 : 49 : 51.887 [其它人] c.TestCorrectPosture - 可以开始干活了20 : 49 : 51.887 [其它人] c.TestCorrectPosture - 可以开始干活了20 : 49 : 51.888 [其它人] c.TestCorrectPosture - 可以开始干活了20 : 49 : 51.888 [其它人] c.TestCorrectPosture - 可以开始干活了20 : 49 : 51.888 [其它人] c.TestCorrectPosture - 可以开始干活了
其它干活的线程,都要一直阻塞,效率太低
小南线程必须睡足 2s 后才能醒来,就算烟提前送到,也无法立刻醒来
加了 synchronized (room) 后,就好比小南在里面反锁了门睡觉,烟根本没法送进门,main 没加
synchronized 就好像 main 线程是翻窗户进来的解决方法,使用 wait - notify 机制
step2 思考下面的实现行吗,为什么?
1 2 3 4 5 6 7 8 9 10 11 12 13 14 15 16 17 18 19 20 21 22 23 24 25 26 27 28 29 30 31 32 33 34 new Thread (() -> { synchronized (room) { log.debug("有烟没?[{}]" , hasCigarette); if (!hasCigarette) { log.debug("没烟,先歇会!" ); try { room.wait(2000 ); } catch (InterruptedException e) { e.printStackTrace(); } } log.debug("有烟没?[{}]" , hasCigarette); if (hasCigarette) { log.debug("可以开始干活了" ); } } }, "小南" ).start() for (int i = 0 ; i < 5 ; i++) { new Thread (() -> { synchronized (room) { log.debug("可以开始干活了" ); } }, "其它人" ).start(); } sleep(1 ); new Thread (() -> { synchronized (room) { hasCigarette = true ; log.debug("烟到了噢!" ); room.notify(); } }, "送烟的" ).start();
输出
1 2 3 4 5 6 7 8 9 10 20 : 51 : 42.489 [小南] c.TestCorrectPosture - 有烟没?[false ]20 : 51 : 42.493 [小南] c.TestCorrectPosture - 没烟,先歇会!20 : 51 : 42.493 [其它人] c.TestCorrectPosture - 可以开始干活了20 : 51 : 42.493 [其它人] c.TestCorrectPosture - 可以开始干活了20 : 51 : 42.494 [其它人] c.TestCorrectPosture - 可以开始干活了20 : 51 : 42.494 [其它人] c.TestCorrectPosture - 可以开始干活了20 : 51 : 42.494 [其它人] c.TestCorrectPosture - 可以开始干活了20 : 51 : 43.490 [送烟的] c.TestCorrectPosture - 烟到了噢!20 : 51 : 43.490 [小南] c.TestCorrectPosture - 有烟没?[true ]20 : 51 : 43.490 [小南] c.TestCorrectPosture - 可以开始干活了
解决了其它干活的线程阻塞的问题
但如果有其它线程也在等待条件呢?
step3 1 2 3 4 5 6 7 8 9 10 11 12 13 14 15 16 17 18 19 20 21 22 23 24 25 26 27 28 29 30 31 32 33 34 35 36 37 38 39 40 41 42 43 44 45 46 47 48 49 new Thread (() -> { synchronized (room) { log.debug("有烟没?[{}]" , hasCigarette); if (!hasCigarette) { log.debug("没烟,先歇会!" ); try { room.wait(); } catch (InterruptedException e) { e.printStackTrace(); } } log.debug("有烟没?[{}]" , hasCigarette); if (hasCigarette) { log.debug("可以开始干活了" ); } else { log.debug("没干成活..." ); } } }, "小南" ).start(); new Thread (() -> { synchronized (room) { Thread thread = Thread.currentThread(); log.debug("外卖送到没?[{}]" , hasTakeout); if (!hasTakeout) { log.debug("没外卖,先歇会!" ); try { room.wait(); } catch (InterruptedException e) { e.printStackTrace(); } } log.debug("外卖送到没?[{}]" , hasTakeout); if (hasTakeout) { log.debug("可以开始干活了" ); } else { log.debug("没干成活..." ); } } }, "小女" ).start(); sleep(1 ); new Thread (() -> { synchronized (room) { hasTakeout = true ; log.debug("外卖到了噢!" ); room.notify(); } }, "送外卖的" ).start();
输出
1 2 3 4 5 6 7 20 : 53 : 12.173 [小南] c.TestCorrectPosture - 有烟没?[false ]20 : 53 : 12.176 [小南] c.TestCorrectPosture - 没烟,先歇会!20 : 53 : 12.176 [小女] c.TestCorrectPosture - 外卖送到没?[false ]20 : 53 : 12.176 [小女] c.TestCorrectPosture - 没外卖,先歇会!20 : 53 : 13.174 [送外卖的] c.TestCorrectPosture - 外卖到了噢!20 : 53 : 13.174 [小南] c.TestCorrectPosture - 有烟没?[false ]20 : 53 : 13.174 [小南] c.TestCorrectPosture - 没干成活...
notify 只能随机唤醒一个 WaitSet 中的线程,这时如果有其它线程也在等待,那么就可能唤醒不了正确的线程,称之为【虚假唤醒】
解决方法,改为 notifyAll
step4 1 2 3 4 5 6 7 new Thread (() -> {synchronized (room) { hasTakeout = true ; log.debug("外卖到了噢!" ); room.notifyAll(); } }, "送外卖的" ).start();
输出
1 2 3 4 5 6 7 8 9 20 : 55 : 23.978 [小南] c.TestCorrectPosture - 有烟没?[false ]20 : 55 : 23.982 [小南] c.TestCorrectPosture - 没烟,先歇会!20 : 55 : 23.982 [小女] c.TestCorrectPosture - 外卖送到没?[false ]20 : 55 : 23.982 [小女] c.TestCorrectPosture - 没外卖,先歇会!20 : 55 : 24.979 [送外卖的] c.TestCorrectPosture - 外卖到了噢!20 : 55 : 24.979 [小女] c.TestCorrectPosture - 外卖送到没?[true ]20 : 55 : 24.980 [小女] c.TestCorrectPosture - 可以开始干活了20 : 55 : 24.980 [小南] c.TestCorrectPosture - 有烟没?[false ]20 : 55 : 24.980 [小南] c.TestCorrectPosture - 没干成活...
用 notifyAll 仅解决某个线程的唤醒问题,但使用 if + wait 判断仅有一次机会,一旦条件不成立,就没有重新判断的机会了
解决方法,用 while + wait,当条件不成立,再次 wait
step5 将 if 改为 while
1 2 3 4 5 6 7 8 if (!hasCigarette) { log.debug("没烟,先歇会!" ); try { room.wait(); } catch (InterruptedException e) { e.printStackTrace(); } }
改动后
1 2 3 4 5 6 7 8 while (!hasCigarette) { log.debug("没烟,先歇会!" ); try { room.wait(); } catch (InterruptedException e) { e.printStackTrace(); } }
输出
1 2 3 4 5 6 7 8 20 : 58 : 34.322 [小南] c.TestCorrectPosture - 有烟没?[false ]20 : 58 : 34.326 [小南] c.TestCorrectPosture - 没烟,先歇会!20 : 58 : 34.326 [小女] c.TestCorrectPosture - 外卖送到没?[false ]20 : 58 : 34.326 [小女] c.TestCorrectPosture - 没外卖,先歇会!20 : 58 : 35.323 [送外卖的] c.TestCorrectPosture - 外卖到了噢!20 : 58 : 35.324 [小女] c.TestCorrectPosture - 外卖送到没?[true ]20 : 58 : 35.324 [小女] c.TestCorrectPosture - 可以开始干活了20 : 58 : 35.324 [小南] c.TestCorrectPosture - 没烟,先歇会!
1 2 3 4 5 6 7 8 9 10 11 synchronized (lock) { while (条件不成立) { lock.wait(); } } synchronized (lock) { lock.notifyAll(); }
同步模式之保护性暂停 定义 要点
与前面的保护性暂停中的 GuardObject 不同,不需要产生结果和消费结果的线程一一对应
消费队列可以用来平衡生产和消费的线程资源
生产者仅负责产生结果数据,不关心数据该如何处理,而消费者专心处理结果数据
消息队列是有容量限制的,满时不会再加入数据,空时不会再消耗数据
JDK 中各种阻塞队列,采用的就是这种模式
实现 1 2 3 4 5 6 7 8 9 10 11 12 13 14 15 16 17 18 19 20 21 22 23 24 class GuardedObject { private Object response; private final Object lock = new Object (); public Object get () { synchronized (lock) { while (response == null ) { try { lock.wait(); } catch (InterruptedException e) { e.printStackTrace(); } } return response; } } public void complete (Object response) { synchronized (lock) { this .response = response; lock.notifyAll(); } } }
应用 一个线程等待另一个线程的执行结果
1 2 3 4 5 6 7 8 9 10 11 12 13 14 15 16 17 18 public static void main (String[] args) { GuardedObject guardedObject = new GuardedObject (); new Thread (() -> { try { List<String> response = download(); log.debug("download complete..." ); guardedObject.complete(response); } catch (IOException e) { e.printStackTrace(); } }).start(); log.debug("waiting..." ); Object response = guardedObject.get(); log.debug("get response: [{}] lines" , ((List<String>) response).size()); }
执行结果
1 2 3 08: 42 : 18.568 [main] c.TestGuardedObject - waiting... 08: 42 : 23.312 [Thread-0 ] c.TestGuardedObject - download complete... 08: 42 : 23.312 [main] c.TestGuardedObject - get response: [3 ] lines
带超时版 GuarderObject 如果要控制超时时间呢
1 2 3 4 5 6 7 8 9 10 11 12 13 14 15 16 17 18 19 20 21 22 23 24 25 26 27 28 29 30 31 32 33 34 35 36 37 38 39 40 41 class GuardedObjectV2 { private Object response; private final Object lock = new Object (); public Object get (long millis) { synchronized (lock) { long begin = System.currentTimeMillis(); long timePassed = 0 ; while (response == null ) { long waitTime = millis - timePassed; log.debug("waitTime: {}" , waitTime); if (waitTime <= 0 ) { log.debug("break..." ); break ; } try { lock.wait(waitTime); } catch (InterruptedException e) { e.printStackTrace(); } timePassed = System.currentTimeMillis() - begin; log.debug("timePassed: {}, object is null {}" , timePassed, response == null ); } return response; } } public void complete (Object response) { synchronized (lock) { this .response = response; log.debug("notify..." ); lock.notifyAll(); } } }
测试,没有超时
1 2 3 4 5 6 7 8 9 10 11 12 13 14 15 public static void main (String[] args) { GuardedObjectV2 v2 = new GuardedObjectV2 (); new Thread (() -> { sleep(1 ); v2.complete(null ); sleep(1 ); v2.complete(Arrays.asList("a" , "b" , "c" )); }).start(); Object response = v2.get(2500 ); if (response != null ) { log.debug("get response: [{}] lines" , ((List<String>) response).size()); } else { log.debug("can't get response" ); } }
输出
1 2 3 4 5 6 7 08: 49 : 39.917 [main] c.GuardedObjectV2 - waitTime: 2500 08: 49 : 40.917 [Thread-0 ] c.GuardedObjectV2 - notify... 08: 49 : 40.917 [main] c.GuardedObjectV2 - timePassed: 1003 , object is null true 08: 49 : 40.917 [main] c.GuardedObjectV2 - waitTime: 1497 08: 49 : 41.918 [Thread-0 ] c.GuardedObjectV2 - notify... 08: 49 : 41.918 [main] c.GuardedObjectV2 - timePassed: 2004 , object is null false 08: 49 : 41.918 [main] c.TestGuardedObjectV2 - get response: [3 ] lines
测试,超时
1 2 List<String> lines = v2.get(1500 );
输出
1 2 3 4 5 6 7 8 9 08: 47 : 54.963 [main] c.GuardedObjectV2 - waitTime: 1500 08: 47 : 55.963 [Thread-0 ] c.GuardedObjectV2 - notify... 08: 47 : 55.963 [main] c.GuardedObjectV2 - timePassed: 1002 , object is null true 08: 47 : 55.963 [main] c.GuardedObjectV2 - waitTime: 498 08: 47 : 56.461 [main] c.GuardedObjectV2 - timePassed: 1500 , object is null true 08: 47 : 56.461 [main] c.GuardedObjectV2 - waitTime: 0 08: 47 : 56.461 [main] c.GuardedObjectV2 - break ... 08: 47 : 56.461 [main] c.TestGuardedObjectV2 - can't get response 08:47:56.963 [Thread-0] c.GuardedObjectV2 - notify...
原理之 join 是调用者轮询检查线程 alive 状态
等价于下面的代码
1 2 3 4 5 6 synchronized (t1) { while (t1.isAlive()) { t1.wait(0 ); } }
注意
join 体现的是【保护性暂停】模式,请参考之
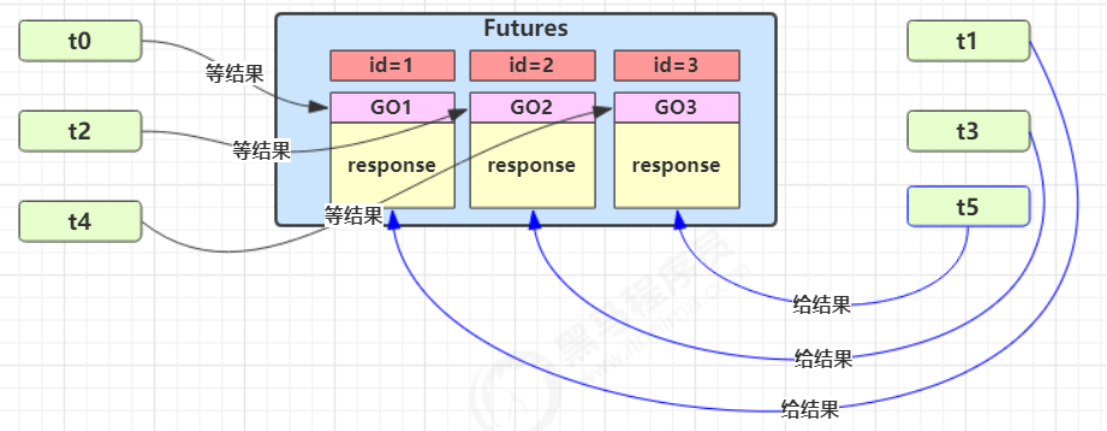
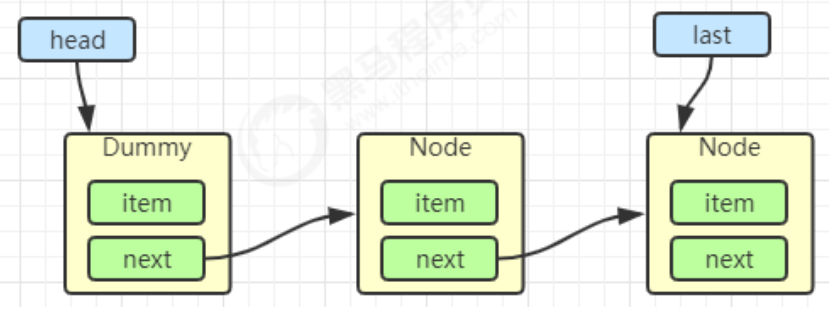
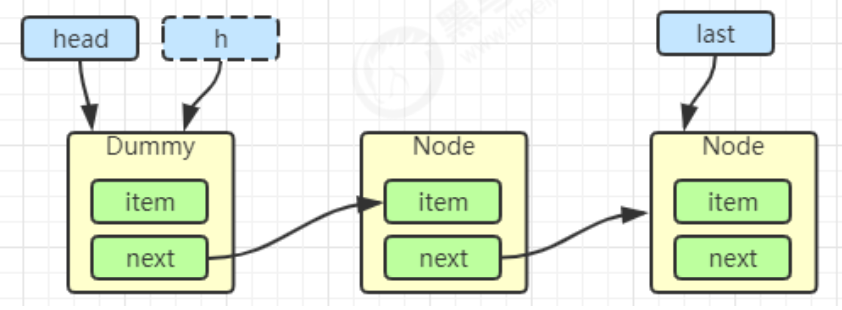
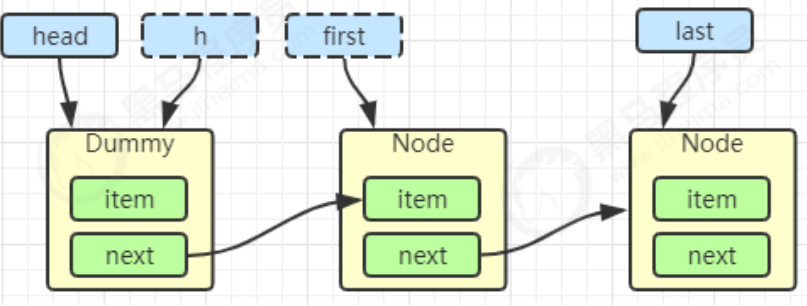
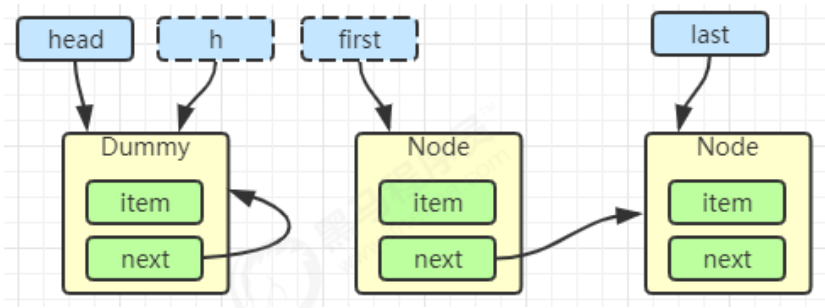
多任务版 GuarderObject 图中 Futures 就好比居民楼一层的信箱(每个信箱有房间编号),左侧的 t0,t2,t4 就好比等待邮件的居民,右侧的 t1,t3,t5 就好比邮递员
如果需要在多个类之间使用 GuardedObject 对象,作为参数传递不是很方便,因此设计一个用来解耦的中间类,这样不仅能够解耦【结果等待者】和【结果生产者】,还能够同时支持多个任务的管理
新增 id 用来标识 Guarded Object
1 2 3 4 5 6 7 8 9 10 11 12 13 14 15 16 17 18 19 20 21 22 23 24 25 26 27 28 29 30 31 32 33 34 35 36 37 38 39 40 41 42 43 44 45 46 47 48 49 50 51 class GuardedObject { private int id; public GuardedObject (int id) { this .id = id; } public int getId () { return id; } private Object response; public Object get (long timeout) { synchronized (this ) { long begin = System.currentTimeMillis(); long passedTime = 0 ; while (response == null ) { long waitTime = timeout - passedTime; if (timeout - passedTime <= 0 ) { break ; } try { this .wait(waitTime); } catch (InterruptedException e) { e.printStackTrace(); } passedTime = System.currentTimeMillis() - begin; } return response; } } public void complete (Object response) { synchronized (this ) { this .response = response; this .notifyAll(); } } }
中间解耦类
1 2 3 4 5 6 7 8 9 10 11 12 13 14 15 16 17 18 19 20 21 22 23 class Mailboxes { private static Map<Integer, GuardedObject> boxes = new Hashtable <>(); private static int id = 1 ; private static synchronized int generateId () { return id++; } public static GuardedObject getGuardedObject (int id) { return boxes.remove(id); } public static GuardedObject createGuardedObject () { GuardedObject go = new GuardedObject (generateId()); boxes.put(go.getId(), go); return go; } public static Set<Integer> getIds () { return boxes.keySet(); } }
业务相关类
1 2 3 4 5 6 7 8 9 10 class People extends Thread { @Override public void run () { GuardedObject guardedObject = Mailboxes.createGuardedObject(); log.debug("开始收信 id:{}" , guardedObject.getId()); Object mail = guardedObject.get(5000 ); log.debug("收到信 id:{}, 内容:{}" , guardedObject.getId(), mail); } }
1 2 3 4 5 6 7 8 9 10 11 12 13 14 15 16 class Postman extends Thread { private int id; private String mail; public Postman (int id, String mail) { this .id = id; this .mail = mail; } @Override public void run () { GuardedObject guardedObject = Mailboxes.getGuardedObject(id); log.debug("送信 id:{}, 内容:{}" , id, mail); guardedObject.complete(mail); } }
测试
1 2 3 4 5 6 7 8 9 10 public static void main (String[] args) throws InterruptedException { for (int i = 0 ; i < 3 ; i++) { new People ().start(); } Sleeper.sleep(1 ); for (Integer id : Mailboxes.getIds()) { new Postman (id, "内容" + id).start(); } }
某次运行结果
1 2 3 4 5 6 7 8 9 10 : 35 : 05 .689 c.People [Thread-1 ] - 开始收信 id: 3 10 : 35 : 05 .689 c.People [Thread-2 ] - 开始收信 id: 1 10 : 35 : 05 .689 c.People [Thread-0 ] - 开始收信 id: 2 10 : 35 : 06 .688 c.Postman [Thread-4 ] - 送信 id: 2 , 内容: 内容2 10 : 35 : 06 .688 c.Postman [Thread-5 ] - 送信 id: 1 , 内容: 内容1 10 : 35 : 06 .688 c.People [Thread-0 ] - 收到信 id: 2 , 内容: 内容2 10 : 35 : 06 .688 c.People [Thread-2 ] - 收到信 id: 1 , 内容: 内容1 10 : 35 : 06 .688 c.Postman [Thread-3 ] - 送信 id: 3 , 内容: 内容3 10 : 35 : 06 .689 c.People [Thread-1 ] - 收到信 id: 3 , 内容: 内容3
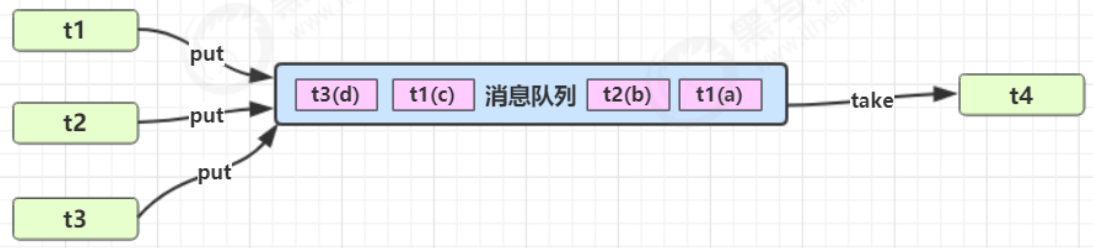
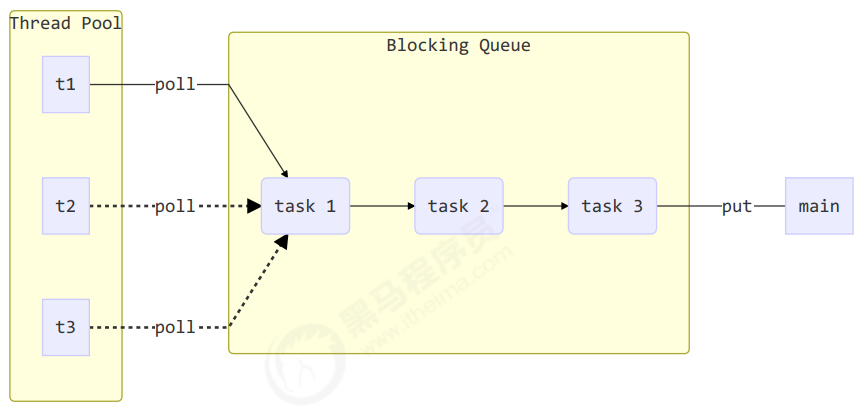
异步模式之生产者/消费者 定义 要点
与前面的保护性暂停中的 GuardObject 不同,不需要产生结果和消费结果的线程一一对应
消费队列可以用来平衡生产和消费的线程资源
生产者仅负责产生结果数据,不关心数据该如何处理,而消费者专心处理结果数据
消息队列是有容量限制的,满时不会再加入数据,空时不会再消耗数据
JDK 中各种阻塞队列,采用的就是这种模式
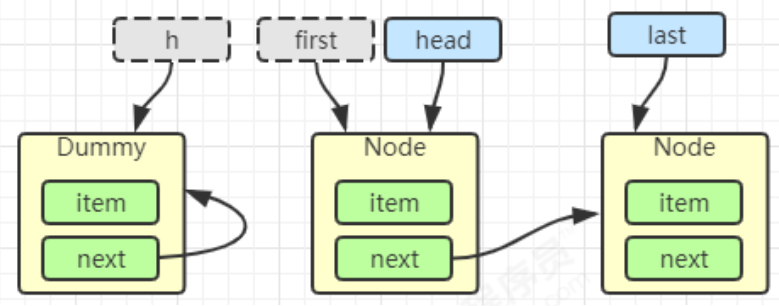
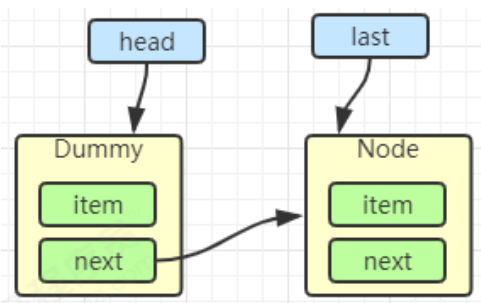
实现 1 2 3 4 5 6 7 8 9 10 11 12 13 14 15 16 17 18 19 20 21 22 23 24 25 26 27 28 29 30 31 32 33 34 35 36 37 38 39 40 41 42 43 44 45 46 47 48 49 50 51 52 53 54 55 56 57 58 59 class Message { private int id; private Object message; public Message (int id, Object message) { this .id = id; this .message = message; } public int getId () { return id; } public Object getMessage () { return message; } } class MessageQueue { private LinkedList<Message> queue; private int capacity; public MessageQueue (int capacity) { this .capacity = capacity; queue = new LinkedList <>(); } public Message take () { synchronized (queue) { while (queue.isEmpty()) { log.debug("没货了, wait" ); try { queue.wait(); } catch (InterruptedException e) { e.printStackTrace(); } } Message message = queue.removeFirst(); queue.notifyAll(); return message; } } public void put (Message message) { synchronized (queue) { while (queue.size() == capacity) { log.debug("库存已达上限, wait" ); try { queue.wait(); } catch (InterruptedException e) { e.printStackTrace(); } } queue.addLast(message); queue.notifyAll(); } } }
应用 1 2 3 4 5 6 7 8 9 10 11 12 13 14 15 16 17 18 19 20 21 22 23 24 25 MessageQueue messageQueue = new MessageQueue (2 );for (int i = 0 ; i < 4 ; i++) { int id = i; new Thread (() -> { try { log.debug("download..." ); List<String> response = Downloader.download(); log.debug("try put message({})" , id); messageQueue.put(new Message (id, response)); } catch (IOException e) { e.printStackTrace(); } }, "生产者" + i).start(); } new Thread (() -> { while (true ) { Message message = messageQueue.take(); List<String> response = (List<String>) message.getMessage(); log.debug("take message({}): [{}] lines" , message.getId(), response.size()); } }, "消费者" ).start();
某次运行结果
1 2 3 4 5 6 7 8 9 10 11 12 13 14 15 16 17 18 10 : 48 : 38.070 [生产者3 ] c.TestProducerConsumer - download...10 : 48 : 38.070 [生产者0 ] c.TestProducerConsumer - download...10 : 48 : 38.070 [消费者] c.MessageQueue - 没货了, wait10 : 48 : 38.070 [生产者1 ] c.TestProducerConsumer - download...10 : 48 : 38.070 [生产者2 ] c.TestProducerConsumer - download...10 : 48 : 41.236 [生产者1 ] c.TestProducerConsumer - try put message(1 )10 : 48 : 41.237 [生产者2 ] c.TestProducerConsumer - try put message(2 )10 : 48 : 41.236 [生产者0 ] c.TestProducerConsumer - try put message(0 )10 : 48 : 41.237 [生产者3 ] c.TestProducerConsumer - try put message(3 )10 : 48 : 41.239 [生产者2 ] c.MessageQueue - 库存已达上限, wait10 : 48 : 41.240 [生产者1 ] c.MessageQueue - 库存已达上限, wait10 : 48 : 41.240 [消费者] c.TestProducerConsumer - take message(0 ): [3 ] lines 10 : 48 : 41.240 [生产者2 ] c.MessageQueue - 库存已达上限, wait10 : 48 : 41.240 [消费者] c.TestProducerConsumer - take message(3 ): [3 ] lines10 : 48 : 41.240 [消费者] c.TestProducerConsumer - take message(1 ): [3 ] lines10 : 48 : 41.240 [消费者] c.TestProducerConsumer - take message(2 ): [3 ] lines10 : 48 : 41.240 [消费者] c.MessageQueue - 没货了, wait
9. Park & Unpark 9.1 基本使用 它们是 LockSupport 类中的方法
1 2 3 4 LockSupport.park(); LockSupport.unpark(暂停线程对象)
先 park 再 unpark
1 2 3 4 5 6 7 8 9 10 11 Thread t1 = new Thread (() -> { log.debug("start..." ); sleep(1 ); log.debug("park..." ); LockSupport.park(); log.debug("resume..." ); },"t1" ); t1.start(); sleep(2 ); log.debug("unpark..." ); LockSupport.unpark(t1);
输出
1 2 3 4 18 : 42 : 52.585 c.TestParkUnpark [t1] - start...18 : 42 : 53.589 c.TestParkUnpark [t1] - park...18 : 42 : 54.583 c.TestParkUnpark [main] - unpark...18 : 42 : 54.583 c.TestParkUnpark [t1] - resume...
先 unpark 再 park
1 2 3 4 5 6 7 8 9 10 11 Thread t1 = new Thread (() -> { log.debug("start..." ); sleep(2 ); log.debug("park..." ); LockSupport.park(); log.debug("resume..." ); }, "t1" ); t1.start(); sleep(1 ); log.debug("unpark..." ); LockSupport.unpark(t1);
输出
1 2 3 4 18 : 43 : 50.765 c.TestParkUnpark [t1] - start...18 : 43 : 51.764 c.TestParkUnpark [main] - unpark...18 : 43 : 52.769 c.TestParkUnpark [t1] - park...18 : 43 : 52.769 c.TestParkUnpark [t1] - resume...
9.2 特点 与 Object 的 wait & notify 相比
wait,notify 和 notifyAll 必须配合 Object Monitor 一起使用,而 park,unpark 不必
park & unpark 是以线程为单位来【阻塞】和【唤醒】线程,而 notify 只能随机唤醒一个等待线程,notifyAll是唤醒所有等待线程,就不那么【精确】
park & unpark 可以先 unpark,而 wait & notify 不能先 notify
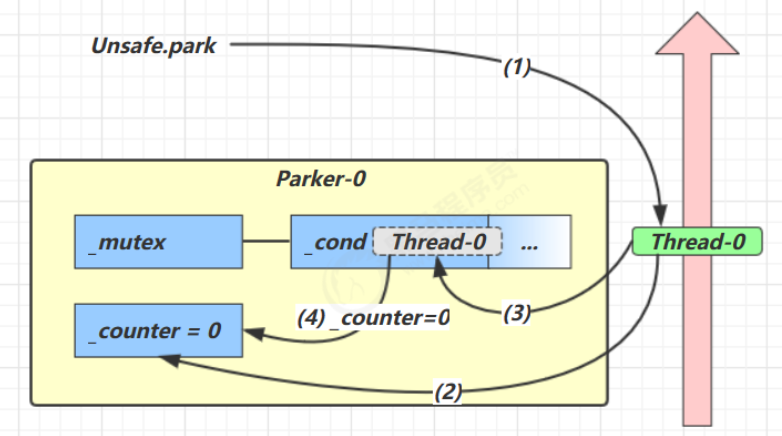
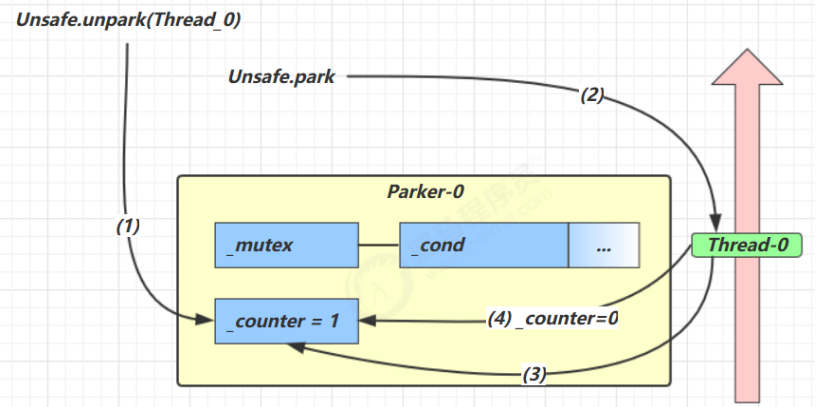
9.3 原理之 park & unpark 每个线程都有自己的一个 Parker 对象,由三部分组成 _counter , _cond 和 _mutex 打个比喻
线程就像一个旅人,Parker 就像他随身携带的背包,条件变量就好比背包中的帐篷。_counter 就好比背包中的备用干粮(0 为耗尽,1 为充足)
调用 park 就是要看需不需要停下来歇息
如果备用干粮耗尽,那么钻进帐篷歇息(park之前没有unpark)
如果备用干粮充足,那么不需停留,继续前进 (park之前有unpark)
调用 unpark,就好比令干粮充足
如果这时线程还在帐篷,就唤醒让他继续前进 (park之后有unpark)
如果这时线程还在运行,那么下次他调用 park 时,仅是消耗掉备用干粮,不需停留,继续前进
因为背包空间有限,多次调用 unpark 仅会补充一份备用干粮 (park之前有多次unpark,只对首个park起作用)
当前线程调用 Unsafe.park() 方法
检查 _counter ,本情况为 0,这时,获得 _mutex 互斥锁
线程进入 _cond 条件变量阻塞
设置 _counter = 0
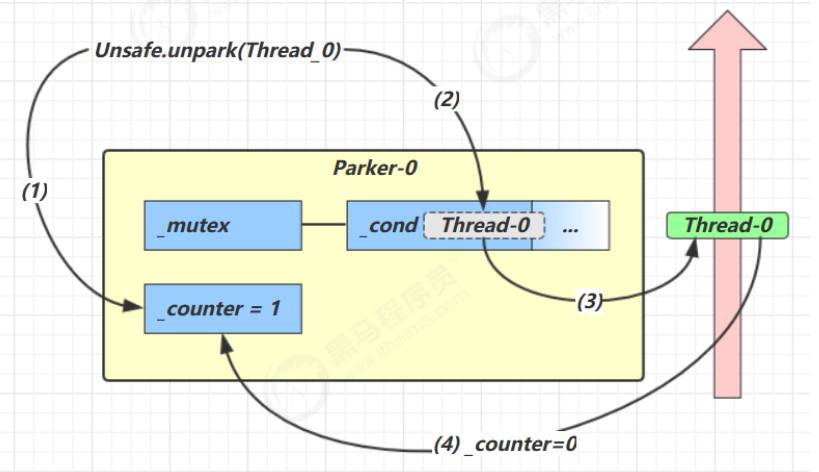
调用 Unsafe.unpark(Thread_0) 方法,设置 _counter 为 1
唤醒 _cond 条件变量中的 Thread_0
Thread_0 恢复运行
设置 _counter 为 0
调用 Unsafe.unpark(Thread_0) 方法,设置 _counter 为 1
当前线程调用 Unsafe.park() 方法
检查 _counter ,本情况为 1,这时线程无需阻塞,继续运行
设置 _counter 为 0
10. 重新理解线程状态转换
假设有线程 Thread t
情况 1 NEW --> RUNNABLE
当调用 t.start() 方法时,由 NEW --> RUNNABLE
情况 2 RUNNABLE <--> WAITING t 线程用 synchronized(obj) 获取了对象锁后
调用 obj.wait() 方法时,t 线程从 RUNNABLE --> WAITING
调用 obj.notify() , obj.notifyAll() , t.interrupt() 时
竞争锁成功,t 线程从 WAITING --> RUNNABLE
竞争锁失败,t 线程从 WAITING --> BLOCKED
1 2 3 4 5 6 7 8 9 10 11 12 13 14 15 16 17 18 19 20 21 22 23 24 25 26 27 28 29 30 31 32 public class TestWaitNotify { final static Object obj = new Object (); public static void main (String[] args) { new Thread (() -> { synchronized (obj) { log.debug("执行...." ); try { obj.wait(); } catch (InterruptedException e) { e.printStackTrace(); } log.debug("其它代码...." ); } },"t1" ).start(); new Thread (() -> { synchronized (obj) { log.debug("执行...." ); try { obj.wait(); } catch (InterruptedException e) { e.printStackTrace(); } log.debug("其它代码...." ); } },"t2" ).start(); sleep(0.5 ); log.debug("唤醒 obj 上其它线程" ); synchronized (obj) { obj.notifyAll(); } } }
情况 3 RUNNABLE <--> WAITING
当前线程调用 t.join() 方法时,当前线程从 RUNNABLE --> WAITING
t 线程运行结束,或调用了当前线程的 interrupt() 时,当前线程从 WAITING --> RUNNABLE
情况 4 RUNNABLE <--> WAITING
当前线程调用 LockSupport.park() 方法会让当前线程从 RUNNABLE --> WAITING
调用 LockSupport.unpark(目标线程) 或调用了线程 的 interrupt() ,会让目标线程从 WAITING -->RUNNABLE
情况 5 RUNNABLE <--> TIMED_WAITING t 线程用 synchronized(obj) 获取了对象锁后
调用 obj.wait(long n) 方法时,t 线程从 RUNNABLE --> TIMED_WAITING
t 线程等待时间超过了 n 毫秒,或调用 obj.notify() , obj.notifyAll() , t.interrupt() 时
竞争锁成功,t 线程从 TIMED_WAITING --> RUNNABLE
竞争锁失败,t 线程从 TIMED_WAITING --> BLOCKED
情况 6 RUNNABLE <--> TIMED_WAITING
当前线程调用 t.join(long n) 方法时,当前线程从 RUNNABLE --> TIMED_WAITING
当前线程等待时间超过了 n 毫秒,或t 线程运行结束,或调用了当前线程的 interrupt() 时,当前线程从TIMED_WAITING --> RUNNABLE
情况 7 RUNNABLE <--> TIMED_WAITING
当前线程调用 Thread.sleep(long n) ,当前线程从 RUNNABLE --> TIMED_WAITING
当前线程等待时间超过了 n 毫秒,当前线程从 TIMED_WAITING --> RUNNABLE
情况 8 RUNNABLE <--> TIMED_WAITING
当前线程调用 LockSupport.parkNanos(long nanos) 或 LockSupport.parkUntil(long millis) 时,当前线程从 RUNNABLE --> TIMED_WAITING
调用 LockSupport.unpark(目标线程) 或调用了线程 的 interrupt() ,或是等待超时,会让目标线程从TIMED_WAITING--> RUNNABLE
情况 9 RUNNABLE <--> BLOCKED
t 线程用 synchronized(obj) 获取了对象锁时如果竞争失败,从 RUNNABLE --> BLOCKED
持 obj 锁线程的同步代码块执行完毕,会唤醒该对象上所有 BLOCKED 的线程重新竞争,如果其中 t 线程竞争成功,从 BLOCKED --> RUNNABLE ,其它失败的线程仍然 BLOCKED
情况 10 RUNNABLE <–> TERMINATED 当前线程所有代码运行完毕,进入 TERMINATED
11. 多把锁 11.1 多把不相干的锁 一间大屋子有两个功能:睡觉、学习,互不相干。
现在小南要学习,小女要睡觉,但如果只用一间屋子(一个对象锁)的话,那么并发度很低
解决方法是准备多个房间(多个对象锁)
例如
1 2 3 4 5 6 7 8 9 10 11 12 13 14 class BigRoom { public void sleep () { synchronized (this ) { log.debug("sleeping 2 小时" ); Sleeper.sleep(2 ); } } public void study () { synchronized (this ) { log.debug("study 1 小时" ); Sleeper.sleep(1 ); } } }
执行
1 2 3 4 5 6 7 BigRoom bigRoom = new BigRoom ();new Thread (() -> { bigRoom.compute(); },"小南" ).start(); new Thread (() -> { bigRoom.sleep(); },"小女" ).start();
某次结果
1 2 12 : 13 : 54.471 [小南] c.BigRoom - study 1 小时12 : 13 : 55.476 [小女] c.BigRoom - sleeping 2 小时
改进
1 2 3 4 5 6 7 8 9 10 11 12 13 14 15 16 17 18 19 class BigRoom { private final Object studyRoom = new Object (); private final Object bedRoom = new Object (); public void sleep () { synchronized (bedRoom) { log.debug("sleeping 2 小时" ); Sleeper.sleep(2 ); } } public void study () { synchronized (studyRoom) { log.debug("study 1 小时" ); Sleeper.sleep(1 ); } } }
某次执行结果
1 2 12 : 15 : 35.069 [小南] c.BigRoom - study 1 小时12 : 15 : 35.069 [小女] c.BigRoom - sleeping 2 小时
将锁的粒度细分
好处,是可以增强并发度
坏处,如果一个线程需要同时获得多把锁,就容易发生死锁
12. 活跃性 12.1 死锁 有这样的情况:一个线程需要同时获取多把锁,这时就容易发生死锁
t1 线程 获得 A对象 锁,接下来想获取 B对象 的锁
t2 线程 获得 B对象 锁,接下来想获取 A对象 的锁 、
例:
1 2 3 4 5 6 7 8 9 10 11 12 13 14 15 16 17 18 19 20 21 22 23 24 25 26 27 Object A = new Object ();Object B = new Object ();Thread t1 = new Thread (() -> { synchronized (A) { log.debug("lock A" ); sleep(1 ); synchronized (B) { log.debug("lock B" ); log.debug("操作..." ); } } }, "t1" ); Thread t2 = new Thread (() -> { synchronized (B) { log.debug("lock B" ); sleep(0.5 ); synchronized (A) { log.debug("lock A" ); log.debug("操作..." ); } } }, "t2" ); t1.start(); t2.start();
结果
1 2 12 : 22 : 06 .962 [t2] c.TestDeadLock - lock B12 : 22 : 06 .962 [t1] c.TestDeadLock - lock A
12.2 定位死锁
检测死锁可以使用 jconsole工具,或者使用 jps 定位进程 id,再用 jstack 定位死锁:
1 2 3 4 5 6 7 cmd > jps Picked up JAVA_TOOL_OPTIONS: -Dfile.encoding=UTF-8 12320 Jps 22816 KotlinCompileDaemon 33200 TestDeadLock // JVM 进程 11508 Main 28468 Launcher
1 2 3 4 5 6 7 8 9 10 11 12 13 14 15 16 17 18 19 20 21 22 23 24 25 26 27 28 29 30 31 32 33 34 35 36 37 38 39 40 41 42 43 44 45 46 47 48 49 cmd > jstack 33200 Picked up JAVA_TOOL_OPTIONS: -Dfile.encoding=UTF-8 2018 -12 -29 05 :51 :40 Full thread dump Java HotSpot (TM) 64 -Bit Server VM (25.91 -b14 mixed mode) : "DestroyJavaVM" #13 prio=5 os_prio=0 tid=0x0000000003525000 nid=0x2f60 waiting on condition [0x0000000000000000 ] java.lang.Thread.State: RUNNABLE "Thread-1" #12 prio=5 os_prio=0 tid=0x000000001eb69000 nid=0xd40 waiting for monitor entry [0x000000001f54f000 ] java.lang.Thread.State: BLOCKED (on object monitor) at thread.TestDeadLock.lambda$main$1 (TestDeadLock.java:28 ) - waiting to lock <0x000000076b5bf1c0 > (a java.lang.Object) - locked <0x000000076b5bf1d0 > (a java.lang.Object) at thread.TestDeadLock$$Lambda$2 /883049899. run(Unknown Source) at java.lang.Thread.run(Thread.java:745 ) "Thread-0" #11 prio=5 os_prio=0 tid=0x000000001eb68800 nid=0x1b28 waiting for monitor entry [0x000000001f44f000 ] java.lang.Thread.State: BLOCKED (on object monitor) at thread.TestDeadLock.lambda$main$0 (TestDeadLock.java:15 ) - waiting to lock <0x000000076b5bf1d0 > (a java.lang.Object) - locked <0x000000076b5bf1c0 > (a java.lang.Object) at thread.TestDeadLock$$Lambda$1 /495053715. run(Unknown Source) at java.lang.Thread.run(Thread.java:745 ) Found one Java-level deadlock: ============================= "Thread-1" : waiting to lock monitor 0x000000000361d378 (object 0x000000076b5bf1c0 , a java.lang.Object), which is held by "Thread-0" "Thread-0" : waiting to lock monitor 0x000000000361e768 (object 0x000000076b5bf1d0 , a java.lang.Object), which is held by "Thread-1" Java stack information for the threads listed above: =================================================== "Thread-1" : at thread.TestDeadLock.lambda$main$1 (TestDeadLock.java:28 ) - waiting to lock <0x000000076b5bf1c0 > (a java.lang.Object) - locked <0x000000076b5bf1d0 > (a java.lang.Object) at thread.TestDeadLock$$Lambda$2 /883049899. run(Unknown Source) at java.lang.Thread.run(Thread.java:745 ) "Thread-0" : at thread.TestDeadLock.lambda$main$0 (TestDeadLock.java:15 ) - waiting to lock <0x000000076b5bf1d0 > (a java.lang.Object) - locked <0x000000076b5bf1c0 > (a java.lang.Object) at thread.TestDeadLock$$Lambda$1 /495053715. run(Unknown Source) at java.lang.Thread.run(Thread.java:745 ) Found 1 deadlock.
避免死锁要注意加锁顺序
另外如果由于某个线程进入了死循环,导致其它线程一直等待,对于这种情况 linux 下可以通过 top 先定位到CPU 占用高的 Java 进程,再利用 top -Hp 进程id 来定位是哪个线程,最后再用 jstack 排查
12.3 哲学家就餐问题
有五位哲学家,围坐在圆桌旁。
他们只做两件事,思考和吃饭,思考一会吃口饭,吃完饭后接着思考。
吃饭时要用两根筷子吃,桌上共有 5 根筷子,每位哲学家左右手边各有一根筷子。
如果筷子被身边的人拿着,自己就得等待
筷子类
1 2 3 4 5 6 7 8 9 10 class Chopstick { String name; public Chopstick (String name) { this .name = name; } @Override public String toString () { return "筷子{" + name + '}' ; } }
哲学家类
1 2 3 4 5 6 7 8 9 10 11 12 13 14 15 16 17 18 19 20 21 22 23 24 25 26 27 28 class Philosopher extends Thread { Chopstick left; Chopstick right; public Philosopher (String name, Chopstick left, Chopstick right) { super (name); this .left = left; this .right = right; } private void eat () { log.debug("eating..." ); Sleeper.sleep(1 ); } @Override public void run () { while (true ) { synchronized (left) { synchronized (right) { eat(); } } } } }
就餐
1 2 3 4 5 6 7 8 9 10 Chopstick c1 = new Chopstick ("1" );Chopstick c2 = new Chopstick ("2" );Chopstick c3 = new Chopstick ("3" );Chopstick c4 = new Chopstick ("4" );Chopstick c5 = new Chopstick ("5" );new Philosopher ("苏格拉底" , c1, c2).start();new Philosopher ("柏拉图" , c2, c3).start();new Philosopher ("亚里士多德" , c3, c4).start();new Philosopher ("赫拉克利特" , c4, c5).start();new Philosopher ("阿基米德" , c5, c1).start();
执行不多会,就执行不下去了
1 2 3 4 5 12 : 33 : 15.575 [苏格拉底] c.Philosopher - eating...12 : 33 : 15.575 [亚里士多德] c.Philosopher - eating...12 : 33 : 16.580 [阿基米德] c.Philosopher - eating...12 : 33 : 17.580 [阿基米德] c.Philosopher - eating...// 卡在这里, 不向下运行
使用 jconsole 检测死锁,发现
1 2 3 4 5 6 7 8 9 10 11 12 13 14 15 16 17 18 19 20 21 22 23 24 25 26 27 28 29 30 31 32 33 34 35 ------------------------------------------------------------------------- 名称: 阿基米德 状态: cn.itcast.Chopstick@1540e19d (筷子1 ) 上的BLOCKED , 拥有者: 苏格拉底 总阻止数: 2 , 总等待数: 1 堆栈跟踪: cn.itcast.Philosopher.run(TestDinner.java: 48 ) - 已锁定 cn.itcast.Chopstick@6d6f6e28 (筷子5 ) ------------------------------------------------------------------------- 名称: 苏格拉底 状态: cn.itcast.Chopstick@677327b6 (筷子2 ) 上的BLOCKED , 拥有者: 柏拉图 总阻止数: 2 , 总等待数: 1 堆栈跟踪: cn.itcast.Philosopher.run(TestDinner.java: 48 ) - 已锁定 cn.itcast.Chopstick@1540e19d (筷子1 ) ------------------------------------------------------------------------- 名称: 柏拉图 状态: cn.itcast.Chopstick@14ae5a5 (筷子3 ) 上的BLOCKED , 拥有者: 亚里士多德 总阻止数: 2 , 总等待数: 0 堆栈跟踪: cn.itcast.Philosopher.run(TestDinner.java: 48 ) - 已锁定 cn.itcast.Chopstick@677327b6 (筷子2 ) ------------------------------------------------------------------------- 名称: 亚里士多德 状态: cn.itcast.Chopstick@7f31245a (筷子4 ) 上的BLOCKED , 拥有者: 赫拉克利特 总阻止数: 1 , 总等待数: 1 堆栈跟踪: cn.itcast.Philosopher.run(TestDinner.java: 48 ) - 已锁定 cn.itcast.Chopstick@14ae5a5 (筷子3 ) ------------------------------------------------------------------------- 名称: 赫拉克利特 状态: cn.itcast.Chopstick@6d6f6e28 (筷子5 ) 上的BLOCKED , 拥有者: 阿基米德 总阻止数: 2 , 总等待数: 0 堆栈跟踪: cn.itcast.Philosopher.run(TestDinner.java: 48 ) - 已锁定 cn.itcast.Chopstick@7f31245a (筷子4 )
这种线程没有按预期结束,执行不下去的情况,归类为【活跃性】问题,除了死锁以外,还有活锁和饥饿者两种情况
12.4 活锁 活锁出现在两个线程互相改变对方的结束条件,最后谁也无法结束,例如
1 2 3 4 5 6 7 8 9 10 11 12 13 14 15 16 17 18 19 20 21 22 23 24 25 public class TestLiveLock { static volatile int count = 10 ; static final Object lock = new Object (); public static void main (String[] args) { new Thread (() -> { while (count > 0 ) { sleep(0.2 ); count--; log.debug("count: {}" , count); } }, "t1" ).start(); new Thread (() -> { while (count < 20 ) { sleep(0.2 ); count++; log.debug("count: {}" , count); } }, "t2" ).start(); } }
12.5 饥饿 很多教程中把饥饿定义为,一个线程由于优先级太低,始终得不到 CPU 调度执行,也不能够结束,饥饿的情况不易演示,讲读写锁时会涉及饥饿问题
下面我讲一下我遇到的一个线程饥饿的例子,先来看看使用顺序加锁的方式解决之前的死锁问题
13. ReentrantLock 相对于 synchronized 它具备如下特点
可中断
可以设置超时时间
可以设置为公平锁
支持多个条件变量
与 synchronized 一样,都支持可重入
基本语法
1 2 3 4 5 6 7 8 9 reentrantLock.lock(); try { } finally { reentrantLock.unlock(); }
13.1 可重入 可重入是指同一个线程如果首次获得了这把锁,那么因为它是这把锁的拥有者,因此有权利再次获取这把锁,如果是不可重入锁,那么第二次获得锁时,自己也会被锁挡住
1 2 3 4 5 6 7 8 9 10 11 12 13 14 15 16 17 18 19 20 21 22 23 24 25 26 27 28 29 30 31 32 33 34 static ReentrantLock lock = new ReentrantLock ();public static void main (String[] args) { method1(); } public static void method1 () { lock.lock(); try { log.debug("execute method1" ); method2(); } finally { lock.unlock(); } } public static void method2 () { lock.lock(); try { log.debug("execute method2" ); method3(); } finally { lock.unlock(); } } public static void method3 () { lock.lock(); try { log.debug("execute method3" ); } finally { lock.unlock(); } }
输出
1 2 3 17 : 59 : 11.862 [main] c.TestReentrant - execute method117 : 59 : 11.865 [main] c.TestReentrant - execute method217 : 59 : 11.865 [main] c.TestReentrant - execute method3
13.2 可打断 示例
1 2 3 4 5 6 7 8 9 10 11 12 13 14 15 16 17 18 19 20 21 22 23 24 25 26 27 28 ReentrantLock lock = new ReentrantLock ();Thread t1 = new Thread (() -> { log.debug("启动..." ); try { lock.lockInterruptibly(); } catch (InterruptedException e) { e.printStackTrace(); log.debug("等锁的过程中被打断" ); return ; } try { log.debug("获得了锁" ); } finally { lock.unlock(); } }, "t1" ); lock.lock(); log.debug("获得了锁" ); t1.start(); try { sleep(1 ); t1.interrupt(); log.debug("执行打断" ); } finally { lock.unlock(); }
输出
1 2 3 4 5 6 7 8 9 10 11 12 13 14 18 : 02 : 40.520 [main] c.TestInterrupt - 获得了锁18 : 02 : 40.524 [t1] c.TestInterrupt - 启动...18 : 02 : 41.530 [main] c.TestInterrupt - 执行打断java.lang.InterruptedException at java.util.concurrent.locks.AbstractQueuedSynchronizer.doAcquireInterruptibly(AbstractQueuedSynchr onizer.java: 898 ) at java.util.concurrent.locks.AbstractQueuedSynchronizer.acquireInterruptibly(AbstractQueuedSynchron izer.java: 1222 ) at java.util.concurrent.locks.ReentrantLock.lockInterruptibly(ReentrantLock.java: 335 ) at cn.itcast.n4.reentrant.TestInterrupt.lambda $main$0 (TestInterrupt.java: 17 ) at java.lang.Thread.run(Thread.java: 748 ) 18 : 02 : 41.532 [t1] c.TestInterrupt - 等锁的过程中被打断
注意
如果是不可中断模式,那么即使使用了 interrupt 也不会让等待中断
可打断只能在阻塞时被打断(打断后只会再重新执行循环,并不是真正打断),而获取锁后是不可打断的
1 2 3 4 5 6 7 8 9 10 11 12 13 14 15 16 17 18 19 20 21 22 23 24 ReentrantLock lock = new ReentrantLock ();Thread t1 = new Thread (() -> { log.debug("启动..." ); lock.lock(); try { log.debug("获得了锁" ); } finally { lock.unlock(); } }, "t1" ); lock.lock(); log.debug("获得了锁" ); t1.start(); try { sleep(1 ); t1.interrupt(); log.debug("执行打断" ); sleep(1 ); } finally { log.debug("释放了锁" ); lock.unlock(); }
输出
1 2 3 4 5 18 : 06 : 56.261 [main] c.TestInterrupt - 获得了锁18 : 06 : 56.265 [t1] c.TestInterrupt - 启动...18 : 06 : 57.266 [main] c.TestInterrupt - 执行打断 // 这时 t1 并没有被真正打断, 而是仍继续等待锁 18:06:58.267 [main] c.TestInterrupt - 释放了锁 18:06:58.267 [t1] c.TestInterrupt - 获得了锁
13.3 锁超时 立刻失败
1 2 3 4 5 6 7 8 9 10 11 12 13 14 15 16 17 18 19 20 21 22 ReentrantLock lock = new ReentrantLock ();Thread t1 = new Thread (() -> { log.debug("启动..." ); if (!lock.tryLock()) { log.debug("获取立刻失败,返回" ); return ; } try { log.debug("获得了锁" ); } finally { lock.unlock(); } }, "t1" ); lock.lock(); log.debug("获得了锁" ); t1.start(); try { sleep(2 ); } finally { lock.unlock(); }
输出
1 2 3 18 : 15 : 02 .918 [main] c.TestTimeout - 获得了锁18 : 15 : 02 .921 [t1] c.TestTimeout - 启动...18 : 15 : 02 .921 [t1] c.TestTimeout - 获取立刻失败,返回
超时失败
1 2 3 4 5 6 7 8 9 10 11 12 13 14 15 16 17 18 19 20 21 22 23 24 25 26 ReentrantLock lock = new ReentrantLock ();Thread t1 = new Thread (() -> { log.debug("启动..." ); try { if (!lock.tryLock(1 , TimeUnit.SECONDS)) { log.debug("获取等待 1s 后失败,返回" ); return ; } } catch (InterruptedException e) { e.printStackTrace(); } try { log.debug("获得了锁" ); } finally { lock.unlock(); } }, "t1" ); lock.lock(); log.debug("获得了锁" ); t1.start(); try { sleep(2 ); } finally { lock.unlock(); }
输出
1 2 3 18 : 19 : 40.537 [main] c.TestTimeout - 获得了锁18 : 19 : 40.544 [t1] c.TestTimeout - 启动...18 : 19 : 41.547 [t1] c.TestTimeout - 获取等待 1s 后失败,返回
使用 tryLock 解决哲学家就餐问题
1 2 3 4 5 6 7 8 9 10 11 12 class Chopstick extends ReentrantLock { String name; public Chopstick (String name) { this .name = name; } @Override public String toString () { return "筷子{" + name + '}' ; } }
1 2 3 4 5 6 7 8 9 10 11 12 13 14 15 16 17 18 19 20 21 22 23 24 25 26 27 28 29 30 31 32 33 34 35 class Philosopher extends Thread { Chopstick left; Chopstick right; public Philosopher (String name, Chopstick left, Chopstick right) { super (name); this .left = left; this .right = right; } @Override public void run () { while (true ) { if (left.tryLock()) { try { if (right.tryLock()) { try { eat(); } finally { right.unlock(); } } } finally { left.unlock(); } } } } private void eat () { log.debug("eating..." ); Sleeper.sleep(1 ); } }
13.4 公平锁 ReentrantLock 默认是不公平的
1 2 3 4 5 6 7 8 9 10 11 12 13 14 15 16 17 18 19 20 21 22 23 24 ReentrantLock lock = new ReentrantLock (false );lock.lock(); for (int i = 0 ; i < 500 ; i++) { new Thread (() -> { lock.lock(); try { System.out.println(Thread.currentThread().getName() + " running..." ); } finally { lock.unlock(); } }, "t" + i).start(); } Thread.sleep(1000 ); new Thread (() -> { System.out.println(Thread.currentThread().getName() + " start..." ); lock.lock(); try { System.out.println(Thread.currentThread().getName() + " running..." ); } finally { lock.unlock(); } }, "强行插入" ).start(); lock.unlock();
强行插入,有机会在中间输出
注意 :该实验不一定总能复现
1 2 3 4 5 6 7 8 9 10 11 12 t39 running... t40 running... t41 running... t42 running... t43 running... 强行插入 start... 强行插入 running... t44 running... t45 running... t46 running... t47 running... t49 running...
改为公平锁后
1 ReentrantLock lock = new ReentrantLock (true );
强行插入,总是在最后输出
1 2 3 4 5 6 7 8 9 10 t465 running... t464 running... t477 running... t442 running... t468 running... t493 running... t482 running... t485 running... t481 running... 强行插入 running...
公平锁一般没有必要,会降低并发度,后面分析原理时会讲解
13.5 条件变量 synchronized 中也有条件变量,就是我们讲原理时那个 waitSet 休息室,当条件不满足时进入 waitSet 等待ReentrantLock 的条件变量比 synchronized 强大之处在于,它是支持多个条件变量的,这就好比
synchronized 是那些不满足条件的线程都在一间休息室等消息
而 ReentrantLock 支持多间休息室,有专门等烟的休息室、专门等早餐的休息室、唤醒时也是按休息室来唤醒
使用要点:
await 前需要获得锁
await 执行后,会释放锁(透明释放锁,关键,可以有多个线程同时处于waing),进入 conditionObject 等待
await 的线程被唤醒(或打断、或超时)取重新竞争 lock 锁
竞争 lock 锁成功后,从 await 后继续执行
例子:
1 2 3 4 5 6 7 8 9 10 11 12 13 14 15 16 17 18 19 20 21 22 23 24 25 26 27 28 29 30 31 32 33 34 35 36 37 38 39 40 41 42 43 44 45 46 47 48 49 50 51 52 53 54 55 56 57 58 59 60 61 static ReentrantLock lock = new ReentrantLock ();static Condition waitCigaretteQueue = lock.newCondition();static Condition waitbreakfastQueue = lock.newCondition();static volatile boolean hasCigrette = false ;static volatile boolean hasBreakfast = false ;public static void main (String[] args) { new Thread (() -> { try { lock.lock(); while (!hasCigrette) { try { waitCigaretteQueue.await(); } catch (InterruptedException e) { e.printStackTrace(); } } log.debug("等到了它的烟" ); } finally { lock.unlock(); } }).start(); new Thread (() -> { try { lock.lock(); while (!hasBreakfast) { try { waitbreakfastQueue.await(); } catch (InterruptedException e) { e.printStackTrace(); } } log.debug("等到了它的早餐" ); } finally { lock.unlock(); } }).start(); sleep(1 ); sendBreakfast(); sleep(1 ); sendCigarette(); } private static void sendCigarette () { lock.lock(); try { log.debug("送烟来了" ); hasCigrette = true ; waitCigaretteQueue.signal(); } finally { lock.unlock(); } } private static void sendBreakfast () { lock.lock(); try { log.debug("送早餐来了" ); hasBreakfast = true ; waitbreakfastQueue.signal(); } finally { lock.unlock(); } }
输出
1 2 3 4 18 : 52 : 27.680 [main] c.TestCondition - 送早餐来了18 : 52 : 27.682 [Thread-1 ] c.TestCondition - 等到了它的早餐18 : 52 : 28.683 [main] c.TestCondition - 送烟来了18 : 52 : 28.683 [Thread-0 ] c.TestCondition - 等到了它的烟
13.6 同步模式之顺序控制 固定运行顺序 比如,必须先 2 后 1 打印
1. wait notify 版 1 2 3 4 5 6 7 8 9 10 11 12 13 14 15 16 17 18 19 20 21 22 23 24 25 26 27 28 29 30 31 static Object obj = new Object ();static boolean t2runed = false ;public static void main (String[] args) { Thread t1 = new Thread (() -> { synchronized (obj) { while (!t2runed) { try { obj.wait(); } catch (InterruptedException e) { e.printStackTrace(); } } } System.out.println(1 ); }); Thread t2 = new Thread (() -> { System.out.println(2 ); synchronized (obj) { t2runed = true ; obj.notifyAll(); } }); t1.start(); t2.start(); }
2. Park Unpark 版 可以看到,实现上很麻烦:
首先,需要保证先 wait 再 notify,否则 wait 线程永远得不到唤醒。因此使用了『运行标记』来判断该不该wait
第二,如果有些干扰线程错误地 notify 了 wait 线程,条件不满足时还要重新等待,使用了 while 循环来解决此问题
最后,唤醒对象上的 wait 线程需要使用 notifyAll,因为『同步对象』上的等待线程可能不止一个
可以使用 LockSupport 类的 park 和 unpark 来简化上面的题目:
1 2 3 4 5 6 7 8 9 10 11 12 13 Thread t1 = new Thread (() -> { try { Thread.sleep(1000 ); } catch (InterruptedException e) { } LockSupport.park(); System.out.println("1" ); }); Thread t2 = new Thread (() -> { System.out.println("2" ); LockSupport.unpark(t1); }); t1.start(); t2.start();
park 和 unpark 方法比较灵活,他俩谁先调用,谁后调用无所谓。并且是以线程为单位进行『暂停』和『恢复』,不需要『同步对象』和『运行标记』
交替输出 线程 1 输出 a 5 次,线程 2 输出 b 5 次,线程 3 输出 c 5 次。现在要求输出 abcabcabcabcabc 怎么实现
wait notify 版 1 2 3 4 5 6 7 8 9 10 11 12 13 14 15 16 17 18 19 20 21 22 23 24 class SyncWaitNotify { private int flag; private int loopNumber; public SyncWaitNotify (int flag, int loopNumber) { this .flag = flag; this .loopNumber = loopNumber; } public void print (int waitFlag, int nextFlag, String str) { for (int i = 0 ; i < loopNumber; i++) { synchronized (this ) { while (this .flag != waitFlag) { try { this .wait(); } catch (InterruptedException e) { e.printStackTrace(); } } System.out.print(str); flag = nextFlag; this .notifyAll(); } } } }
1 2 3 4 5 6 7 8 9 10 SyncWaitNotify syncWaitNotify = new SyncWaitNotify (1 , 5 );new Thread (() -> {syncWaitNotify.print(1 , 2 , "a" ); }).start(); new Thread (() -> {syncWaitNotify.print(2 , 3 , "b" ); }).start(); new Thread (() -> {syncWaitNotify.print(3 , 1 , "c" ); }).start();
Lock 条件变量版 1 2 3 4 5 6 7 8 9 10 11 12 13 14 15 16 17 18 19 20 21 22 23 24 25 26 27 28 29 30 class AwaitSignal extends ReentrantLock { public void start (Condition first) { this .lock(); try { log.debug("start" ); first.signal(); } finally { this .unlock(); } } public void print (String str, Condition current, Condition next) { for (int i = 0 ; i < loopNumber; i++) { this .lock(); try { current.await(); log.debug(str); next.signal(); } catch (InterruptedException e) { e.printStackTrace(); } finally { this .unlock(); } } } private int loopNumber; public AwaitSignal (int loopNumber) { this .loopNumber = loopNumber; } }
1 2 3 4 5 6 7 8 9 10 11 12 13 14 15 16 17 18 19 AwaitSignal as = new AwaitSignal (5 );Condition aWaitSet = as.newCondition();Condition bWaitSet = as.newCondition();Condition cWaitSet = as.newCondition();new Thread (() -> { as.print("a" , aWaitSet, bWaitSet); }).start(); new Thread (() -> { as.print("b" , bWaitSet, cWaitSet); }).start(); new Thread (() -> { as.print("c" , cWaitSet, aWaitSet); }).start(); as.start(aWaitSet);
注意
该实现没有考虑 a,b,c 线程都就绪再开始
Park Unpark 版 1 2 3 4 5 6 7 8 9 10 11 12 13 14 15 16 17 18 19 20 21 22 23 24 25 26 27 28 29 30 31 32 33 34 35 36 37 38 39 40 41 42 43 44 class SyncPark { private int loopNumber; private Thread[] threads; public SyncPark (int loopNumber) { this .loopNumber = loopNumber; } public void setThreads (Thread... threads) { this .threads = threads; } public void print (String str) { for (int i = 0 ; i < loopNumber; i++) { LockSupport.park(); System.out.print(str); LockSupport.unpark(nextThread()); } } private Thread nextThread () { Thread current = Thread.currentThread(); int index = 0 ; for (int i = 0 ; i < threads.length; i++) { if (threads[i] == current) { index = i; break ; } } if (index < threads.length - 1 ) { return threads[index+1 ]; } else { return threads[0 ]; } } public void start () { for (Thread thread : threads) { thread.start(); } LockSupport.unpark(threads[0 ]); } }
1 2 3 4 5 6 7 8 9 10 11 12 SyncPark syncPark = new SyncPark (5 );Thread t1 = new Thread (() -> { syncPark.print("a" ); }); Thread t2 = new Thread (() -> { syncPark.print("b" ); }); Thread t3 = new Thread (() -> { syncPark.print("c\n" ); }); syncPark.setThreads(t1, t2, t3); syncPark.start();
14. 本章小结 本章我们需要重点掌握的是
三、共享模型之内存 1. 本章内容 上一章讲解的 Monitor 主要关注的是访问共享变量时,保证临界区代码的原子性
这一章我们进一步深入学习共享变量在多线程间的【可见性】问题与多条指令执行时的【有序性】问题
2. Java 内存模型 JMM 即 Java Memory Model,它定义了主存、工作内存抽象概念,底层对应着 CPU 寄存器、缓存、硬件内存、
JMM 体现在以下几个方面
原子性 - 保证指令不会受到线程上下文切换的影响
可见性 - 保证指令不会受 cpu 缓存的影响
有序性 - 保证指令不会受 cpu 指令并行优化的影响
3. 可见性 3.1 退不出的循环 先来看一个现象,main 线程对 run 变量的修改对于 t 线程不可见,导致了 t 线程无法停止:
1 2 3 4 5 6 7 8 9 10 11 static boolean run = true ;public static void main (String[] args) throws InterruptedException {Thread t = new Thread (()->{while (run){} }); t.start(); sleep(1 ); run = false ; }
为什么呢?分析一下:
初始状态, t 线程刚开始从主内存读取了 run 的值到工作内存。
因为 t 线程要频繁从主内存中读取 run 的值,JIT 编译器会将 run 的值缓存至自己工作内存中的高速缓存中,减少对主存中 run 的访问,提高效率
1 秒之后,main 线程修改了 run 的值,并同步至主存,而 t 是从自己工作内存中的高速缓存中读取这个变量的值,结果永远是旧值
3.2 解决方法 volatile(易变关键字)
它可以用来修饰成员变量和静态成员变量,他可以避免线程从自己的工作缓存中查找变量的值,必须到主存中获取它的值,线程操作volatile 变量都是直接操作主存
3.3 可见性 vs 原子性 前面例子体现的实际就是可见性,它保证的是在多个线程之间,一个线程对 volatile 变量的修改对另一个线程可见, 不能保证原子性,仅用在一个写线程,多个读线程的情况: 上例从字节码理解是这样的:
1 2 3 4 5 6 getstatic run // 线程 t 获取 run true getstatic run / / 线程 t 获取 run true getstatic run / / 线程 t 获取 run true getstatic run / / 线程 t 获取 run true putstatic run / / 线程 main 修改 run 为 false, 仅此一次 getstatic run / / 线程 t 获取 run false
比较一下之前我们将线程安全时举的例子:两个线程一个 i++ 一个 i– ,只能保证看到最新值,不能解决指令交错
1 2 3 4 5 6 7 8 9 // 假设i的初始值为0 getstatic i / / 线程2-获取静态变量i的值 线程内i=0 getstatic i / / 线程1-获取静态变量i的值 线程内i=0 iconst_1 / / 线程1-准备常量1 iadd / / 线程1-自增 线程内i=1 putstatic i / / 线程1-将修改后的值存入静态变量i 静态变量i=1 iconst_1 / / 线程2-准备常量1 isub / / 线程2-自减 线程内i=-1 putstatic i / / 线程2-将修改后的值存入静态变量i 静态变量i=-1
注意
synchronized 语句块既可以保证代码块的原子性,也同时保证代码块内变量的可见性。但缺点是synchronized 是属于重量级操作,性能相对更低
如果在前面示例的死循环中加入 System.out.println() 会发现即使不加 volatile 修饰符,线程 t 也能正确看到对 run 变量的修改了,想一想为什么?
3.4 模式之两阶段终止 Two Phase Termination
在一个线程 T1 中如何“优雅”终止线程 T2?这里的【优雅】指的是给 T2 一个料理后事的机会。
错误思路
使用线程对象的 stop() 方法停止线程
stop 方法会真正杀死线程,如果这时线程锁住了共享资源,那么当它被杀死后就再也没有机会释放锁,其它线程将永远无法获取锁
使用 System.exit(int) 方法停止线程
目的仅是停止一个线程,但这种做法会让整个程序都停止
两阶段终止模式
(1) 利用 isInterrupted interrupt 可以打断正在执行的线程,无论这个线程是在 sleep,wait,还是正常运行
1 2 3 4 5 6 7 8 9 10 11 12 13 14 15 16 17 18 19 20 21 22 23 24 25 class TPTInterrupt { private Thread thread; public void start () { thread = new Thread (() -> { while (true ) { Thread current = Thread.currentThread(); if (current.isInterrupted()) { log.debug("料理后事" ); break ; } try { Thread.sleep(1000 ); log.debug("将结果保存" ); } catch (InterruptedException e) { current.interrupt(); } } },"监控线程" ); thread.start(); } public void stop () { thread.interrupt(); } }
调用
1 2 3 4 5 TPTInterrupt t = new TPTInterrupt ();t.start(); Thread.sleep(3500 ); log.debug("stop" ); t.stop();
结果
1 2 3 4 5 11 : 49 : 42.915 c.TwoPhaseTermination [监控线程] - 将结果保存11 : 49 : 43.919 c.TwoPhaseTermination [监控线程] - 将结果保存11 : 49 : 44.919 c.TwoPhaseTermination [监控线程] - 将结果保存11 : 49 : 45.413 c.TestTwoPhaseTermination [main] - stop11 : 49 : 45.413 c.TwoPhaseTermination [监控线程] - 料理后事
(2) 利用停止标记 1 2 3 4 5 6 7 8 9 10 11 12 13 14 15 16 17 18 19 20 21 22 23 24 25 26 27 28 class TPTVolatile { private Thread thread; private volatile boolean stop = false ; public void start () { thread = new Thread (() -> { while (true ) { Thread current = Thread.currentThread(); if (stop) { log.debug("料理后事" ); break ; } try { Thread.sleep(1000 ); log.debug("将结果保存" ); } catch (InterruptedException e) { } } },"监控线程" ); thread.start(); } public void stop () { stop = true ; thread.interrupt(); } }
调用
1 2 3 4 5 TPTVolatile t = new TPTVolatile ();t.start(); Thread.sleep(3500 ); log.debug("stop" ); t.stop();
结果
1 2 3 4 5 11 : 54 : 52.003 c.TPTVolatile [监控线程] - 将结果保存11 : 54 : 53.006 c.TPTVolatile [监控线程] - 将结果保存11 : 54 : 54.007 c.TPTVolatile [监控线程] - 将结果保存11 : 54 : 54.502 c.TestTwoPhaseTermination [main] - stop11 : 54 : 54.502 c.TPTVolatile [监控线程] - 料理后事
(3) 案例:JVM 内存监控 3.5 模式之Balking 定义 Balking (犹豫)模式用在一个线程发现另一个线程或本线程已经做了某一件相同的事,那么本线程就无需再做了,直接结束返回
实现 例如:
1 2 3 4 5 6 7 8 9 10 11 12 13 14 public class MonitorService { private volatile boolean starting; public void start () { log.info("尝试启动监控线程..." ); synchronized (this ) { if (starting) { return ; } starting = true ; } } }
当前端页面多次点击按钮调用 start 时
输出
1 2 3 4 5 [http-nio-8080 -exec-1 ] cn.itcast.monitor.service.MonitorService - 该监控线程已启动?( false ) [http-nio-8080 -exec-1 ] cn.itcast.monitor.service.MonitorService - 监控线程已启动... [http-nio-8080 -exec-2 ] cn.itcast.monitor.service.MonitorService - 该监控线程已启动?( true ) [http-nio-8080 -exec-3 ] cn.itcast.monitor.service.MonitorService - 该监控线程已启动?( true ) [http-nio-8080 -exec-4 ] cn.itcast.monitor.service.MonitorService - 该监控线程已启动?( true )
它还经常用来实现线程安全的单例
1 2 3 4 5 6 7 8 9 10 11 12 public final class Singleton { private Singleton () { } private static Singleton INSTANCE = null ; public static synchronized Singleton getInstance () { if (INSTANCE != null ) { return INSTANCE; } INSTANCE = new Singleton (); return INSTANCE; } }
对比一下保护性暂停模式:保护性暂停模式用在一个线程等待另一个线程的执行结果,当条件不满足时线程等待。
4. 有序性 JVM 会在不影响正确性的前提下,可以调整语句的执行顺序,思考下面一段代码
1 2 3 4 5 static int i;static int j;i = ...; j = ...;
可以看到,至于是先执行 i 还是 先执行 j ,对最终的结果不会产生影响。所以,上面代码真正执行时,既可以是
也可以是
这种特性称之为『指令重排』,多线程下『指令重排』会影响正确性。为什么要有重排指令这项优化呢?从 CPU执行指令的原理来理解一下吧
4.1 原理之指令级并行 事实上,现代处理器会设计为一个时钟周期完成一条执行时间最长的 CPU 指令。为什么这么做呢?可以想到指令还可以再划分成一个个更小的阶段,例如,每条指令都可以分为: 取指令 - 指令译码 - 执行指令 - 内存访问 - 数据写回 这 5 个阶段
术语参考:
instruction fetch (IF)
instruction decode (ID)
execute (EX)
memory access (MEM)
register write back (WB)
在不改变程序结果的前提下,这些指令的各个阶段可以通过重排序 和组合 来实现指令级并行 ,这一技术在 80’s 中叶到 90’s 中叶占据了计算架构的重要地位。
提示:
分阶段,分工是提升效率的关键!
指令重排的前提是,重排指令不能影响结果,例如
1 2 3 4 5 6 7 int a = 10 ; int b = 20 ; System.out.println( a + b ); int a = 10 ; int b = a - 5 ;
参考: Scoreboarding and the Tomasulo algorithm (which is similar to scoreboarding but makes use of register renaming ) are two of the most common techniques for implementing out-of-order execution and instruction-level parallelism.
现代 CPU 支持多级指令流水线 ,例如支持同时执行 取指令 - 指令译码 - 执行指令 - 内存访问 - 数据写回 的处理器,就可以称之为五级指令流水线 。这时 CPU 可以在一个时钟周期内,同时运行五条指令的不同阶段(相当于一条执行时间最长的复杂指令),IPC = 1,本质上,流水线技术并不能缩短单条指令的执行时间,但它变相地提高了指令地吞吐率。
提示:
奔腾四(Pentium 4)支持高达 35 级流水线,但由于功耗太高被废弃
4.2 诡异的结果 1 2 3 4 5 6 7 8 9 10 11 12 13 14 15 int num = 0 ;boolean ready = false ;public void actor1 (I_Result r) { if (ready) { r.r1 = num + num; } else { r.r1 = 1 ; } } public void actor2 (I_Result r) { num = 2 ; ready = true ; }
I_Result 是一个对象,有一个属性 r1 用来保存结果,问,可能的结果有几种?
有同学这么分析
情况1:线程1 先执行,这时 ready = false,所以进入 else 分支结果为 1
情况2:线程2 先执行 num = 2,但没来得及执行 ready = true,线程1 执行,还是进入 else 分支,结果为1
情况3:线程2 执行到 ready = true,线程1 执行,这回进入 if 分支,结果为 4(因为 num 已经执行过了)
但我告诉你,结果还有可能是 0 😁😁😁,信不信吧!
这种情况下是:线程2 执行 ready = true,切换到线程1,进入 if 分支,相加为 0,再切回线程2 执行 num = 2
相信很多人已经晕了 😵😵😵
这种现象叫做指令重排,是 JIT 编译器在运行时的一些优化,这个现象需要通过大量测试才能复现:
借助 java 并发压测工具 jcstress https://wiki.openjdk.java.net/display/CodeTools/jcstress
1 mvn archetype: generate -DinteractiveMode=false -DarchetypeGroupId=org.openjdk.jcstress -DarchetypeArtifactId=jcstress-java-test-archetype -DarchetypeVersion=0.5 -DgroupId=cn.itcast -DartifactId=ordering -Dversion=1.0
创建 maven 项目,提供如下测试类
1 2 3 4 5 6 7 8 9 10 11 12 13 14 15 16 17 18 19 20 21 @JCStressTest @Outcome(id = {"1", "4"}, expect = Expect.ACCEPTABLE, desc = "ok") @Outcome(id = "0", expect = Expect.ACCEPTABLE_INTERESTING, desc = "!!!!") @State public class ConcurrencyTest { int num = 0 ; boolean ready = false ; @Actor public void actor1 (I_Result r) { if (ready) { r.r1 = num + num; } else { r.r1 = 1 ; } } @Actor public void actor2 (I_Result r) { num = 2 ; ready = true ; } }
执行
1 2 mvn clean install java -jar target/jcstress.jar
会输出我们感兴趣的结果,摘录其中一次结果:
1 2 3 4 5 6 7 8 9 10 11 12 13 14 15 16 17 18 19 20 21 22 23 24 *** INTERESTING tests Some interesting behaviors observed. This is for the plain curiosity. 2 matching test results. [OK ] cn.itcast.ConcurrencyTest1 (JVM args: [-XX :-TieredCompilation ]) Observed state Occurrences Expectation Interpretation 0 3 ,943 ACCEPTABLE_INTERESTING !!!! 1 20 ,090,265 ACCEPTABLE ok 4 26 ,615 ,603 ACCEPTABLE ok [OK ] cn.itcast.ConcurrencyTest1 (JVM args: []) Observed state Occurrences Expectation Interpretation 0 1 ,714 ACCEPTABLE_INTERESTING !!!! 1 18 ,118 ,845 ACCEPTABLE ok 4 29 ,707 ,292 ACCEPTABLE ok
可以看到,出现结果为 0 的情况有 3,943 次,虽然次数相对很少,但毕竟是出现了。
4.3 解决方法 volatile 修饰的变量,可以禁用指令重排
1 2 3 4 5 6 7 8 9 10 11 12 13 14 15 16 17 18 19 20 21 @JCStressTest @Outcome(id = {"1", "4"}, expect = Expect.ACCEPTABLE, desc = "ok") @Outcome(id = "0", expect = Expect.ACCEPTABLE_INTERESTING, desc = "!!!!") @State public class ConcurrencyTest { int num = 0 ; volatile boolean ready = false ; @Actor public void actor1 (I_Result r) { if (ready) { r.r1 = num + num; } else { r.r1 = 1 ; } } @Actor public void actor2 (I_Result r) { num = 2 ; ready = true ; } }
结果为:
1 2 3 *** INTERESTING tests Some interesting behaviors observed. This is for the plain curiosity. 0 matching test results.
4.4 原理之 volatile volatile 的底层实现原理是内存屏障,Memory Barrier(Memory Fence)
对 volatile 变量的写指令后会加入写屏障
对 volatile 变量的读指令前会加入读屏障
(1) 如何保证可见性
写屏障(sfence)保证在该屏障之前的,对共享变量的改动,都同步到主存当中
1 2 3 4 5 public void actor2 (I_Result r) { num = 2 ; ready = true ; }
而读屏障(lfence)保证在该屏障之后,对共享变量的读取,加载的是主存中最新数据
1 2 3 4 5 6 7 8 9 public void actor1 (I_Result r) { if (ready) { r.r1 = num + num; } else { r.r1 = 1 ; } }
(2) 如何保证有序性
写屏障会确保指令重排序时,不会将写屏障之前的代码排在写屏障之后
1 2 3 4 5 public void actor2 (I_Result r) { num = 2 ; ready = true ; }
读屏障会确保指令重排序时,不会将读屏障之后的代码排在读屏障之前
1 2 3 4 5 6 7 8 9 public void actor1 (I_Result r) { if (ready) { r.r1 = num + num; } else { r.r1 = 1 ; } }
还是那句话,不能解决指令交错:
写屏障仅仅是保证之后的读能够读到最新的结果,但不能保证读跑到它前面去
而有序性的保证也只是保证了本线程内相关代码不被重排序
(3) double-checked locking 问题 以著名的 double-checked locking 单例模式为例
1 2 3 4 5 6 7 8 9 10 11 12 13 14 15 public final class Singleton { private Singleton () { } private static Singleton INSTANCE = null ; public static Singleton getInstance () { if (INSTANCE == null ) { synchronized (Singleton.class) { if (INSTANCE == null ) { INSTANCE = new Singleton (); } } } return INSTANCE; } }
以上的实现特点是:
懒惰实例化
首次使用 getInstance() 才使用 synchronized 加锁,后续使用时无需加锁
有隐含的,但很关键的一点:第一个 if 使用了 INSTANCE 变量,是在同步块之外
但在多线程环境下,上面的代码是有问题的,getInstance 方法对应的字节码为:
1 2 3 4 5 6 7 8 9 10 11 12 13 14 15 16 17 18 19 20 21 22 0 : getstatic 3 : ifnonnull 37 6 : ldc 8 : dup 9 : astore_0 10 : monitorenter 11 : getstatic 14 : ifnonnull 27 17 : new 20 : dup 21 : invokespecial 24 : putstatic 27 : aload_0 28 : monitorexit 29 : goto 37 32 : astore_1 33 : aload_0 34 : monitorexit 35 : aload_1 36 : athrow 37 : getstatic 40 : areturn
其中
17 表示创建对象,将对象引用入栈 // new Singleton
20 表示复制一份对象引用 // 引用地址
21 表示利用一个对象引用,调用构造方法
24 表示利用一个对象引用,赋值给 static INSTANCE
也许 jvm 会优化为:先执行 24,再执行 21。如果两个线程 t1,t2 按如下时间序列执行:
关键在于 0: getstatic 这行代码在 monitor 控制之外,它就像之前举例中不守规则的人,可以越过 monitor 读取INSTANCE 变量的值
这时 t1 还未完全将构造方法执行完毕,如果在构造方法中要执行很多初始化操作,那么 t2 拿到的是将是一个未初始化完毕的单例
对 INSTANCE 使用 volatile 修饰即可,可以禁用指令重排,但要注意在 JDK 5 以上的版本的 volatile 才会真正有效
(4) double-checked locking 解决 1 2 3 4 5 6 7 8 9 10 11 12 13 14 15 16 public final class Singleton { private Singleton () { } private static volatile Singleton INSTANCE = null ; public static Singleton getInstance () { if (INSTANCE == null ) { synchronized (Singleton.class) { if (INSTANCE == null ) { INSTANCE = new Singleton (); } } } return INSTANCE; } }
字节码上看不出来 volatile 指令的效果
1 2 3 4 5 6 7 8 9 10 11 12 13 14 15 16 17 18 19 20 21 22 23 24 0 : getstatic 3 : ifnonnull 37 6 : ldc 8 : dup9 : astore_010 : monitorenter -----------------------> 保证原子性、可见性11 : getstatic 14 : ifnonnull 27 17 : new 20 : dup21 : invokespecial 24 : putstatic 27 : aload_028 : monitorexit ------------------------> 保证原子性、可见性29 : goto 37 32 : astore_133 : aload_034 : monitorexit35 : aload_136 : athrow37 : getstatic 40 : areturn
如上面的注释内容所示,读写 volatile 变量时会加入内存屏障(Memory Barrier(Memory Fence)),保证下面两点:
可见性
写屏障(sfence)保证在该屏障之前的 t1 对共享变量的改动,都同步到主存当中
而读屏障(lfence)保证在该屏障之后 t2 对共享变量的读取,加载的是主存中最新数据
有序性
写屏障会确保指令重排序时,不会将写屏障之前的代码排在写屏障之后
读屏障会确保指令重排序时,不会将读屏障之后的代码排在读屏障之前
更底层是读写变量时使用 lock 指令来多核 CPU 之间的可见性与有序性
4.5 happens-before happens-before 规定了对共享变量的写操作对其它线程的读操作可见,它是可见性与有序性的一套规则总结,抛开以下 happens-before 规则,JMM 并不能保证一个线程对共享变量的写,对于其它线程对该共享变量的读可见
线程解锁 m 之前对变量的写,对于接下来对 m 加锁的其它线程对该变量的读可见
1 2 3 4 5 6 7 8 9 10 11 12 13 static int x;static Object m = new Object ();new Thread (()->{ synchronized (m) { x = 10 ; } },"t1" ).start(); new Thread (()->{ synchronized (m) { System.out.println(x); } },"t2" ).start();
线程对 volatile 变量的写,对接下来其它线程对该变量的读可见
1 2 3 4 5 6 7 volatile static int x;new Thread (()->{ x = 10 ; },"t1" ).start(); new Thread (()->{ System.out.println(x); },"t2" ).start();
线程 start 前对变量的写,对该线程开始后对该变量的读可见
1 2 3 4 5 static int x;x = 10 ; new Thread (()->{ System.out.println(x); },"t2" ).start();
线程结束前对变量的写,对其它线程得知它结束后的读可见,对共享变量的读取,加载的是主存中最新数据(比如其它线程调用 t1.isAlive() 或 t1.join()等待它结束)
1 2 3 4 5 6 7 static int x;Thread t1 = new Thread (()->{ x = 10 ; },"t1" ); t1.start(); t1.join(); System.out.println(x);
线程 t1 打断 t2(interrupt)前对变量的写,对于其他线程得知 t2 被打断后对变量的读可见(通过t2.interrupted 或 t2.isInterrupted)
1 2 3 4 5 6 7 8 9 10 11 12 13 14 15 16 17 18 19 20 21 22 static int x;public static void main (String[] args) { Thread t2 = new Thread (()->{ while (true ) { if (Thread.currentThread().isInterrupted()) { System.out.println(x); break ; } } },"t2" ); t2.start(); new Thread (()->{ sleep(1 ); x = 10 ; t2.interrupt(); },"t1" ).start(); while (!t2.isInterrupted()) { Thread.yield(); } System.out.println(x); }
对变量默认值(0,false,null)的写,对其它线程对该变量的读可见
具有传递性,如果 x hb-> y 并且 y hb-> z 那么有 x hb-> z ,配合 volatile 的防指令重排,有下面的例子
1 2 3 4 5 6 7 8 9 10 volatile static int x;static int y;new Thread (()->{ y = 10 ; x = 20 ; },"t1" ).start(); new Thread (()->{ System.out.println(x); },"t2" ).start();
变量都是指成员变量或静态成员变量
4.6 习题 balking 模式习题 希望 doInit() 方法仅被调用一次,下面的实现是否有问题,为什么?
1 2 3 4 5 6 7 8 9 10 11 12 13 14 15 public class TestVolatile { volatile boolean initialized = false ; void init () { if (initialized) { return ; } doInit(); initialized = true ; } private void doInit () { } }
线程安全单例习题 单例模式有很多实现方法,饿汉、懒汉、静态内部类、枚举类,试分析每种实现下获取单例对象(即调用getInstance)时的线程安全,并思考注释中的问题
饿汉式:类加载就会导致该单实例对象被创建
懒汉式:类加载不会导致该单实例对象被创建,而是首次使用该对象时才会创建
实现1:
1 2 3 4 5 6 7 8 9 10 11 12 13 14 15 public final class Singleton implements Serializable { private Singleton () {} private static final Singleton INSTANCE = new Singleton (); public static Singleton getInstance () { return INSTANCE; } public Object readResolve () { return INSTANCE; } }
实现2:
1 2 3 4 5 6 7 8 9 enum Singleton { INSTANCE; }
实现3:
1 2 3 4 5 6 7 8 9 10 11 12 public final class Singleton { private Singleton () { } private static Singleton INSTANCE = null ; public static synchronized Singleton getInstance () { if ( INSTANCE != null ){ return INSTANCE; } INSTANCE = new Singleton (); return INSTANCE; } }
实现4:DCL
1 2 3 4 5 6 7 8 9 10 11 12 13 14 15 16 17 18 19 public final class Singleton { private Singleton () { } private static volatile Singleton INSTANCE = null ; public static Singleton getInstance () { if (INSTANCE != null ) { return INSTANCE; } synchronized (Singleton.class) { if (INSTANCE != null ) { return INSTANCE; } INSTANCE = new Singleton (); return INSTANCE; } } }
实现5:
1 2 3 4 5 6 7 8 9 10 11 public final class Singleton { private Singleton () { } private static class LazyHolder { static final Singleton INSTANCE = new Singleton (); } public static Singleton getInstance () { return LazyHolder.INSTANCE; } }
5. 本章小结 本章重点讲解了 JMM 中的
可见性 - 由 JVM 缓存优化引起
有序性 - 由 JVM 指令重排序优化引起
happens-before 规则
原理方面
模式方面
两阶段终止模式的 volatile 改进
同步模式之 balking
四、共享模型之无锁 1. 本章内容
CAS 与 volatile
原子整数
原子引用
原子累加器
Unsafe
2. 问题提出 有如下需求,保证 account.withdraw 取款方法的线程安全
1 2 3 4 5 6 7 8 9 10 11 12 13 14 15 16 17 18 19 20 21 22 23 24 25 26 27 28 29 30 31 32 33 package cn.itcast;import java.util.ArrayList;import java.util.List;interface Account { Integer getBalance () ; void withdraw (Integer amount) ; static void demo (Account account) { List<Thread> ts = new ArrayList <>(); long start = System.nanoTime(); for (int i = 0 ; i < 1000 ; i++) { ts.add(new Thread (() -> { account.withdraw(10 ); })); } ts.forEach(Thread::start); ts.forEach(t -> { try { t.join(); } catch (InterruptedException e) { e.printStackTrace(); } }); long end = System.nanoTime(); System.out.println(account.getBalance() + " cost: " + (end-start)/1000_000 + " ms" ); } }
原有实现并不是线程安全的
1 2 3 4 5 6 7 8 9 10 11 12 13 14 class AccountUnsafe implements Account { private Integer balance; public AccountUnsafe (Integer balance) { this .balance = balance; } @Override public Integer getBalance () { return balance; } @Override public void withdraw (Integer amount) { balance -= amount; } }
执行测试代码
1 2 3 public static void main (String[] args) { Account.demo(new AccountUnsafe (10000 )); }
某次的执行结果
2.1 为什么不安全 withdraw 方法
1 2 3 public void withdraw (Integer amount) { balance -= amount; }
对应的字节码
1 2 3 4 5 6 7 8 9 ALOAD 0 // <- this ALOAD 0 GETFIELD cn/itcast /AccountUnsafe.balance : Ljava/lang /Integer; / / <- this.balance INVOKEVIRTUAL java/lang /Integer.intValue ()I / / 拆箱 ALOAD 1 / / <- amount INVOKEVIRTUAL java/lang /Integer.intValue ()I / / 拆箱 ISUB / / 减法 INVOKESTATIC java/lang /Integer.valueOf (I)Ljava/lang /Integer; / / 结果装箱 PUTFIELD cn/itcast /AccountUnsafe.balance : Ljava/lang /Integer; / / -> this.balance
多线程执行流程
1 2 3 4 5 6 7 8 9 10 11 12 13 14 15 16 17 18 ALOAD 0 // thread-0 <- this ALOAD 0 GETFIELD cn/itcast /AccountUnsafe.balance / / thread-0 <- this.balance INVOKEVIRTUAL java/lang /Integer.intValue / / thread-0 拆箱 ALOAD 1 / / thread-0 <- amount INVOKEVIRTUAL java/lang /Integer.intValue / / thread-0 拆箱 ISUB / / thread-0 减法 INVOKESTATIC java/lang /Integer.valueOf / / thread-0 结果装箱 PUTFIELD cn/itcast /AccountUnsafe.balance / / thread-0 -> this.balance ALOAD 0 / / thread-1 <- this ALOAD 0 GETFIELD cn/itcast /AccountUnsafe.balance / / thread-1 <- this.balance INVOKEVIRTUAL java/lang /Integer.intValue / / thread-1 拆箱 ALOAD 1 / / thread-1 <- amount INVOKEVIRTUAL java/lang /Integer.intValue / / thread-1 拆箱 ISUB / / thread-1 减法 INVOKESTATIC java/lang /Integer.valueOf / / thread-1 结果装箱 PUTFIELD cn/itcast /AccountUnsafe.balance / / thread-1 -> this.balance
2.2 解决思路-锁 首先想到的是给 Account 对象加锁
1 2 3 4 5 6 7 8 9 10 11 12 13 14 class AccountUnsafe implements Account { private Integer balance; public AccountUnsafe (Integer balance) { this .balance = balance; } @Override public synchronized Integer getBalance () { return balance; } @Override public synchronized void withdraw (Integer amount) { balance -= amount; } }
结果为
2.3 解决思路-无锁 1 2 3 4 5 6 7 8 9 10 11 12 13 14 15 16 17 18 19 20 21 22 class AccountSafe implements Account { private AtomicInteger balance; public AccountSafe (Integer balance) { this .balance = new AtomicInteger (balance); } @Override public Integer getBalance () { return balance.get(); } @Override public void withdraw (Integer amount) { while (true ) { int prev = balance.get(); int next = prev - amount; if (balance.compareAndSet(prev, next)) { break ; } } } }
执行测试代码
1 2 3 public static void main (String[] args) { Account.demo(new AccountSafe (10000 )); }
某次的执行结果
3. CAS 与 volatile 前面看到的 AtomicInteger 的解决方法,内部并没有用锁来保护共享变量的线程安全。那么它是如何实现的呢?
1 2 3 4 5 6 7 8 9 10 11 12 13 14 15 16 17 18 19 20 21 public void withdraw (Integer amount) { while (true ) { while (true ) { int prev = balance.get(); int next = prev - amount; if (balance.compareAndSet(prev, next)) { break ; } } } }
其中的关键是 compareAndSet,它的简称就是 CAS (也有 Compare And Swap 的说法),它必须是原子操作。
注意
其实 CAS 的底层是 lock cmpxchg 指令(X86 架构),在单核 CPU 和多核 CPU 下都能够保证【比较-交
在多核状态下,某个核执行到带 lock 的指令时,CPU 会让总线锁住,当这个核把此指令执行完毕,再
3.1 慢动作分析 1 2 3 4 5 6 7 8 9 10 11 12 13 14 15 16 17 18 19 20 21 22 23 24 25 26 27 28 29 30 31 @Slf4j public class SlowMotion { public static void main (String[] args) { AtomicInteger balance = new AtomicInteger (10000 ); int mainPrev = balance.get(); log.debug("try get {}" , mainPrev); new Thread (() -> { sleep(1000 ); int prev = balance.get(); balance.compareAndSet(prev, 9000 ); log.debug(balance.toString()); }, "t1" ).start(); sleep(2000 ); log.debug("try set 8000..." ); boolean isSuccess = balance.compareAndSet(mainPrev, 8000 ); log.debug("is success ? {}" , isSuccess); if (!isSuccess){ mainPrev = balance.get(); log.debug("try set 8000..." ); isSuccess = balance.compareAndSet(mainPrev, 8000 ); log.debug("is success ? {}" , isSuccess); } } private static void sleep (int millis) { try { Thread.sleep(millis); } catch (InterruptedException e) { e.printStackTrace(); } } }
输出结果
1 2 3 4 5 6 2019 -10 -13 11 : 28 : 37.134 [main] try get 10000 2019 -10 -13 11 : 28 : 38.154 [t1] 9000 2019 -10 -13 11 : 28 : 39.154 [main] try set 8000 ...2019 -10 -13 11 : 28 : 39.154 [main] is success ? false 2019 -10 -13 11 : 28 : 39.154 [main] try set 8000 ...2019 -10 -13 11 : 28 : 39.154 [main] is success ? true
3.2 volatile 获取共享变量时,为了保证该变量的可见性,需要使用 volatile 修饰。
它可以用来修饰成员变量和静态成员变量,他可以避免线程从自己的工作缓存中查找变量的值,必须到主存中获取它的值,线程操作 volatile 变量都是直接操作主存。即一个线程对 volatile 变量的修改,对另一个线程可见。
注意
volatile 仅仅保证了共享变量的可见性,让其它线程能够看到最新值,但不能解决指令交错问题(不能保证原子性)
CAS 必须借助 volatile 才能读取到共享变量的最新值来实现【比较并交换】的效果
3.3 为什么无锁效率高
无锁情况下,即使重试失败,线程始终在高速运行,没有停歇,而 synchronized 会让线程在没有获得锁的时候,发生上下文切换,进入阻塞。打个比喻
线程就好像高速跑道上的赛车,高速运行时,速度超快,一旦发生上下文切换,就好比赛车要减速、熄火,等被唤醒又得重新打火、启动、加速… 恢复到高速运行,代价比较大
但无锁情况下,因为线程要保持运行,需要额外 CPU 的支持,CPU 在这里就好比高速跑道,没有额外的跑道,线程想高速运行也无从谈起,虽然不会进入阻塞,但由于没有分到时间片,仍然会进入可运行状态,还是会导致上下文切换。
3.4 CAS 的特点 结合 CAS 和 volatile 可以实现无锁并发,适用于线程数少、多核 CPU 的场景下。
CAS 是基于乐观锁的思想:最乐观的估计,不怕别的线程来修改共享变量,就算改了也没关系,我吃亏点再重试呗。
synchronized 是基于悲观锁的思想:最悲观的估计,得防着其它线程来修改共享变量,我上了锁你们都别想改,我改完了解开锁,你们才有机会。
CAS 体现的是无锁并发、无阻塞并发,请仔细体会这两句话的意思
因为没有使用 synchronized,所以线程不会陷入阻塞,这是效率提升的因素之一
但如果竞争激烈,可以想到重试必然频繁发生,反而效率会受影响
4. 原子整数 J.U.C 并发包提供了:
AtomicBoolean
AtomicInteger
AtomicLong
以 AtomicInteger 为例
1 2 3 4 5 6 7 8 9 10 11 12 13 14 15 16 17 18 19 20 21 22 23 24 25 26 27 AtomicInteger i = new AtomicInteger (0 );System.out.println(i.getAndIncrement()); System.out.println(i.incrementAndGet()); System.out.println(i.decrementAndGet()); System.out.println(i.getAndDecrement()); System.out.println(i.getAndAdd(5 )); System.out.println(i.addAndGet(-5 )); System.out.println(i.getAndUpdate(p -> p - 2 )); System.out.println(i.updateAndGet(p -> p + 2 )); System.out.println(i.getAndAccumulate(10 , (p, x) -> p + x)); System.out.println(i.accumulateAndGet(-10 , (p, x) -> p + x));
5. 原子引用 为什么需要原子引用类型?
AtomicReference
AtomicMarkableReference
AtomicStampedReference
有如下方法
1 2 3 4 5 6 7 8 9 10 11 12 13 14 15 16 17 18 19 20 21 22 23 24 25 26 27 public interface DecimalAccount { BigDecimal getBalance () ; void withdraw (BigDecimal amount) ; static void demo (DecimalAccount account) { List<Thread> ts = new ArrayList <>(); for (int i = 0 ; i < 1000 ; i++) { ts.add(new Thread (() -> { account.withdraw(BigDecimal.TEN); })); } ts.forEach(Thread::start); ts.forEach(t -> { try { t.join(); } catch (InterruptedException e) { e.printStackTrace(); } }); System.out.println(account.getBalance()); } }
试着提供不同的 DecimalAccount 实现,实现安全的取款操作
5.1 不安全实现 1 2 3 4 5 6 7 8 9 10 11 12 13 14 15 16 17 18 19 class DecimalAccountUnsafe implements DecimalAccount { BigDecimal balance; public DecimalAccountUnsafe (BigDecimal balance) { this .balance = balance; } @Override public BigDecimal getBalance () { return balance; } @Override public void withdraw (BigDecimal amount) { BigDecimal balance = this .getBalance(); this .balance = balance.subtract(amount); } }
5.2 安全实现-使用锁 1 2 3 4 5 6 7 8 9 10 11 12 13 14 15 16 17 18 19 20 21 22 class DecimalAccountSafeLock implements DecimalAccount { private final Object lock = new Object (); BigDecimal balance; public DecimalAccountSafeLock (BigDecimal balance) { this .balance = balance; } @Override public BigDecimal getBalance () { return balance; } @Override public void withdraw (BigDecimal amount) { synchronized (lock) { BigDecimal balance = this .getBalance(); this .balance = balance.subtract(amount); } } }
5.3 安全实现-使用CAS 1 2 3 4 5 6 7 8 9 10 11 12 13 14 15 16 17 18 19 20 21 22 23 24 class DecimalAccountSafeCas implements DecimalAccount { AtomicReference<BigDecimal> ref; public DecimalAccountSafeCas (BigDecimal balance) { ref = new AtomicReference <>(balance); } @Override public BigDecimal getBalance () { return ref.get(); } @Override public void withdraw (BigDecimal amount) { while (true ) { BigDecimal prev = ref.get(); BigDecimal next = prev.subtract(amount); if (ref.compareAndSet(prev, next)) { break ; } } } }
测试代码
1 2 3 DecimalAccount.demo(new DecimalAccountUnsafe(new BigDecimal("10000" ))); DecimalAccount.demo(new DecimalAccountSafeLock(new BigDecimal("10000" ))); DecimalAccount.demo(new DecimalAccountSafeCas(new BigDecimal("10000" )));
运行结果
1 2 3 4310 cost: 425 ms0 cost: 285 ms0 cost: 274 ms
5.4 ABA问题及解决 ABA 问题 1 2 3 4 5 6 7 8 9 10 11 12 13 14 15 16 17 18 19 20 static AtomicReference<String> ref = new AtomicReference <>("A" );public static void main (String[] args) throws InterruptedException { log.debug("main start..." ); String prev = ref.get(); other(); sleep(1 ); log.debug("change A->C {}" , ref.compareAndSet(prev, "C" )); } private static void other () { new Thread (() -> { log.debug("change A->B {}" , ref.compareAndSet(ref.get(), "B" )); }, "t1" ).start(); sleep(0.5 ); new Thread (() -> { log.debug("change B->A {}" , ref.compareAndSet(ref.get(), "A" )); }, "t2" ).start(); }
输出
1 2 3 4 11 : 29 : 52.325 c.Test36 [main] - main start...11 : 29 : 52.379 c.Test36 [t1] - change A->B true 11 : 29 : 52.879 c.Test36 [t2] - change B->A true 11 : 29 : 53.880 c.Test36 [main] - change A->C true
主线程仅能判断出共享变量的值与最初值 A 是否相同,不能感知到这种从 A 改为 B 又 改回 A 的情况,如果主线程希望:
只要有其它线程【动过了】共享变量,那么自己的 cas 就算失败,这时,仅比较值是不够的,需要再加一个版本号
AtomicStampedReference 1 2 3 4 5 6 7 8 9 10 11 12 13 14 15 16 17 18 19 20 21 22 23 24 25 26 27 static AtomicStampedReference<String> ref = new AtomicStampedReference <>("A" , 0 );public static void main (String[] args) throws InterruptedException { log.debug("main start..." ); String prev = ref.getReference(); int stamp = ref.getStamp(); log.debug("版本 {}" , stamp); other(); sleep(1 ); log.debug("change A->C {}" , ref.compareAndSet(prev, "C" , stamp, stamp + 1 )); } private static void other () { new Thread (() -> { log.debug("change A->B {}" , ref.compareAndSet(ref.getReference(), "B" , ref.getStamp(), ref.getStamp() + 1 )); log.debug("更新版本为 {}" , ref.getStamp()); }, "t1" ).start(); sleep(0.5 ); new Thread (() -> { log.debug("change B->A {}" , ref.compareAndSet(ref.getReference(), "A" , ref.getStamp(), ref.getStamp() + 1 )); log.debug("更新版本为 {}" , ref.getStamp()); }, "t2" ).start(); }
输出为
1 2 3 4 5 6 7 15 : 41 : 34.891 c.Test36 [main] - main start...15 : 41 : 34.894 c.Test36 [main] - 版本 0 15 : 41 : 34.956 c.Test36 [t1] - change A->B true 15 : 41 : 34.956 c.Test36 [t1] - 更新版本为 1 15 : 41 : 35.457 c.Test36 [t2] - change B->A true 15 : 41 : 35.457 c.Test36 [t2] - 更新版本为 2 15 : 41 : 36.457 c.Test36 [main] - change A->C false
AtomicStampedReference 可以给原子引用加上版本号,追踪原子引用整个的变化过程,如: A -> B -> A ->C ,通过AtomicStamped-Reference,我们可以知道,引用变量中途被更改了几次。但是有时候,并不关心引用变量更改了几次,只是单纯的关心是否更改过 ,所以就有了AtomicMarkableReference
AtomicMarkableReference 1 2 3 4 5 6 7 class GarbageBag {String desc; public GarbageBag (String desc) {this .desc = desc;} public void setDesc (String desc) {this .desc = desc;
1 2 3 4 5 6 7 8 9 10 11 12 13 14 15 16 17 18 19 20 21 22 23 24 @Slf4j public class TestABAAtomicMarkableReference { public static void main (String[] args) throws InterruptedException { GarbageBag bag = new GarbageBag ("装满了垃圾" ); AtomicMarkableReference<GarbageBag> ref = new AtomicMarkableReference <>(bag, true ); log.debug("主线程 start..." ); GarbageBag prev = ref.getReference(); log.debug(prev.toString()); new Thread (() -> { log.debug("打扫卫生的线程 start..." ); bag.setDesc("空垃圾袋" ); while (!ref.compareAndSet(bag, bag, true , false )) {} log.debug(bag.toString()); }).start(); Thread.sleep(1000 ); log.debug("主线程想换一只新垃圾袋?" ); boolean success = ref.compareAndSet(prev, new GarbageBag ("空垃圾袋" ), true , false ); log.debug("换了么?" + success); log.debug(ref.getReference().toString()); } }
输出
1 2 3 4 5 6 7 2019 -10 -13 15 : 30 : 09.264 [main] 主线程 start...2019 -10 -13 15 : 30 : 09.270 [main] cn.itcast.GarbageBag@5f0fd5a0 装满了垃圾2019 -10 -13 15 : 30 : 09.293 [Thread-1 ] 打扫卫生的线程 start...2019 -10 -13 15 : 30 : 09.294 [Thread-1 ] cn.itcast.GarbageBag@5f0fd5a0 空垃圾袋2019 -10 -13 15 : 30 : 10.294 [main] 主线程想换一只新垃圾袋?2019 -10 -13 15 : 30 : 10.294 [main] 换了么?false 2019 -10 -13 15 : 30 : 10.294 [main] cn.itcast.GarbageBag@5f0fd5a0 空垃圾袋
可以注释掉打扫卫生线程代码,再观察输出
6. 原子数组
AtomicIntegerArray
AtomicLongArray
AtomicReferenceArray
有如下方法
1 2 3 4 5 6 7 8 9 10 11 12 13 14 15 16 17 18 19 20 21 22 23 24 25 26 27 28 29 30 31 32 33 34 35 private static <T> void demo ( Supplier<T> arraySupplier, Function<T, Integer> lengthFun, BiConsumer<T, Integer> putConsumer, Consumer<T> printConsumer ) { List<Thread> ts = new ArrayList <>(); T array = arraySupplier.get(); int length = lengthFun.apply(array); for (int i = 0 ; i < length; i++) { ts.add(new Thread (() -> { for (int j = 0 ; j < 10000 ; j++) { putConsumer.accept(array, j%length); } })); } ts.forEach(t -> t.start()); ts.forEach(t -> { try { t.join(); } catch (InterruptedException e) { e.printStackTrace(); } }); printConsumer.accept(array); }
6.1 不安全的数组 1 2 3 4 5 6 demo( ()->new int [10 ], (array)->array.length, (array, index) -> array[index]++, array-> System.out.println(Arrays.toString(array)) );
结果
1 [9870 , 9862 , 9774 , 9697 , 9683 , 9678 , 9679 , 9668 , 9680 , 9698 ]
6.2 安全的数组 1 2 3 4 5 6 demo( ()-> new AtomicIntegerArray (10 ), (array) -> array.length(), (array, index) -> array.getAndIncrement(index), array -> System.out.println(array) );
结果
1 [10000 , 10000 , 10000 , 10000 , 10000 , 10000 , 10000 , 10000 , 10000 , 10000 ]
7. 字段更新器
AtomicReferenceFieldUpdater // 域 字段
AtomicIntegerFieldUpdater
AtomicLongFieldUpdater
利用字段更新器,可以针对对象的某个域(Field)进行原子操作,只能配合 volatile 修饰的字段使用,否则会出现异常
1 Exception in thread "main" java.lang.IllegalArgumentException: Must be volatile type
1 2 3 4 5 6 7 8 9 10 11 12 13 14 15 16 17 public class Test5 { private volatile int field; public static void main (String[] args) { AtomicIntegerFieldUpdater fieldUpdater = AtomicIntegerFieldUpdater.newUpdater(Test5.class, "field" ); Test5 test5 = new Test5 (); fieldUpdater.compareAndSet(test5, 0 , 10 ); System.out.println(test5.field); fieldUpdater.compareAndSet(test5, 10 , 20 ); System.out.println(test5.field); fieldUpdater.compareAndSet(test5, 10 , 30 ); System.out.println(test5.field); } }
输出
8. 原子累加器 8.1 累加器性能比较 1 2 3 4 5 6 7 8 9 10 11 12 13 14 15 16 17 18 19 20 21 22 23 24 25 26 private static <T> void demo (Supplier<T> adderSupplier, Consumer<T> action) { T adder = adderSupplier.get(); long start = System.nanoTime(); List<Thread> ts = new ArrayList <>(); for (int i = 0 ; i < 40 ; i++) { ts.add(new Thread (() -> { for (int j = 0 ; j < 500000 ; j++) { action.accept(adder); } })); } ts.forEach(t -> t.start()); ts.forEach(t -> { try { t.join(); } catch (InterruptedException e) { e.printStackTrace(); } }); long end = System.nanoTime(); System.out.println(adder + " cost:" + (end - start)/1000_000 ); }
比较 AtomicLong 与 LongAdder
1 2 3 4 5 6 7 for (int i = 0 ; i < 5 ; i++) { demo(() -> new LongAdder (), adder -> adder.increment()); } for (int i = 0 ; i < 5 ; i++) { demo(() -> new AtomicLong (), adder -> adder.getAndIncrement()); }
输出
1 2 3 4 5 6 7 8 9 10 1000000 cost: 43 1000000 cost: 9 1000000 cost: 7 1000000 cost: 7 1000000 cost: 7 1000000 cost: 31 1000000 cost: 27 1000000 cost: 28 1000000 cost: 24 1000000 cost: 22
性能提升的原因很简单,就是在有竞争时,设置多个累加单元,Therad-0 累加 Cell[0],而 Thread-1 累加Cell[1]… 最后将结果汇总。这样它们在累加时操作的不同的 Cell 变量,因此减少了 CAS 重试失败,从而提高性能。
8.2 源码之LongAdder LongAdder 是并发大师 @author Doug Lea (大哥李)的作品,设计的非常精巧
LongAdder 类有几个关键域
1 2 3 4 5 6 transient volatile Cell[] cells;transient volatile long base;transient volatile int cellsBusy;
8.3 cas 锁 1 2 3 4 5 6 7 8 9 10 11 12 13 14 15 public class LockCas { private AtomicInteger state = new AtomicInteger (0 ); public void lock () { while (true ) { if (state.compareAndSet(0 , 1 )) { break ; } } } public void unlock () { log.debug("unlock..." ); state.set(0 ); } }
测试
1 2 3 4 5 6 7 8 9 10 11 12 13 14 15 16 17 18 19 20 LockCas lock = new LockCas ();new Thread (() -> { log.debug("begin..." ); lock.lock(); try { log.debug("lock..." ); sleep(1 ); } finally { lock.unlock(); } }).start(); new Thread (() -> { log.debug("begin..." ); lock.lock(); try { log.debug("lock..." ); } finally { lock.unlock(); } }).start();
输出
1 2 3 4 5 6 18 : 27 : 07 .198 c.Test42 [Thread-0 ] - begin ...18 : 27 : 07 .202 c.Test42 [Thread-0 ] - lock...18 : 27 : 07 .198 c.Test42 [Thread-1 ] - begin ...18 : 27 : 08.204 c.Test42 [Thread-0 ] - unlock...18 : 27 : 08.204 c.Test42 [Thread-1 ] - lock...18 : 27 : 08.204 c.Test42 [Thread-1 ] - unlock...
8.4 原理之伪共享 其中 Cell 即为累加单元
1 2 3 4 5 6 7 8 9 10 11 @sun .misc.Contended static final class Cell { volatile long value; Cell(long x) { value = x; } final boolean cas (long prev, long next) { return UNSAFE.compareAndSwapLong(this , valueOffset, prev, next); } }
得从缓存说起
缓存与内存的速度比较
从 cpu 到
大约需要的时钟周期
寄存器
1 cycle (4GHz 的 CPU 约为0.25ns)
L1
3~4 cycle
L2
10~20 cycle
L3
40~45 cycle
内存
120~240 cycle
因为 CPU 与 内存的速度差异很大,需要靠预读数据至缓存来提升效率。
而缓存以缓存行为单位,每个缓存行对应着一块内存,一般是 64 byte(8 个 long)(译注:有可能处理器的缓存行是128字节,那么使用64字节填充还是会存在伪共享问题)
缓存的加入会造成数据副本的产生,即同一份数据会缓存在不同核心的缓存行中
CPU 要保证数据的一致性,如果某个 CPU 核心更改了数据,其它 CPU 核心对应的整个缓存行必须失效
因为 Cell 是数组形式,在内存中是连续存储的,一个 Cell 为 24 字节(16 字节的对象头和 8 字节的 value),因此缓存行可以存下 2 个的 Cell 对象。这样问题来了:
Core-0 要修改 Cell[0]
Core-1 要修改 Cell[1]
无论谁修改成功,都会导致对方 Core 的缓存行失效,比如 Core-0 中 Cell[0]=6000, Cell[1]=8000 要累加Cell[0]=6001, Cell[1]=8000 ,这时会让 Core-1 的缓存行失效
@sun.misc.Contended 用来解决这个问题,它的原理是在使用此注解的对象或字段的前后各增加 128 字节大小的padding,从而让 CPU 将对象预读至缓存时占用不同的缓存行,这样,不会造成对方缓存行的失效
累加主要调用下面的方法
1 2 3 4 5 6 7 8 9 10 11 12 13 14 15 16 17 18 19 20 21 22 23 24 public void add (long x) { Cell[] as; long b, v; int m; Cell a; if ((as = cells) != null || !casBase(b = base, b + x)) { boolean uncontended = true ; if ( as == null || (m = as.length - 1 ) < 0 || (a = as[getProbe() & m]) == null || !(uncontended = a.cas(v = a.value, v + x)) ) { longAccumulate(x, null , uncontended); } } }
add 流程图
1 2 3 4 5 6 7 8 9 10 11 12 13 14 15 16 17 18 19 20 21 22 23 24 25 26 27 28 29 30 31 32 33 34 35 36 37 38 39 40 41 42 43 44 45 46 47 48 49 50 51 52 final void longAccumulate (long x, LongBinaryOperator fn, boolean wasUncontended) { int h; if ((h = getProbe()) == 0 ) { ThreadLocalRandom.current(); h = getProbe(); wasUncontended = true ; } boolean collide = false ; for (;;) { Cell[] as; Cell a; int n; long v; if ((as = cells) != null && (n = as.length) > 0 ) { if ((a = as[(n - 1 ) & h]) == null ) { } else if (!wasUncontended) wasUncontended = true ; else if (a.cas(v = a.value, ((fn == null ) ? v + x : fn.applyAsLong(v, x)))) break ; else if (n >= NCPU || cells != as) collide = false ; else if (!collide) collide = true ; else if (cellsBusy == 0 && casCellsBusy()) { continue ; } h = advanceProbe(h); } else if (cellsBusy == 0 && cells == as && casCellsBusy()) { } else if (casBase(v = base, ((fn == null ) ? v + x : fn.applyAsLong(v, x)))) break ; } }
longAccumulate 流程图
每个线程刚进入 longAccumulate 时,会尝试对应一个 cell 对象(找到一个坑位)
获取最终结果通过 sum 方法
1 2 3 4 5 6 7 8 9 10 11 public long sum () { Cell[] as = cells; Cell a; long sum = base; if (as != null ) { for (int i = 0 ; i < as.length; ++i) { if ((a = as[i]) != null ) sum += a.value; } } return sum; }
9. Unsafe 9.1 概述 Unsafe 对象提供了非常底层的,操作内存、线程的方法,Unsafe 对象不能直接调用,只能通过反射获得
1 2 3 4 5 6 7 8 9 10 11 12 13 14 15 public class UnsafeAccessor { static Unsafe unsafe; static { try { Field theUnsafe = Unsafe.class.getDeclaredField("theUnsafe" ); theUnsafe.setAccessible(true ); unsafe = (Unsafe) theUnsafe.get(null ); } catch (NoSuchFieldException | IllegalAccessException e) { throw new Error (e); } } static Unsafe getUnsafe () { return unsafe; } }
9.2 Unsafe CAS 操作 1 2 3 4 5 @Data class Student { volatile int id; volatile String name; }
1 2 3 4 5 6 7 8 9 10 11 Unsafe unsafe = UnsafeAccessor.getUnsafe();Field id = Student.class.getDeclaredField("id" );Field name = Student.class.getDeclaredField("name" );long idOffset = UnsafeAccessor.unsafe.objectFieldOffset(id);long nameOffset = UnsafeAccessor.unsafe.objectFieldOffset(name);Student student = new Student ();UnsafeAccessor.unsafe.compareAndSwapInt(student, idOffset, 0 , 20 ); UnsafeAccessor.unsafe.compareAndSwapObject(student, nameOffset, null , "张三" ); System.out.println(student);
输出
使用自定义的 AtomicData 实现之前线程安全的原子整数 Account 实现
1 2 3 4 5 6 7 8 9 10 11 12 13 14 15 16 17 18 19 20 21 22 23 24 25 26 27 28 29 30 31 class AtomicData { private volatile int data; static final Unsafe unsafe; static final long DATA_OFFSET; static { unsafe = UnsafeAccessor.getUnsafe(); try { DATA_OFFSET = unsafe.objectFieldOffset(AtomicData.class.getDeclaredField("data" )); } catch (NoSuchFieldException e) { throw new Error (e); } } public AtomicData (int data) { this .data = data; } public void decrease (int amount) { int oldValue; while (true ) { oldValue = data; if (unsafe.compareAndSwapInt(this , DATA_OFFSET, oldValue, oldValue - amount)) { return ; } } } public int getData () { return data; } }
Account 实现
1 2 3 4 5 6 7 8 9 10 11 Account.demo(new Account () { AtomicData atomicData = new AtomicData (10000 ); @Override public Integer getBalance () { return atomicData.getData(); } @Override public void withdraw (Integer amount) { atomicData.decrease(amount); } });
10. 本章小 结
CAS 与 volatile
API
原子整数
原子引用
原子数组
字段更新器
原子累加器
Unsafe
原理方面
五、共享模型之不可变 1. 本章内容
2. 日期转换的问题 2.1 问题提出 下面的代码在运行时,由于 SimpleDateFormat 不是线程安全的
1 2 3 4 5 6 7 8 9 10 SimpleDateFormat sdf = new SimpleDateFormat ("yyyy-MM-dd" );for (int i = 0 ; i < 10 ; i++) { new Thread (() -> { try { log.debug("{}" , sdf.parse("1951-04-21" )); } catch (Exception e) { log.error("{}" , e); } }).start(); }
有很大几率出现 java.lang.NumberFormatException 或者出现不正确的日期解析结果,例如:
1 2 3 4 5 6 7 8 9 10 11 12 13 14 15 16 17 18 19 20 21 22 23 24 25 26 27 28 29 30 31 32 19 : 10 : 40.859 [Thread-2 ] c.TestDateParse - {}java.lang.NumberFormatException: For input string: "" at java.lang.NumberFormatException.forInputString(NumberFormatException.java: 65 ) at java.lang.Long.parseLong(Long.java: 601 ) at java.lang.Long.parseLong(Long.java: 631 ) at java.text.DigitList.getLong(DigitList.java: 195 ) at java.text.DecimalFormat.parse(DecimalFormat.java: 2084 ) at java.text.SimpleDateFormat.subParse(SimpleDateFormat.java: 2162 ) at java.text.SimpleDateFormat.parse(SimpleDateFormat.java: 1514 ) at java.text.DateFormat.parse(DateFormat.java: 364 ) at cn.itcast.n7.TestDateParse.lambda $test 1$0 (TestDateParse.java: 18 ) at java.lang.Thread.run(Thread.java: 748 ) 19 : 10 : 40.859 [Thread-1 ] c.TestDateParse - {}java.lang.NumberFormatException: empty String at sun.misc.FloatingDecimal.readJavaFormatString(FloatingDecimal.java: 1842 ) at sun.misc.FloatingDecimal.parseDouble(FloatingDecimal.java: 110 ) at java.lang.Double.parseDouble(Double.java: 538 ) at java.text.DigitList.getDouble(DigitList.java: 169 ) at java.text.DecimalFormat.parse(DecimalFormat.java: 2089 ) at java.text.SimpleDateFormat.subParse(SimpleDateFormat.java: 2162 ) at java.text.SimpleDateFormat.parse(SimpleDateFormat.java: 1514 ) at java.text.DateFormat.parse(DateFormat.java: 364 ) at cn.itcast.n7.TestDateParse.lambda $test 1$0 (TestDateParse.java: 18 ) at java.lang.Thread.run(Thread.java: 748 ) 19 : 10 : 40.857 [Thread-8 ] c.TestDateParse - Sat Apr 21 00 : 00 : 00 CST 1951 19 : 10 : 40.857 [Thread-9 ] c.TestDateParse - Sat Apr 21 00 : 00 : 00 CST 1951 19 : 10 : 40.857 [Thread-6 ] c.TestDateParse - Sat Apr 21 00 : 00 : 00 CST 1951 19 : 10 : 40.857 [Thread-4 ] c.TestDateParse - Sat Apr 21 00 : 00 : 00 CST 1951 19 : 10 : 40.857 [Thread-5 ] c.TestDateParse - Mon Apr 21 00 : 00 : 00 CST 178960645 19 : 10 : 40.857 [Thread-0 ] c.TestDateParse - Sat Apr 21 00 : 00 : 00 CST 1951 19 : 10 : 40.857 [Thread-7 ] c.TestDateParse - Sat Apr 21 00 : 00 : 00 CST 1951 19 : 10 : 40.857 [Thread-3 ] c.TestDateParse - Sat Apr 21 00 : 00 : 00 CST 1951
2.2 思路 - 同步锁 这样虽能解决问题,但带来的是性能上的损失,并不算很好:
1 2 3 4 5 6 7 8 9 10 11 12 SimpleDateFormat sdf = new SimpleDateFormat ("yyyy-MM-dd" );for (int i = 0 ; i < 50 ; i++) { new Thread (() -> { synchronized (sdf) { try { log.debug("{}" , sdf.parse("1951-04-21" )); } catch (Exception e) { log.error("{}" , e); } } }).start(); }
2.3 思路 - 不可变 如果一个对象在不能够修改其内部状态(属性),那么它就是线程安全的,因为不存在并发修改啊!这样的对象在Java 中有很多,例如在 Java 8 后,提供了一个新的日期格式化类
1 2 3 4 5 6 7 DateTimeFormatter dtf = DateTimeFormatter.ofPattern("yyyy-MM-dd" );for (int i = 0 ; i < 10 ; i++) { new Thread (() -> { LocalDate date = dtf.parse("2018-10-01" , LocalDate::from); log.debug("{}" , date); }).start(); }
可以看 DateTimeFormatter 的文档:
1 2 @implSpec This class is immutable and thread-safe.
不可变对象,实际是另一种避免竞争的方式。
3. 不可变设计 另一个大家更为熟悉的 String 类也是不可变的,以它为例,说明一下不可变设计的要素
1 2 3 4 5 6 7 8 public final class String implements java .io.Serializable, Comparable<String>, CharSequence { private final char value[]; private int hash; }
3.1 final 的使用 发现该类、类中所有属性都是 final 的
属性用 final 修饰保证了该属性是只读的,不能修改
类用 final 修饰保证了该类中的方法不能被覆盖,防止子类无意间破坏不可变性
3.2 保护性拷贝 但有同学会说,使用字符串时,也有一些跟修改相关的方法啊,比如 substring 等,那么下面就看一看这些方法是如何实现的,就以 substring 为例:
1 2 3 4 5 6 7 8 9 10 public String substring (int beginIndex) { if (beginIndex < 0 ) { throw new StringIndexOutOfBoundsException (beginIndex); } int subLen = value.length - beginIndex; if (subLen < 0 ) { throw new StringIndexOutOfBoundsException (subLen); } return (beginIndex == 0 ) ? this : new String (value, beginIndex, subLen); }
发现其内部是调用 String 的构造方法创建了一个新字符串,再进入这个构造看看,是否对 final char[] value 做了修改:
1 2 3 4 5 6 7 8 9 10 11 12 13 14 15 16 17 18 public String (char value[], int offset, int count) { if (offset < 0 ) { throw new StringIndexOutOfBoundsException (offset); } if (count <= 0 ) { if (count < 0 ) { throw new StringIndexOutOfBoundsException (count); } if (offset <= value.length) { this .value = "" .value; return ; } } if (offset > value.length - count) { throw new StringIndexOutOfBoundsException (offset + count); } this .value = Arrays.copyOfRange(value, offset, offset+count); }
结果发现也没有,构造新字符串对象时,会生成新的 char[] value,对内容进行复制 。这种通过创建副本对象来避免共享的手段称之为【保护性拷贝(defensive copy)】
3.3 模式之享元 简介 定义 英文名称:Flyweight pattern. 当需要重用数量有限的同一类对象时
wikipedia: A flyweight is an object that minimizes memory usage by sharing as much data as possible with other similar objects
出自 “Gang of Four” design patterns归类 Structual patterns
体现 包装类 在JDK中 Boolean,Byte,Short,Integer,Long,Character 等包装类提供了 valueOf 方法,例如 Long 的 valueOf 会缓存 -128~127 之间的 Long 对象,在这个范围之间会重用对象,大于这个范围,才会新建 Long 对象:
1 2 3 4 5 6 7 public static Long valueOf (long l) { final int offset = 128 ; if (l >= -128 && l <= 127 ) { return LongCache.cache[(int )l + offset]; } return new Long (l); }
注意:
Byte, Short, Long 缓存的范围都是 -128~127
Character 缓存的范围是 0~127
Integer的默认范围是 -128~127
最小值不能变
但最大值可以通过调整虚拟机参数 -Djava.lang.Integer.IntegerCache.high 来改变
Boolean 缓存了 TRUE 和 FALSE
String 池 BigDecimal BigInteger DIY 例如:一个线上商城应用,QPS 达到数千,如果每次都重新创建和关闭数据库连接,性能会受到极大影响。 这时预先创建好一批连接,放入连接池。一次请求到达后,从连接池获取连接,使用完毕后再还回连接池,这样既节约了连接的创建和关闭时间,也实现了连接的重用,不至于让庞大的连接数压垮数据库
1 2 3 4 5 6 7 8 9 10 11 12 13 14 15 16 17 18 19 20 21 22 23 24 25 26 27 28 29 30 31 32 33 34 35 36 37 38 39 40 41 42 43 44 45 46 47 48 49 50 51 52 53 54 55 56 class Pool { private final int poolSize; private Connection[] connections; private AtomicIntegerArray states; public Pool (int poolSize) { this .poolSize = poolSize; this .connections = new Connection [poolSize]; this .states = new AtomicIntegerArray (new int [poolSize]); for (int i = 0 ; i < poolSize; i++) { connections[i] = new MockConnection ("连接" + (i+1 )); } } public Connection borrow () { while (true ) { for (int i = 0 ; i < poolSize; i++) { if (states.get(i) == 0 ) { if (states.compareAndSet(i, 0 , 1 )) { log.debug("borrow {}" , connections[i]); return connections[i]; } } } synchronized (this ) { try { log.debug("wait..." ); this .wait(); } catch (InterruptedException e) { e.printStackTrace(); } } } } public void free (Connection conn) { for (int i = 0 ; i < poolSize; i++) { if (connections[i] == conn) { states.set(i, 0 ); synchronized (this ) { log.debug("free {}" , conn); this .notifyAll(); } break ; } } } } class MockConnection implements Connection { }
使用连接池:
1 2 3 4 5 6 7 8 9 10 11 12 Pool pool = new Pool (2 );for (int i = 0 ; i < 5 ; i++) { new Thread (() -> { Connection conn = pool.borrow(); try { Thread.sleep(new Random ().nextInt(1000 )); } catch (InterruptedException e) { e.printStackTrace(); } pool.free(conn); }).start(); }
以上实现没有考虑:
连接的动态增长与收缩
连接保活(可用性检测)
等待超时处理
分布式 hash
对于关系型数据库,有比较成熟的连接池实现,例如c3p0, druid等 对于更通用的对象池,可以考虑使用apachecommons pool,例如redis连接池可以参考jedis中关于连接池的实现
3.4 原理之 final 设置 final 变量的原理 理解了 volatile 原理,再对比 final 的实现就比较简单了
1 2 3 public class TestFinal { final int a = 20 ; }
字节码
1 2 3 4 5 6 7 8 0 : aload_0 1 : invokespecial 4 : aload_05 : bipush 20 7 : putfield <-- 写屏障 10 : return
发现 final 变量的赋值也会通过 putfield 指令来完成,同样在这条指令之后也会加入写屏障,保证在其它线程读到它的值时不会出现为 0 的情况
获取final 变量的原理 1 2 3 4 5 6 7 8 9 10 11 12 13 14 15 16 17 18 19 20 21 22 23 24 25 26 27 28 29 30 31 32 33 public class TestFinal { static int A = 10 ; static int B = Short.MAX_VALUE+1 ; final int a = 20 ; final int b = Integer.MAX_VALUE; final void test1 () { final int c = 30 ; new Thread (()->{ System.out.println(c); }).start(); final int d = 30 ; class Task implements Runnable { @Override public void run () { System.out.println(d); } } new Thread (new Task ()).start(); } } class UseFinal1 { public void test () { System.out.println(TestFinal.A); System.out.println(TestFinal.B); System.out.println(new TestFinal ().a); System.out.println(new TestFinal ().b); new TestFinal ().test1(); } }
对UseFinal1类反编译后
1 2 3 4 5 6 7 8 9 10 11 12 13 14 15 16 17 18 19 20 21 22 23 24 25 26 27 28 29 30 31 32 33 34 35 36 37 38 39 40 41 42 43 44 45 46 47 48 49 50 51 52 53 54 55 56 57 58 59 60 61 62 class cn /itcast/n5/UseFinal1 { <init>()V L0 LINENUMBER 29 L0 ALOAD 0 INVOKESPECIAL java/lang/Object.<init> ()V RETURN L1 LOCALVARIABLE this Lcn/itcast/n5/UseFinal1; L0 L1 0 MAXSTACK = 1 MAXLOCALS = 1 public test () V L0 LINENUMBER 31 L0 GETSTATIC java/lang/System.out : Ljava/io/PrintStream; GETSTATIC cn/itcast/n5/TestFinal.A : I INVOKEVIRTUAL java/io/PrintStream.println (I)V L1 LINENUMBER 32 L1 GETSTATIC java/lang/System.out : Ljava/io/PrintStream; GETSTATIC cn/itcast/n5/TestFinal.B : I INVOKEVIRTUAL java/io/PrintStream.println (I)V L2 LINENUMBER 33 L2 GETSTATIC java/lang/System.out : Ljava/io/PrintStream; NEW cn/itcast/n5/TestFinal DUP INVOKESPECIAL cn/itcast/n5/TestFinal.<init> ()V INVOKEVIRTUAL java/lang/Object.getClass ()Ljava/lang/Class; POP BIPUSH 20 INVOKEVIRTUAL java/io/PrintStream.println (I)V L3 LINENUMBER 34 L3 GETSTATIC java/lang/System.out : Ljava/io/PrintStream; NEW cn/itcast/n5/TestFinal DUP INVOKESPECIAL cn/itcast/n5/TestFinal.<init> ()V INVOKEVIRTUAL java/lang/Object.getClass ()Ljava/lang/Class; POP LDC 2147483647 INVOKEVIRTUAL java/io/PrintStream.println (I)V L4 LINENUMBER 35 L4 NEW cn/itcast/n5/TestFinal DUP INVOKESPECIAL cn/itcast/n5/TestFinal.<init> ()V INVOKEVIRTUAL cn/itcast/n5/TestFinal.test1 ()V L5 LINENUMBER 36 L5 RETURN L6 LOCALVARIABLE this Lcn/itcast/n5/UseFinal1; L0 L6 0 MAXSTACK = 3 MAXLOCALS = 1 }
总结:
jdk1.8后,不加final修饰的类成员变量或非静态成员变量,类变量是通过getstatic 到该类 栈获取,普通变量是通过 getfield到栈获取
加 final 后,类变量或者普通变量
-128~127 数值使用 bipush 操作,修饰的变量压入到方法栈中,相当于复制了一份作为共享变量 供 方法 test() 使用-2147483648~2147483647 数值 使用 ldc 操作,修饰的变量存放到了常量池中,共享变量从常量池获取
4. 无状态 在 web 阶段学习时,设计 Servlet 时为了保证其线程安全,都会有这样的建议,不要为 Servlet 设置成员变量,这种没有任何成员变量的类是线程安全的
因为成员变量保存的数据也可以称为状态信息,因此没有成员变量就称之为【无状态】
5. 本章小结
不可变类使用
不可变类设计
* 原理方面
模式方面
六、共享模型之工具 1. 线程池 1.1 自定义线程池
步骤1:自定义拒绝策略接口
1 2 3 4 @FunctionalInterface interface RejectPolicy <T> { void reject (BlockingQueue<T> queue, T task) ; }
步骤2:自定义任务队列
1 2 3 4 5 6 7 8 9 10 11 12 13 14 15 16 17 18 19 20 21 22 23 24 25 26 27 28 29 30 31 32 33 34 35 36 37 38 39 40 41 42 43 44 45 46 47 48 49 50 51 52 53 54 55 56 57 58 59 60 61 62 63 64 65 66 67 68 69 70 71 72 73 74 75 76 77 78 79 80 81 82 83 84 85 86 87 88 89 90 91 92 93 94 95 96 97 98 99 100 101 102 103 104 105 106 107 108 109 110 111 112 113 114 115 116 117 118 119 120 121 122 123 class BlockingQueue <T> { private Deque<T> queue = new ArrayDeque <>(); private ReentrantLock lock = new ReentrantLock (); private Condition fullWaitSet = lock.newCondition(); private Condition emptyWaitSet = lock.newCondition(); private int capcity; public BlockingQueue (int capcity) { this .capcity = capcity; } public T poll (long timeout, TimeUnit unit) { lock.lock(); try { long nanos = unit.toNanos(timeout); while (queue.isEmpty()) { try { if (nanos <= 0 ) { return null ; } nanos = emptyWaitSet.awaitNanos(nanos); } catch (InterruptedException e) { e.printStackTrace(); } } T t = queue.removeFirst(); fullWaitSet.signal(); return t; } finally { lock.unlock(); } } public T take () { lock.lock(); try { while (queue.isEmpty()) { try { emptyWaitSet.await(); } catch (InterruptedException e) { e.printStackTrace(); } } T t = queue.removeFirst(); fullWaitSet.signal(); return t; } finally { lock.unlock(); } } public void put (T task) { lock.lock(); try { while (queue.size() == capcity) { try { log.debug("等待加入任务队列 {} ..." , task); fullWaitSet.await(); } catch (InterruptedException e) { e.printStackTrace(); } } log.debug("加入任务队列 {}" , task); queue.addLast(task); emptyWaitSet.signal(); } finally { lock.unlock(); } } public boolean offer (T task, long timeout, TimeUnit timeUnit) { lock.lock(); try { long nanos = timeUnit.toNanos(timeout); while (queue.size() == capcity) { try { if (nanos <= 0 ) { return false ; } log.debug("等待加入任务队列 {} ..." , task); nanos = fullWaitSet.awaitNanos(nanos); } catch (InterruptedException e) { e.printStackTrace(); } } log.debug("加入任务队列 {}" , task); queue.addLast(task); emptyWaitSet.signal(); return true ; } finally { lock.unlock(); } } public int size () { lock.lock(); try { return queue.size(); } finally { lock.unlock(); } } public void tryPut (RejectPolicy<T> rejectPolicy, T task) { lock.lock(); try { if (queue.size() == capcity) { rejectPolicy.reject(this , task); } else { log.debug("加入任务队列 {}" , task); queue.addLast(task); emptyWaitSet.signal(); } } finally { lock.unlock(); } } }
步骤3:自定义线程池
1 2 3 4 5 6 7 8 9 10 11 12 13 14 15 16 17 18 19 20 21 22 23 24 25 26 27 28 29 30 31 32 33 34 35 36 37 38 39 40 41 42 43 44 45 46 47 48 49 50 51 52 53 54 55 56 57 58 59 60 61 62 63 64 65 66 67 68 69 class ThreadPool { private BlockingQueue<Runnable> taskQueue; private HashSet<Worker> workers = new HashSet <>(); private int coreSize; private long timeout; private TimeUnit timeUnit; private RejectPolicy<Runnable> rejectPolicy; public void execute (Runnable task) { synchronized (workers) { if (workers.size() < coreSize) { Worker worker = new Worker (task); log.debug("新增 worker{}, {}" , worker, task); workers.add(worker); worker.start(); } else { taskQueue.tryPut(rejectPolicy, task); } } } public ThreadPool (int coreSize, long timeout, TimeUnit timeUnit, int queueCapcity, RejectPolicy<Runnable> rejectPolicy) { this .coreSize = coreSize; this .timeout = timeout; this .timeUnit = timeUnit; this .taskQueue = new BlockingQueue <>(queueCapcity); this .rejectPolicy = rejectPolicy; } class Worker extends Thread { private Runnable task; public Worker (Runnable task) { this .task = task; } @Override public void run () { while (task != null || (task = taskQueue.poll(timeout, timeUnit)) != null ) { try { log.debug("正在执行...{}" , task); task.run(); } catch (Exception e) { e.printStackTrace(); } finally { task = null ; } } synchronized (workers) { log.debug("worker 被移除{}" , this ); workers.remove(this ); } } } }
步骤4:测试
1 2 3 4 5 6 7 8 9 10 11 12 13 14 15 16 17 18 19 20 21 22 23 24 25 26 public static void main (String[] args) { ThreadPool threadPool = new ThreadPool (1 , 1000 , TimeUnit.MILLISECONDS, 1 , (queue, task)->{ task.run(); }); for (int i = 0 ; i < 4 ; i++) { int j = i; threadPool.execute(() -> { try { Thread.sleep(1000L ); } catch (InterruptedException e) { e.printStackTrace(); } log.debug("{}" , j); }); } }
1.2 ThreadPoolExecutor
(1) 线程池状态 ThreadPoolExecutor 使用 int 的高 3 位来表示线程池状态,低 29 位表示线程数量
状态名
高 3 位
接收新任 务
处理阻塞队列任 务
说明
RUNNING
111
Y
Y
SHUTDOWN
000
N
Y
不会接收新任务,但会处理阻塞队列剩余 任务
STOP
001
N
N
会中断正在执行的任务,并抛弃阻塞队列 任务
TIDYING
010
-
-
任务全执行完毕,活动线程为 0 即将进入 终结
TERMINATED
011
-
-
终结状态
从数字上比较,TERMINATED > TIDYING > STOP > SHUTDOWN > RUNNING
这些信息存储在一个原子变量 ctl 中,目的是将线程池状态与线程个数合二为一,这样就可以用一次 cas 原子操作进行赋值
1 2 3 4 ctl.compareAndSet(c, ctlOf(targetState, workerCountOf(c)))); private static int ctlOf (int rs, int wc) { return rs | wc; }
(2) 构造方法 1 2 3 4 5 6 7 public ThreadPoolExecutor (int corePoolSize, int maximumPoolSize, long keepAliveTime, TimeUnit unit, BlockingQueue<Runnable> workQueue, ThreadFactory threadFactory, RejectedExecutionHandler handler)
corePoolSize 核心线程数目 (最多保留的线程数)
maximumPoolSize 最大线程数目
keepAliveTime 生存时间 - 针对救急线程
unit 时间单位 - 针对救急线程
workQueue 阻塞队列
threadFactory 线程工厂 - 可以为线程创建时起个好名字
handler 拒绝策略
工作方式:
1 2 3 4 5 6 7 8 9 10 11 12 13 14 15 16 17 18 19 20 21 graph LR subgraph 阻塞队列 size=2 t3(任务3) t4(任务4) end subgraph 线程池c=2,m=3 ct1(核心线程1) ct2(核心线程2) mt1(救急线程) ct1 --> t1(任务1) ct2 --> t2(任务2) end style ct1 fill:#ccf,stroke:#f66,stroke-width:2px style ct2 fill:#ccf,stroke:#f66,stroke-width:2px style mt1 fill:#ccf,stroke:#f66,stroke-width:2px,stroke-dasharray: 5.5
线程池中刚开始没有线程,当一个任务提交给线程池后,线程池会创建一个新线程来执行任务。
当线程数达到 corePoolSize 并没有线程空闲,这时再加入任务,新加的任务会被加入workQueue 队列排队,直到有空闲的线程。
如果队列选择了有界队列,那么任务超过了队列大小时,会创建 maximumPoolSize - corePoolSize 数目的线程来救急。
如果线程到达 maximumPoolSize 仍然有新任务这时会执行拒绝策略。拒绝策略 jdk 提供了 4 种实现,其它著名框架也提供了实现
AbortPolicy 让调用者抛出 RejectedExecutionException 异常,这是默认策略 CallerRunsPolicy 让调用者运行任务DiscardPolicy 放弃本次任务DiscardOldestPolicy 放弃队列中最早的任务,本任务取而代之Dubbo 的实现,在抛出 RejectedExecutionException 异常之前会记录日志,并 dump 线程栈信息,方便定位问题Netty 的实现,是创建一个新线程来执行任务ActiveMQ 的实现,带超时等待(60s)尝试放入队列,类似我们之前自定义的拒绝策略PinPoint 的实现,它使用了一个拒绝策略链,会逐一尝试策略链中每种拒绝策略
当高峰过去后,超过corePoolSize 的救急线程如果一段时间没有任务做,需要结束节省资源,这个时间由 keepAliveTime 和 unit 来控制。
根据这个构造方法,JDK Executors 类中提供了众多工厂方法来创建各种用途的线程池
(3) newFixedThreadPool 1 2 3 4 5 public static ExecutorService newFixedThreadPool (int nThreads) { return new ThreadPoolExecutor (nThreads, nThreads, 0L , TimeUnit.MILLISECONDS, new LinkedBlockingQueue <Runnable>()); }
特点
核心线程数 == 最大线程数(没有救急线程被创建),因此也无需超时时间
阻塞队列是无界的,可以放任意数量的任务
评价
适用于任务量已知,相对耗时的任务
(4) newCachedThreadPool 1 2 3 4 5 public static ExecutorService newCachedThreadPool () { return new ThreadPoolExecutor (0 , Integer.MAX_VALUE, 60L , TimeUnit.SECONDS, new SynchronousQueue <Runnable>()); }
特点
核心线程数是 0, 最大线程数是 Integer.MAX_VALUE,救急线程的空闲生存时间是 60s,意味着
全部都是救急线程(60s 后可以回收)
队列采用了 SynchronousQueue 实现特点是,它没有容量,没有线程来取是放不进去的(一手交钱、一手交
1 2 3 4 5 6 7 8 9 10 11 12 13 14 15 16 17 18 19 20 21 22 23 24 25 26 27 28 29 30 31 SynchronousQueue<Integer> integers = new SynchronousQueue <>(); new Thread (() -> { try { log.debug("putting {} " , 1 ); integers.put(1 ); log.debug("{} putted..." , 1 ); log.debug("putting...{} " , 2 ); integers.put(2 ); log.debug("{} putted..." , 2 ); } catch (InterruptedException e) { e.printStackTrace(); } },"t1" ).start(); sleep(1 ); new Thread (() -> { try { log.debug("taking {}" , 1 ); integers.take(); } catch (InterruptedException e) { e.printStackTrace(); } },"t2" ).start(); sleep(1 ); new Thread (() -> { try { log.debug("taking {}" , 2 ); integers.take(); } catch (InterruptedException e) { e.printStackTrace(); } },"t3" ).start();
输出
1 2 3 4 5 6 11 : 48 : 15.500 c.TestSynchronousQueue [t1] - putting 1 11 : 48 : 16.500 c.TestSynchronousQueue [t2] - taking 1 11 : 48 : 16.500 c.TestSynchronousQueue [t1] - 1 putted...11 : 48 : 16.500 c.TestSynchronousQueue [t1] - putting...2 11 : 48 : 17.502 c.TestSynchronousQueue [t3] - taking 2 11 : 48 : 17.503 c.TestSynchronousQueue [t1] - 2 putted...
评价
整个线程池表现为线程数会根据任务量不断增长,没有上限,当任务执行完毕,空闲 1分钟后释放线程。 适合任务数比较密集,但每个任务执行时间较短的情况
(5) newSingleThreadExecutor 1 2 3 4 5 6 public static ExecutorService newSingleThreadExecutor () { return new FinalizableDelegatedExecutorService (new ThreadPoolExecutor (1 , 1 , 0L , TimeUnit.MILLISECONDS, new LinkedBlockingQueue <Runnable>())); }
使用场景:
希望多个任务排队执行。线程数固定为 1,任务数多于 1 时,会放入无界队列排队。任务执行完毕,这唯一的线程也不会被释放。
区别:
自己创建一个单线程串行执行任务,如果任务执行失败而终止那么没有任何补救措施,而线程池还会新建一个线程,保证池的正常工作
Executors.newSingleThreadExecutor() 线程个数始终为1,不能修改
FinalizableDelegatedExecutorService 应用的是装饰器模式(FinalizableDelegatedExecutorService 是具体装饰角色,DelegatedExecutorService 是抽象装饰角色,ExecutorService 是抽象构件角色),只对外暴露了 ExecutorService 接口,因此不能调用 ThreadPoolExecutor 中特有的方法
Executors.newFixedThreadPool(1) 初始时为1,以后还可以修改
对外暴露的是 ThreadPoolExecutor 对象,可以强转后调用 setCorePoolSize 等方法进行修改
(6) 提交任务 1 2 3 4 5 6 7 8 9 10 11 12 13 14 15 16 17 18 void execute (Runnable command) ;<T> Future<T> submit (Callable<T> task) ; <T> List<Future<T>> invokeAll (Collection<? extends Callable<T>> tasks) throws InterruptedException; <T> List<Future<T>> invokeAll (Collection<? extends Callable<T>> tasks, long timeout, TimeUnit unit) throws InterruptedException; <T> T invokeAny (Collection<? extends Callable<T>> tasks) throws InterruptedException, ExecutionException; <T> T invokeAny (Collection<? extends Callable<T>> tasks, long timeout, TimeUnit unit) throws InterruptedException, ExecutionException, TimeoutException;
execute和submit的区别
execute只能提交Runnable类型的任务,无返回值。submit既可以提交Runnable类型的任务,也可以提交Callable类型的任务,会有一个类型为Future的返回值,但当任务类型为Runnable时,返回值为null。
execute在执行任务时,如果遇到异常会直接抛出,而submit不会直接抛出,只有在使用Future的get方法获取返回值时,才会抛出异常。
submit 执行后会立即返回一个结果,其他线程可以将返回的对象调用其方法get() 获取将来的结果,会阻塞等待(任务未执行完成)。
(7) 关闭线程池 shutdown
1 2 3 4 5 6 7 8 9 10 11 12 13 14 15 16 public void shutdown () { final ReentrantLock mainLock = this .mainLock; mainLock.lock(); try { checkShutdownAccess(); advanceRunState(SHUTDOWN); interruptIdleWorkers(); onShutdown(); } finally { mainLock.unlock(); } tryTerminate(); }
shutdownNow
1 2 3 4 5 6 7 List<Runnable> shutdownNow () ;
1 2 3 4 5 6 7 8 9 10 11 12 13 14 15 16 17 18 19 public List<Runnable> shutdownNow () { List<Runnable> tasks; final ReentrantLock mainLock = this .mainLock; mainLock.lock(); try { checkShutdownAccess(); advanceRunState(STOP); interruptWorkers(); tasks = drainQueue(); } finally { mainLock.unlock(); } tryTerminate(); return tasks; }
其它方法
1 2 3 4 5 6 7 boolean isShutdown () ;boolean isTerminated () ;情,可以利用此方法等待 boolean awaitTermination (long timeout, TimeUnit unit) throws InterruptedException;
* 异步模式之工作线程 定义 让有限的工作线程(Worker Thread)来轮流异步处理无限多的任务。也可以将其归类为分工模式,它的典型实现
例如,海底捞的服务员(线程),轮流处理每位客人的点餐(任务),如果为每位客人都配一名专属的服务员,那
注意,不同任务类型应该使用不同的线程池,这样能够避免饥饿,并能提升效率
例如,如果一个餐馆的工人既要招呼客人(任务类型A),又要到后厨做菜(任务类型B)显然效率不咋地,分成
饥饿 固定大小线程池会有饥饿现象
两个工人是同一个线程池中的两个线程
他们要做的事情是:为客人点餐和到后厨做菜,这是两个阶段的工作
客人点餐:必须先点完餐,等菜做好,上菜,在此期间处理点餐的工人必须等待
后厨做菜:没啥说的,做就是了
比如工人A 处理了点餐任务,接下来它要等着 工人B 把菜做好,然后上菜,他俩也配合的蛮好
但现在同时来了两个客人,这个时候工人A 和工人B 都去处理点餐了,这时没人做饭了,饥饿
1 2 3 4 5 6 7 8 9 10 11 12 13 14 15 16 17 18 19 20 21 22 23 24 25 26 27 28 29 30 31 32 33 34 35 36 public class TestDeadLock { static final List<String> MENU = Arrays.asList("地三鲜" , "宫保鸡丁" , "辣子鸡丁" , "烤鸡翅" ); static Random RANDOM = new Random (); static String cooking () { return MENU.get(RANDOM.nextInt(MENU.size())); } public static void main (String[] args) { ExecutorService executorService = Executors.newFixedThreadPool(2 ); executorService.execute(() -> { log.debug("处理点餐..." ); Future<String> f = executorService.submit(() -> { log.debug("做菜" ); return cooking(); }); try { log.debug("上菜: {}" , f.get()); } catch (InterruptedException | ExecutionException e) { e.printStackTrace(); } }); } }
输出
1 2 3 17 : 21 : 27.883 c.TestDeadLock [pool-1 -thread-1 ] - 处理点餐...17 : 21 : 27.891 c.TestDeadLock [pool-1 -thread-2 ] - 做菜17 : 21 : 27.891 c.TestDeadLock [pool-1 -thread-1 ] - 上菜: 烤鸡翅
当注释取消后,可能的输出
1 2 17 : 08: 41.339 c.TestDeadLock [pool-1 -thread-2 ] - 处理点餐...17 : 08: 41.339 c.TestDeadLock [pool-1 -thread-1 ] - 处理点餐...
解决方法可以增加线程池的大小,不过不是根本解决方案,还是前面提到的,不同的任务类型,采用不同的线程池,例如:
1 2 3 4 5 6 7 8 9 10 11 12 13 14 15 16 17 18 19 20 21 22 23 24 25 26 27 28 29 30 31 32 33 34 35 public class TestDeadLock { static final List<String> MENU = Arrays.asList("地三鲜" , "宫保鸡丁" , "辣子鸡丁" , "烤鸡翅" ); static Random RANDOM = new Random (); static String cooking () { return MENU.get(RANDOM.nextInt(MENU.size())); } public static void main (String[] args) { ExecutorService waiterPool = Executors.newFixedThreadPool(1 ); ExecutorService cookPool = Executors.newFixedThreadPool(1 ); waiterPool.execute(() -> { log.debug("处理点餐..." ); Future<String> f = cookPool.submit(() -> { log.debug("做菜" ); return cooking(); }); try { log.debug("上菜: {}" , f.get()); } catch (InterruptedException | ExecutionException e) { e.printStackTrace(); } }); waiterPool.execute(() -> { log.debug("处理点餐..." ); Future<String> f = cookPool.submit(() -> { log.debug("做菜" ); return cooking(); }); try { log.debug("上菜: {}" , f.get()); } catch (InterruptedException | ExecutionException e) { e.printStackTrace(); } }); } }
输出
1 2 3 4 5 6 17 : 25 : 14.626 c.TestDeadLock [pool-1 -thread-1 ] - 处理点餐...17 : 25 : 14.630 c.TestDeadLock [pool-2 -thread-1 ] - 做菜17 : 25 : 14.631 c.TestDeadLock [pool-1 -thread-1 ] - 上菜: 地三鲜17 : 25 : 14.632 c.TestDeadLock [pool-1 -thread-1 ] - 处理点餐...17 : 25 : 14.632 c.TestDeadLock [pool-2 -thread-1 ] - 做菜17 : 25 : 14.632 c.TestDeadLock [pool-1 -thread-1 ] - 上菜: 辣子鸡丁
创建多少线程池合适
过小会导致程序不能充分地利用系统资源、容易导致饥饿
过大会导致更多的线程上下文切换,占用更多内存
CPU 密集型运算 通常采用 cpu 核数 + 1 能够实现最优的 CPU 利用率,+1 是保证当线程由于页缺失故障(操作系统)或其它原因导致暂停时,额外的这个线程就能顶上去,保证 CPU 时钟周期不被浪费
I/O 密集型运算 CPU 不总是处于繁忙状态,例如,当你执行业务计算时,这时候会使用 CPU 资源,但当你执行 I/O 操作时、远程RPC 调用时,包括进行数据库操作时,这时候 CPU 就闲下来了,你可以利用多线程提高它的利用率。
经验公式如下
线程数 = 核数 * 期望 CPU 利用率 * 总时间(CPU计算时间+等待时间) / CPU 计算时间
例如 4 核 CPU 计算时间是 50% ,其它等待时间是 50%,期望 cpu 被 100% 利用,套用公式 4 * 100% * 100% / 50% = 8
例如 4 核 CPU 计算时间是 10% ,其它等待时间是 90%,期望 cpu 被 100% 利用,套用公式 4 * 100% * 100% / 10% = 40
自定义线程池 (8) 任务调度线程池 在『任务调度线程池』功能加入之前,可以使用 java.util.Timer 来实现定时功能,Timer 的优点在于简单易用,但由于所有任务都是由同一个线程来调度,因此所有任务都是串行执行的,同一时间只能有一个任务在执行,前一个任务的延迟或异常都将会影响到之后的任务。
1 2 3 4 5 6 7 8 9 10 11 12 13 14 15 16 17 18 19 20 public static void main (String[] args) { Timer timer = new Timer (); TimerTask task1 = new TimerTask () { @Override public void run () { log.debug("task 1" ); sleep(2 ); } }; TimerTask task2 = new TimerTask () { @Override public void run () { log.debug("task 2" ); } }; timer.schedule(task1, 1000 ); timer.schedule(task2, 1000 ); }
输出
1 2 3 0 : 46 : 09.444 c.TestTimer [main] - start...20 : 46 : 10.447 c.TestTimer [Timer-0 ] - task 1 20 : 46 : 12.448 c.TestTimer [Timer-0 ] - task 2
使用 ScheduledExecutorService 改写:
1 2 3 4 5 6 7 8 9 ScheduledExecutorService executor = Executors.newScheduledThreadPool(2 );executor.schedule(() -> { System.out.println("任务1,执行时间:" + new Date ()); try { Thread.sleep(2000 ); } catch (InterruptedException e) { } }, 1000 , TimeUnit.MILLISECONDS); executor.schedule(() -> { System.out.println("任务2,执行时间:" + new Date ()); }, 1000 , TimeUnit.MILLISECONDS);
输出
1 2 任务1 ,执行时间:Thu Jan 03 12 : 45 : 17 CST 2019 任务2 ,执行时间:Thu Jan 03 12 : 45 : 17 CST 2019
scheduleAtFixedRate 例子:
1 2 3 4 5 ScheduledExecutorService pool = Executors.newScheduledThreadPool(1 );log.debug("start..." ); pool.scheduleAtFixedRate(() -> { log.debug("running..." ); }, 1 , 1 , TimeUnit.SECONDS);
输出
1 2 3 4 5 21 : 45 : 43.167 c.TestTimer [main] - start...21 : 45 : 44.215 c.TestTimer [pool-1 -thread-1 ] - running...21 : 45 : 45.215 c.TestTimer [pool-1 -thread-1 ] - running...21 : 45 : 46.215 c.TestTimer [pool-1 -thread-1 ] - running...21 : 45 : 47.215 c.TestTimer [pool-1 -thread-1 ] - running...
scheduleAtFixedRate 例子(任务执行时间超过了间隔时间):
1 2 3 4 5 6 ScheduledExecutorService pool = Executors.newScheduledThreadPool(1 );log.debug("start..." ); pool.scheduleAtFixedRate(() -> { log.debug("running..." ); sleep(2 ); }, 1 , 1 , TimeUnit.SECONDS);
输出分析:一开始,延时 1s,接下来,由于任务执行时间 > 间隔时间,间隔被『撑』到了 2s
1 2 3 4 5 21 : 44 : 30.311 c.TestTimer [main] - start...21 : 44 : 31.360 c.TestTimer [pool-1 -thread-1 ] - running...21 : 44 : 33.361 c.TestTimer [pool-1 -thread-1 ] - running...21 : 44 : 35.362 c.TestTimer [pool-1 -thread-1 ] - running...21 : 44 : 37.362 c.TestTimer [pool-1 -thread-1 ] - running...
scheduleWithFixedDelay 例子:
1 2 3 4 5 6 ScheduledExecutorService pool = Executors.newScheduledThreadPool(1 );log.debug("start..." ); pool.scheduleWithFixedDelay(()-> { log.debug("running..." ); sleep(2 ); }, 1 , 1 , TimeUnit.SECONDS);
输出分析:一开始,延时 1s,scheduleWithFixedDelay 的间隔是 上一个任务结束 <-> 延时 <-> 下一个任务开始 所以间隔都是 3s
1 2 3 4 5 21 : 40 : 55.078 c.TestTimer [main] - start...21 : 40 : 56.140 c.TestTimer [pool-1 -thread-1 ] - running...21 : 40 : 59.143 c.TestTimer [pool-1 -thread-1 ] - running...21 : 41 : 02 .145 c.TestTimer [pool-1 -thread-1 ] - running...21 : 41 : 05 .147 c.TestTimer [pool-1 -thread-1 ] - running...
评价 整个线程池表现为:线程数固定,任务数多于线程数时,会放入无界队列排队。任务执行完毕,这些线程也不会被释放。用来执行延迟或反复执行的任务
(9) 正确处理执行任务异常 方法1:主动捉异常
1 2 3 4 5 6 7 8 9 ExecutorService pool = Executors.newFixedThreadPool(1 );pool.submit(() -> { try { log.debug("task1" ); int i = 1 / 0 ; } catch (Exception e) { log.error("error:" , e); } });
输出
1 2 3 4 5 6 7 8 9 21 : 59 : 04 .558 c.TestTimer [pool-1 -thread-1 ] - task121 : 59 : 04 .562 c.TestTimer [pool-1 -thread-1 ] - error: java.lang.ArithmeticException: / by zero at cn.itcast.n8.TestTimer.lambda $main$0 (TestTimer.java: 28 ) at java.util.concurrent.Executors$RunnableAdapter .call(Executors.java: 511 ) at java.util.concurrent.FutureTask.run(FutureTask.java: 266 ) at java.util.concurrent.ThreadPoolExecutor.runWorker(ThreadPoolExecutor.java: 1149 ) at java.util.concurrent.ThreadPoolExecutor$Worker .run(ThreadPoolExecutor.java: 624 ) at java.lang.Thread.run(Thread.java: 748 )
方法2:使用 Future
1 2 3 4 5 6 7 ExecutorService pool = Executors.newFixedThreadPool(1 );Future<Boolean> f = pool.submit(() -> { log.debug("task1" ); int i = 1 / 0 ; return true ; }); log.debug("result:{}" , f.get());
输出
1 2 3 4 5 6 7 8 9 10 11 12 21 : 54 : 58.208 c.TestTimer [pool-1 -thread-1 ] - task1Exception in thread "main" java.util.concurrent.ExecutionException: java.lang.ArithmeticException: / by zero at java.util.concurrent.FutureTask.report(FutureTask.java: 122 ) at java.util.concurrent.FutureTask.get(FutureTask.java: 192 ) at cn.itcast.n8.TestTimer.main(TestTimer.java: 31 ) Caused by: java.lang.ArithmeticException: / by zero at cn.itcast.n8.TestTimer.lambda $main$0 (TestTimer.java: 28 ) at java.util.concurrent.FutureTask.run(FutureTask.java: 266 ) at java.util.concurrent.ThreadPoolExecutor.runWorker(ThreadPoolExecutor.java: 1149 ) at java.util.concurrent.ThreadPoolExecutor$Worker .run(ThreadPoolExecutor.java: 624 ) at java.lang.Thread.run(Thread.java: 748 )
* 应用之定时任务 定期执行 如何让每周四 18:00:00 定时执行任务?
1 2 3 4 5 6 7 8 9 10 11 12 13 14 15 16 17 18 LocalDateTime now = LocalDateTime.now();LocalDateTime thursday = now.with(DayOfWeek.THURSDAY).withHour(18 ).withMinute(0 ).withSecond(0 ).withNano(0 ); if (now.compareTo(thursday) >= 0 ) { thursday = thursday.plusWeeks(1 ); } long initialDelay = Duration.between(now, thursday).toMillis();long oneWeek = 7 * 24 * 3600 * 1000 ;ScheduledExecutorService executor = Executors.newScheduledThreadPool(2 );System.out.println("开始时间:" + new Date ()); executor.scheduleAtFixedRate(() -> { System.out.println("执行时间:" + new Date ()); }, initialDelay, oneWeek, TimeUnit.MILLISECONDS);
(10) tomcat 线程池 Tomcat 在哪里用到了线程池呢
LimitLatch 用来限流,可以控制最大连接个数,类似 J.U.C 中的 Semaphore 后面再讲
Acceptor 只负责【接收新的 socket 连接】
Poller 只负责监听 socket channel 是否有【可读的 I/O 事件】
一旦可读,封装一个任务对象(socketProcessor),提交给 Executor 线程池处理
Executor 线程池中的工作线程最终负责【处理请求】
Tomcat 线程池扩展了 ThreadPoolExecutor,行为稍有不同
如果总线程数达到 maximumPoolSize
这时不会立刻抛 RejectedExecutionException 异常
而是再次尝试将任务放入队列,如果还失败,才抛出 RejectedExecutionException 异常
源码 tomcat-7.0.42
1 2 3 4 5 6 7 8 9 10 11 12 13 14 15 16 17 18 19 20 21 22 23 public void execute (Runnable command, long timeout, TimeUnit unit) { submittedCount.incrementAndGet(); try { super .execute(command); } catch (RejectedExecutionException rx) { if (super .getQueue() instanceof TaskQueue) { final TaskQueue queue = (TaskQueue)super .getQueue(); try { if (!queue.force(command, timeout, unit)) { submittedCount.decrementAndGet(); throw new RejectedExecutionException ("Queue capacity is full." ); } } catch (InterruptedException x) { submittedCount.decrementAndGet(); Thread.interrupted(); throw new RejectedExecutionException (x); } } else { submittedCount.decrementAndGet(); throw rx; } } }
TaskQueue.java
1 2 3 4 5 6 7 public boolean force (Runnable o, long timeout, TimeUnit unit) throws InterruptedException { if ( parent.isShutdown() ) throw new RejectedExecutionException ( "Executor not running, can't force a command into the queue" ); return super .offer(o,timeout,unit); }
Connector 配置
配置项
默认值
说明
acceptorThreadCount
1
acceptor 线程数量
pollerThreadCount
1
poller 线程数量
minSpareThreads
10
核心线程数,即 corePoolSize
maxThreads
200
最大线程数,即 maximumPoolSize
executor
-
Executor 名称,用来引用下面的 Executor
Executor 线程配置
配置项
默认值
说明
threadPriority
5
线程优先级
daemon
true
是否守护线程
minSpareThreads
25
核心线程数,即 corePoolSize
maxThreads
200
最大线程数,即 maximumPoolSize
maxIdleTime
60000
线程生存时间,单位是毫秒,默认值即 1 分钟
maxQueueSize
Integer.MAX_VALUE
队列长度
prestartminSpareThreads
false
核心线程是否在服务器启动时启动
1 2 3 4 5 6 graph LR a(添加新任务) --> b(提交任务 < 核心线程) b -->|是| c(加入队列) b --> |否| d(提交任务 < 最大线程) d --> |是| e(创建急救线程) d --> |否| c
1.3 Fork/Join (1) 概念 Fork/Join 是 JDK 1.7 加入的新的线程池实现,它体现的是一种分治思想,适用于能够进行任务拆分的 cpu 密集型运算
所谓的任务拆分,是将一个大任务拆分为算法上相同的小任务,直至不能拆分可以直接求解。跟递归相关的一些计算,如归并排序、斐波那契数列、都可以用分治思想进行求解
Fork/Join 在分治的基础上加入了多线程,可以把每个任务的分解和合并交给不同的线程来完成,进一步提升了运算效率
Fork/Join 默认会创建与 cpu 核心数大小相同的线程池
(2) 使用 提交给 Fork/Join 线程池的任务需要继承 RecursiveTask(有返回值)或 RecursiveAction(没有返回值),例如下面定义了一个对 1~n 之间的整数求和的任务
1 2 3 4 5 6 7 8 9 10 11 12 13 14 15 16 17 18 19 20 21 22 23 24 25 26 27 @Slf4j(topic = "c.AddTask") class AddTask1 extends RecursiveTask <Integer> { int n; public AddTask1 (int n) { this .n = n; } @Override public String toString () { return "{" + n + '}' ; } @Override protected Integer compute () { if (n == 1 ) { log.debug("join() {}" , n); return n; } AddTask1 t1 = new AddTask1 (n - 1 ); t1.fork(); log.debug("fork() {} + {}" , n, t1); int result = n + t1.join(); log.debug("join() {} + {} = {}" , n, t1, result); return result; } }
然后提交给 ForkJoinPool 来执行
1 2 3 4 public static void main (String[] args) { ForkJoinPool pool = new ForkJoinPool (4 ); System.out.println(pool.invoke(new AddTask1 (5 ))); }
结果
1 2 3 4 5 6 7 8 9 10 [ForkJoinPool-1 -worker-0 ] - fork() 2 + {1 } [ForkJoinPool-1 -worker-1 ] - fork() 5 + {4 } [ForkJoinPool-1 -worker-0 ] - join() 1 [ForkJoinPool-1 -worker-0 ] - join() 2 + {1 } = 3 [ForkJoinPool-1 -worker-2 ] - fork() 4 + {3 } [ForkJoinPool-1 -worker-3 ] - fork() 3 + {2 } [ForkJoinPool-1 -worker-3 ] - join() 3 + {2 } = 6 [ForkJoinPool-1 -worker-2 ] - join() 4 + {3 } = 10 [ForkJoinPool-1 -worker-1 ] - join() 5 + {4 } = 15 15
用图来表示
1 2 3 4 5 6 7 8 9 10 11 12 13 14 15 graph LR t1("t1 5 + {4}") t2("t2 4 + {3}") t3("t3 3 + {2}") t00("t0 2 + {1}") t0("t0") t00 -- "{1}" --> t0 t0 -. "1" .-> t00 t3 -. "{2}" .-> t00 t00 -. "3" .-> t3 t2 -- "{3}" --> t3 t3 -. "6" .-> t2 t1 -- "{4}" --> t2 t2 -. "10" .-> t1
改进
1 2 3 4 5 6 7 8 9 10 11 12 13 14 15 16 17 18 19 20 21 22 23 24 25 26 27 28 29 30 31 32 33 34 35 class AddTask3 extends RecursiveTask <Integer> { int begin; int end; public AddTask3 (int begin, int end) { this .begin = begin; this .end = end; } @Override public String toString () { return "{" + begin + "," + end + '}' ; } @Override protected Integer compute () { if (begin == end) { log.debug("join() {}" , begin); return begin; } if (end - begin == 1 ) { log.debug("join() {} + {} = {}" , begin, end, end + begin); return end + begin; } int mid = (end + begin) / 2 ; AddTask3 t1 = new AddTask3 (begin, mid); t1.fork(); AddTask3 t2 = new AddTask3 (mid + 1 , end); t2.fork(); log.debug("fork() {} + {} = ?" , t1, t2); int result = t1.join() + t2.join(); log.debug("join() {} + {} = {}" , t1, t2, result); return result; } }
然后提交给 ForkJoinPool 来执行
1 2 3 4 public static void main (String[] args) { ForkJoinPool pool = new ForkJoinPool (4 ); System.out.println(pool.invoke(new AddTask3 (1 , 10 ))); }
结果
1 2 3 4 5 6 7 8 [ForkJoinPool-1 -worker-0 ] - join() 1 + 2 = 3 [ForkJoinPool-1 -worker-3 ] - join() 4 + 5 = 9 [ForkJoinPool-1 -worker-0 ] - join() 3 [ForkJoinPool-1 -worker-1 ] - fork() {1 ,3 } + {4 ,5 } = ? [ForkJoinPool-1 -worker-2 ] - fork() {1 ,2 } + {3 ,3 } = ? [ForkJoinPool-1 -worker-2 ] - join() {1 ,2 } + {3 ,3 } = 6 [ForkJoinPool-1 -worker-1 ] - join() {1 ,3 } + {4 ,5 } = 15 15
用图来表示
1 2 3 4 5 6 7 8 9 10 11 12 13 14 15 16 graph LR t1("t1 {1,3} + {4,5}") t2("t2 {1,2},{3,3}") t3("t3") t0("t0") t1 -- "{1,3}" --> t2 t1 -- "{4,5}" --> t3 t2 -- "{1,2}" --> t0 t2 -- "{3,3}" --> t0 t0 -. "3".-> t2 t0 -. "3" .-> t2 t2 -. "6" .- t1 t3 -. "9" .-> t1 t1 -. 15 .-> 结果
2. J.U.C 2.1 AQS 原理 概述 全称是 AbstractQueuedSynchronizer,是阻塞式锁和相关的同步器工具的框架
特点:
用 state 属性来表示资源的状态(分独占模式和共享模式),子类需要定义如何维护这个状态,控制如何获取锁和释放锁
getState - 获取 state 状态
setState - 设置 state 状态
compareAndSetState - cas 机制设置 state 状态
独占模式是只有一个线程能够访问资源,而共享模式可以允许多个线程访问资源
提供了基于 FIFO 的等待队列,类似于 Monitor 的 EntryList
条件变量来实现等待、唤醒机制,支持多个条件变量,类似于 Monitor 的 WaitSet
子类主要实现这样一些方法(默认抛出 UnsupportedOperationException)
tryAcquire
tryRelease
tryAcquireShared
tryReleaseShared
isHeldExclusively
获取锁的姿势
1 2 3 4 if (!tryAcquire(arg)) { }
释放锁的姿势
1 2 3 4 if (tryRelease(arg)) { }
实现不可重入锁 自定义同步器 1 2 3 4 5 6 7 8 9 10 11 12 13 14 15 16 17 18 19 20 21 22 23 24 25 26 27 28 29 30 31 final class MySync extends AbstractQueuedSynchronizer { @Override protected boolean tryAcquire (int acquires) { if (acquires == 1 ){ if (compareAndSetState(0 , 1 )) { setExclusiveOwnerThread(Thread.currentThread()); return true ; } } return false ; } @Override protected boolean tryRelease (int acquires) { if (acquires == 1 ) { if (getState() == 0 ) { throw new IllegalMonitorStateException (); } setExclusiveOwnerThread(null ); setState(0 ); return true ; } return false ; } protected Condition newCondition () { return new ConditionObject (); } @Override protected boolean isHeldExclusively () { return getState() == 1 ; } }
自定义锁 有了自定义同步器,很容易复用 AQS ,实现一个功能完备的自定义锁
1 2 3 4 5 6 7 8 9 10 11 12 13 14 15 16 17 18 19 20 21 22 23 24 25 26 27 28 29 30 31 32 33 class MyLock implements Lock { static MySync sync = new MySync (); @Override public void lock () { sync.acquire(1 ); } @Override public void lockInterruptibly () throws InterruptedException { sync.acquireInterruptibly(1 ); } @Override public boolean tryLock () { return sync.tryAcquire(1 ); } @Override public boolean tryLock (long time, TimeUnit unit) throws InterruptedException { return sync.tryAcquireNanos(1 , unit.toNanos(time)); } @Override public void unlock () { sync.release(1 ); } @Override public Condition newCondition () { return sync.newCondition(); } }
测试一下
1 2 3 4 5 6 7 8 9 10 11 12 13 14 15 16 17 18 19 20 MyLock lock = new MyLock ();new Thread (() -> { lock.lock(); try { log.debug("locking..." ); sleep(1 ); } finally { log.debug("unlocking..." ); lock.unlock(); } },"t1" ).start(); new Thread (() -> { lock.lock(); try { log.debug("locking..." ); } finally { log.debug("unlocking..." ); lock.unlock(); } },"t2" ).start();
输出
1 2 3 4 22 : 29 : 28.727 c.TestAqs [t1] - locking...22 : 29 : 29.732 c.TestAqs [t1] - unlocking...22 : 29 : 29.732 c.TestAqs [t2] - locking...22 : 29 : 29.732 c.TestAqs [t2] - unlocking...
不可重入测试
如果改为下面代码,会发现自己也会被挡住(只会打印一次 locking)
1 2 3 4 lock.lock(); log.debug("locking..." ); lock.lock(); log.debug("locking..." )
心得 起源 早期程序员会自己通过一种同步器去实现另一种相近的同步器,例如用可重入锁去实现信号量,或反之。这显然不够优雅,于是在 JSR166(java 规范提案)中创建了 AQS,提供了这种通用的同步器机制。
目标 AQS 要实现的功能目标
阻塞版本获取锁 acquire 和非阻塞的版本尝试获取锁 tryAcquire
获取锁超时机制
通过打断取消机制
独占机制及共享机制
条件不满足时的等待机制
要实现的性能目标
Instead, the primary performance goal here is scalability: to predictably maintain efficiency even, or especially, when synchronizers are contended.
设计 AQS 的基本思想其实很简单
获取锁的逻辑
1 2 3 4 5 6 while (state 状态不允许获取) { if (队列中还没有此进程) { 入队并阻塞 } } 当前线程出队
释放锁的逻辑
1 2 3 if (state 状态允许了) { 恢复阻塞的线程(s) }
要点
原子维护 state 状态
阻塞及恢复线程
维护队列
1) state设计
tate 使用 volatile 配合 cas 保证其修改时的原子性
state 使用了 32bit int 来维护同步状态,因为当时使用 long 在很多平台下测试的结果并不理想
2) 阻塞恢复设计
早期的控制线程暂停和恢复的 api 有 suspend 和 resume,但它们是不可用的,因为如果先调用的 resume那么 suspend 将感知不到
解决方法是使用 park & unpark 来实现线程的暂停和恢复,具体原理在之前讲过了,先 unpark再park 也没问题
park & unpark 是针对线程的,而不是针对同步器的,因此控制粒度更为精细
park 线程还可以通过 interrupt 打断
3) 队列设计
用了 FIFO 先入先出队列,并不支持优先级队列
设计时借鉴了 CLH 队列,它是一种单向无锁队列
1 2 3 4 5 6 7 8 9 10 11 12 13 14 graph LR subgraph 初始 head1(head) --> Dumy1(Dumy) tail1(tail) --> Dumy1 end subgraph 新节点 head2(head) --> Dumy2(Dumy) tail2(tail) --> Node Node -- "prev" --> Dumy2 end style Dumy1 fill:#f9f,stroke:#333,stroke-width:2px style Dumy2 fill:#f9f,stroke:#333,stroke-width:2px
队列中有 head 和 tail 两个指针节点,都用 volatile 修饰配合 cas 使用,每个节点有 state 维护节点状态入队伪代码,只需要考虑 tail 赋值的原子性
1 2 3 4 5 do { Node prev = tail; } while (tail.compareAndSet(prev,node))
出队伪代码
1 2 3 4 5 6 while (Node prev=node.prev).state != 唤醒状态) { } head = node;
CLH好处:
AQS 在一些方面改进了CLH
1 2 3 4 5 6 7 8 9 10 11 12 13 14 15 16 17 18 19 20 private Node enq (final Node node) { for (;;) { Node t = tail; if (t == null ) { if (compareAndSetHead(new Node ())) tail = head; } else { node.prev = t; if (compareAndSetTail(t, node)) { t.next = node; return t; } } } }
主要用到ASQ 的并发工具类
2.2 RenntrantLock 原理
非公平锁实现原理 加锁解锁流程 先从构造器开始看,默认为非公平锁实现
1 2 3 public ReentrantLock () { sync = new NonFairSync (); }
NonfairSync继承自ASQ
没有竞争时
第出现时一个竞争
Thread-1 执行了
(1) CAS 尝试将 state 由 0 改为 1,结果失败
(2)进入 tryAcquire 逻辑,这时 state 已经是1,结果仍然失败
(3) 接下来进入 addWaiter 逻辑,构造 Node 队列
图中黄色三角表示该 Node 的 waitStatus 状态,其中 0 为默认正常状态
Node 的创建是懒惰的
其中第一个 Node 称为 Dummy(哑元)或哨兵,用来占位,并不关联线程
当前线程进入 acquireQueued 逻辑
(1) acquireQueued 会在一个死循环中不断尝试获得锁,失败后进入 park 阻塞
(4) shouldParkAfterFailedAcquire 执行完毕回到 acquireQueued ,再次 tryAcquire 尝试获取锁,当然这时state 仍为 1,失败
再次有多个线程经历上述过程竞争失败,变成这个样子
Thread-0 释放锁,进入 tryRelease 流程,如果成功
设置 exclusiveOwnerThread 为 null
state = 0
当前队列不为 null,并且 head 的 waitStatus = -1,进入 unparkSuccessor 流程
找到队列中离 head 最近的一个 Node(没取消的),unpark 恢复其运行,本例中即为 Thread-1回到 Thread-1 的 acquireQueued 流程
如果加锁成功(没有竞争),会设置
exclusiveOwnerThread 为 Thread-1,state = 1
head 指向刚刚 Thread-1 所在的 Node,该 Node 清空 Thread
原本的 head 因为从链表断开,而可被垃圾回收
如果这时候有其它线程来竞争(非公平的体现),例如这时有 Thread-4 来了
如果不巧又被 Thread-4 占了先
Thread-4 被设置为 exclusiveOwnerThread,state = 1
Thread-1 再次进入 acquireQueued 流程,获取锁失败,重新进入 park 阻塞
加锁源码 1 2 3 4 5 6 7 8 9 10 11 12 13 14 15 16 17 18 19 20 21 22 23 24 25 26 27 28 29 30 31 32 33 34 35 36 37 38 39 40 41 42 43 44 45 46 47 48 49 50 51 52 53 54 55 56 57 58 59 60 61 62 63 64 65 66 67 68 69 70 71 72 73 74 75 76 77 78 79 80 81 82 83 84 85 86 87 88 89 90 91 92 93 94 95 96 97 98 99 100 101 102 103 104 105 106 107 108 109 110 111 112 113 114 115 116 117 118 119 120 121 122 123 124 125 126 127 128 129 130 131 132 133 134 135 136 137 138 139 140 141 142 143 144 145 146 147 static final class NonfairSync extends Sync { private static final long serialVersionUID = 7316153563782823691L ; final void lock () { if (compareAndSetState(0 , 1 )) setExclusiveOwnerThread(Thread.currentThread()); else acquire(1 ); } public final void acquire (int arg) { if ( !tryAcquire(arg) && acquireQueued(addWaiter(Node.EXCLUSIVE), arg) ) { selfInterrupt(); } } protected final boolean tryAcquire (int acquires) { return nonfairTryAcquire(acquires); } final boolean nonfairTryAcquire (int acquires) { final Thread current = Thread.currentThread(); int c = getState(); if (c == 0 ) { if (compareAndSetState(0 , acquires)) { setExclusiveOwnerThread(current); return true ; } } else if (current == getExclusiveOwnerThread()) { int nextc = c + acquires; if (nextc < 0 ) throw new Error ("Maximum lock count exceeded" ); setState(nextc); return true ; } return false ; } private Node addWaiter (Node mode) { Node node = new Node (Thread.currentThread(), mode); Node pred = tail; if (pred != null ) { node.prev = pred; if (compareAndSetTail(pred, node)) { pred.next = node; return node; } } enq(node); return node; } private Node enq (final Node node) { for (;;) { Node t = tail; if (t == null ) { if (compareAndSetHead(new Node ())) { tail = head; } } else { node.prev = t; if (compareAndSetTail(t, node)) { t.next = node; return t; } } } } final boolean acquireQueued (final Node node, int arg) { boolean failed = true ; try { boolean interrupted = false ; for (;;) { final Node p = node.predecessor(); if (p == head && tryAcquire(arg)) { setHead(node); p.next = null ; failed = false ; return interrupted; } if ( shouldParkAfterFailedAcquire(p, node) && parkAndCheckInterrupt() ) { interrupted = true ; } } } finally { if (failed) cancelAcquire(node); } } private static boolean shouldParkAfterFailedAcquire (Node pred, Node node) { int ws = pred.waitStatus; if (ws == Node.SIGNAL) { return true ; } if (ws > 0 ) { do { node.prev = pred = pred.prev; } while (pred.waitStatus > 0 ); pred.next = node; } else { compareAndSetWaitStatus(pred, ws, Node.SIGNAL); } return false ; } private final boolean parkAndCheckInterrupt () { LockSupport.park(this ); return Thread.interrupted(); } }
注意
是否需要 unpark 是由当前节点的前驱节点的 waitStatus == Node.SIGNAL 来决定,而不是本节点的 waitStatus 决定
解锁源码 1 2 3 4 5 6 7 8 9 10 11 12 13 14 15 16 17 18 19 20 21 22 23 24 25 26 27 28 29 30 31 32 33 34 35 36 37 38 39 40 41 42 43 44 45 46 47 48 49 50 51 52 53 54 55 56 57 58 59 60 61 static final class NonfairSync extends Sync { public void unlock () { sync.release(1 ); } public final boolean release (int arg) { if (tryRelease(arg)) { Node h = head; if ( h != null && h.waitStatus != 0 ) { unparkSuccessor(h); } return true ; } return false ; } protected final boolean tryRelease (int releases) { int c = getState() - releases; if (Thread.currentThread() != getExclusiveOwnerThread()) throw new IllegalMonitorStateException (); boolean free = false ; if (c == 0 ) { free = true ; setExclusiveOwnerThread(null ); } setState(c); return free; } private void unparkSuccessor (Node node) { int ws = node.waitStatus; if (ws < 0 ) { compareAndSetWaitStatus(node, ws, 0 ); } Node s = node.next; if (s == null || s.waitStatus > 0 ) { s = null ; for (Node t = tail; t != null && t != node; t = t.prev) if (t.waitStatus <= 0 ) s = t; } if (s != null ) LockSupport.unpark(s.thread); } }
可重入原理 1 2 3 4 5 6 7 8 9 10 11 12 13 14 15 16 17 18 19 20 21 22 23 24 25 26 27 28 29 30 31 32 33 34 35 36 37 38 39 static final class NonfairSync extends Sync { final boolean nonfairTryAcquire (int acquires) { final Thread current = Thread.currentThread(); int c = getState(); if (c == 0 ) { if (compareAndSetState(0 , acquires)) { setExclusiveOwnerThread(current); return true ; } } else if (current == getExclusiveOwnerThread()) { int nextc = c + acquires; if (nextc < 0 ) throw new Error ("Maximum lock count exceeded" ); setState(nextc); return true ; } return false ; } protected final boolean tryRelease (int releases) { int c = getState() - releases; if (Thread.currentThread() != getExclusiveOwnerThread()) throw new IllegalMonitorStateException (); boolean free = false ; if (c == 0 ) { free = true ; setExclusiveOwnerThread(null ); } setState(c); return free; } }
可打断原理 不可打断模式 在此模式下,即使它被打断,仍会驻留在 AQS 队列中,一直要等到获得锁后方能得知自己被打断了
1 2 3 4 5 6 7 8 9 10 11 12 13 14 15 16 17 18 19 20 21 22 23 24 25 26 27 28 29 30 31 32 33 34 35 36 37 38 39 40 41 42 43 44 45 46 47 48 49 static final class NonfairSync extends Sync { private final boolean parkAndCheckInterrupt () { LockSupport.park(this ); return Thread.interrupted(); } final boolean acquireQueued (final Node node, int arg) { boolean failed = true ; try { boolean interrupted = false ; for (;;) { final Node p = node.predecessor(); if (p == head && tryAcquire(arg)) { setHead(node); p.next = null ; failed = false ; return interrupted; } if ( shouldParkAfterFailedAcquire(p, node) && parkAndCheckInterrupt() ) { interrupted = true ; } } } finally { if (failed) cancelAcquire(node); } } public final void acquire (int arg) { if ( !tryAcquire(arg) && acquireQueued(addWaiter(Node.EXCLUSIVE), arg) ) { selfInterrupt(); } } static void selfInterrupt () { Thread.currentThread().interrupt(); } }
打断模式 1 2 3 4 5 6 7 8 9 10 11 12 13 14 15 16 17 18 19 20 21 22 23 24 25 26 27 28 29 30 31 32 33 34 static final class NonfairSync extends Sync { public final void acquireInterruptibly (int arg) throws InterruptedException { if (Thread.interrupted()) throw new InterruptedException (); if (!tryAcquire(arg)) doAcquireInterruptibly(arg); } private void doAcquireInterruptibly (int arg) throws InterruptedException { final Node node = addWaiter(Node.EXCLUSIVE); boolean failed = true ; try { for (;;) { final Node p = node.predecessor(); if (p == head && tryAcquire(arg)) { setHead(node); p.next = null ; failed = false ; return ; } if (shouldParkAfterFailedAcquire(p, node) && parkAndCheckInterrupt()) { throw new InterruptedException (); } } } finally { if (failed) cancelAcquire(node); } } }
公平锁实现原理 1 2 3 4 5 6 7 8 9 10 11 12 13 14 15 16 17 18 19 20 21 22 23 24 25 26 27 28 29 30 31 32 33 34 35 36 37 38 39 40 41 42 43 44 45 46 47 48 49 50 static final class FairSync extends Sync { private static final long serialVersionUID = -3000897897090466540L ; final void lock () { acquire(1 ); } public final void acquire (int arg) { if ( !tryAcquire(arg) && acquireQueued(addWaiter(Node.EXCLUSIVE), arg) ) { selfInterrupt(); } } protected final boolean tryAcquire (int acquires) { final Thread current = Thread.currentThread(); int c = getState(); if (c == 0 ) { if (!hasQueuedPredecessors() && compareAndSetState(0 , acquires)) { setExclusiveOwnerThread(current); return true ; } } else if (current == getExclusiveOwnerThread()) { int nextc = c + acquires; if (nextc < 0 ) throw new Error ("Maximum lock count exceeded" ); setState(nextc); return true ; } return false ; } public final boolean hasQueuedPredecessors () { Node t = tail; Node h = head; Node s; return h != t && ( (s = h.next) == null || s.thread != Thread.currentThread() ); } }
条件变量实现原理 每个条件变量其实就对应着一个等待队列,其实现类是 ConditionObject
await 流程 开始 Thread-0 持有锁,调用 await,进入 ConditionObject 的 addConditionWaiter 流程创建新的 Node 状态为 -2(Node.CONDITION),关联 Thread-0,加入等待队列尾部
接下来进入 AQS 的 fullyRelease 流程,释放同步器上的锁
unpark AQS 队列中的下一个节点,竞争锁,假设没有其他竞争线程,那么 Thread-1 竞争成功
signal 流程 假设 Thread-1 要来唤醒 Thread-0
进入 ConditionObject 的 doSignal 流程,取得等待队列中第一个 Node,即 Thread-0 所在 Node
firstWaiter就是第一个节点,而不是firstWaiter的nextWaiter,此时第一个节点脱离该链表结构,firstWaiter指向下一个lastWaiter总是最后一个节点,直到没有节点firstWaiter和lastWaiter都指向null
执行 transferForSignal 流程,将该 Node 加入 AQS 队列尾部,将 Thread-0 的 waitStatus 改为 0,Thread-3 的 waitStatus 改为 -1
如果 Node 节点这时被 取消,这Node 节点不会再 signal ,会重新去执行 在 ConditionObject中 的 firstWaiter的doSignal 流程
Thread-1 释放锁
如果 新加入的Node 的前一个节点 由于 被取消或者超时,会优先将 Node 节点 恢复为(调用unpark) 运行
其他情况按照 AQS 节点优先顺序 去 执行
源码 1 2 3 4 5 6 7 8 9 10 11 12 13 14 15 16 17 18 19 20 21 22 23 24 25 26 27 28 29 30 31 32 33 34 35 36 37 38 39 40 41 42 43 44 45 46 47 48 49 50 51 52 53 54 55 56 57 58 59 60 61 62 63 64 65 66 67 68 69 70 71 72 73 74 75 76 77 78 79 80 81 82 83 84 85 86 87 88 89 90 91 92 93 94 95 96 97 98 99 100 101 102 103 104 105 106 107 108 109 110 111 112 113 114 115 116 117 118 119 120 121 122 123 124 125 126 127 128 129 130 131 132 133 134 135 136 137 138 139 140 141 142 143 144 145 146 147 148 149 150 151 152 153 154 155 156 157 158 159 160 161 162 163 164 165 166 167 168 169 170 171 172 173 174 175 176 177 178 179 180 181 182 183 184 185 186 187 188 189 190 191 192 193 194 195 196 197 198 199 200 201 202 203 204 205 206 207 208 209 210 211 212 213 214 215 216 217 218 219 public class ConditionObject implements Condition , java.io.Serializable { private static final long serialVersionUID = 1173984872572414699L ; private transient Node firstWaiter; private transient Node lastWaiter; public ConditionObject () { } private Node addConditionWaiter () { Node t = lastWaiter; if (t != null && t.waitStatus != Node.CONDITION) { unlinkCancelledWaiters(); t = lastWaiter; } Node node = new Node (Thread.currentThread(), Node.CONDITION); if (t == null ) firstWaiter = node; else t.nextWaiter = node; lastWaiter = node; return node; } private void doSignal (Node first) { do { if ( (firstWaiter = first.nextWaiter) == null ) { lastWaiter = null ; } first.nextWaiter = null ; } while ( !transferForSignal(first) && (first = firstWaiter) != null ); } final boolean transferForSignal (Node node) { if (!compareAndSetWaitStatus(node, Node.CONDITION, 0 )) return false ; Node p = enq(node); int ws = p.waitStatus; if ( ws > 0 || !compareAndSetWaitStatus(p, ws, Node.SIGNAL) ) { LockSupport.unpark(node.thread); } return true ; } private void doSignalAll (Node first) { lastWaiter = firstWaiter = null ; do { Node next = first.nextWaiter; first.nextWaiter = null ; transferForSignal(first); first = next; } while (first != null ); } private void unlinkCancelledWaiters () { } public final void signal () { if (!isHeldExclusively()) throw new IllegalMonitorStateException (); Node first = firstWaiter; if (first != null ) doSignal(first); } public final void signalAll () { if (!isHeldExclusively()) throw new IllegalMonitorStateException (); Node first = firstWaiter; if (first != null ) doSignalAll(first); } public final void awaitUninterruptibly () { Node node = addConditionWaiter(); int savedState = fullyRelease(node); boolean interrupted = false ; while (!isOnSyncQueue(node)) { LockSupport.park(this ); if (Thread.interrupted()) interrupted = true ; } if (acquireQueued(node, savedState) || interrupted) selfInterrupt(); } final int fullyRelease (Node node) { boolean failed = true ; try { int savedState = getState(); if (release(savedState)) { failed = false ; return savedState; } else { throw new IllegalMonitorStateException (); } } finally { if (failed) node.waitStatus = Node.CANCELLED; } } private static final int REINTERRUPT = 1 ; private static final int THROW_IE = -1 ; private int checkInterruptWhileWaiting (Node node) { return Thread.interrupted() ? (transferAfterCancelledWait(node) ? THROW_IE : REINTERRUPT) : 0 ; } private void reportInterruptAfterWait (int interruptMode) throws InterruptedException { if (interruptMode == THROW_IE) throw new InterruptedException (); else if (interruptMode == REINTERRUPT) selfInterrupt(); } public final void await () throws InterruptedException { if (Thread.interrupted()) { throw new InterruptedException (); } Node node = addConditionWaiter(); int savedState = fullyRelease(node); int interruptMode = 0 ; while (!isOnSyncQueue(node)) { LockSupport.park(this ); if ((interruptMode = checkInterruptWhileWaiting(node)) != 0 ) break ; } if (acquireQueued(node, savedState) && interruptMode != THROW_IE) interruptMode = REINTERRUPT; if (node.nextWaiter != null ) unlinkCancelledWaiters(); if (interruptMode != 0 ) reportInterruptAfterWait(interruptMode); } public final long awaitNanos (long nanosTimeout) throws InterruptedException { if (Thread.interrupted()) { throw new InterruptedException (); } Node node = addConditionWaiter(); int savedState = fullyRelease(node); final long deadline = System.nanoTime() + nanosTimeout; int interruptMode = 0 ; while (!isOnSyncQueue(node)) { if (nanosTimeout <= 0L ) { transferAfterCancelledWait(node); break ; } if (nanosTimeout >= spinForTimeoutThreshold) LockSupport.parkNanos(this , nanosTimeout); if ((interruptMode = checkInterruptWhileWaiting(node)) != 0 ) break ; nanosTimeout = deadline - System.nanoTime(); } if (acquireQueued(node, savedState) && interruptMode != THROW_IE) interruptMode = REINTERRUPT; if (node.nextWaiter != null ) unlinkCancelledWaiters(); if (interruptMode != 0 ) reportInterruptAfterWait(interruptMode); return deadline - System.nanoTime(); } public final boolean awaitUntil (Date deadline) throws InterruptedException { } public final boolean await (long time, TimeUnit unit) throws InterruptedException { } }
2.3 读写锁 ReentrantReadWriteLock 当读操作远远高于写操作时,这时候使用 读写锁 让 读-读 可以并发,提高性能。 类似于数据库中的 select ... from ... lock in share mode
提供一个 数据容器类 内部分别使用读锁保护数据的 read() 方法,写锁保护数据的 write() 方法
1 2 3 4 5 6 7 8 9 10 11 12 13 14 15 16 17 18 19 20 21 22 23 24 25 26 27 28 29 class DataContainer { private Object data; private ReentrantReadWriteLock rw = new ReentrantReadWriteLock (); private ReentrantReadWriteLock.ReadLock r = rw.readLock(); private ReentrantReadWriteLock.WriteLock w = rw.writeLock(); public Object read () { log.debug("获取读锁..." ); r.lock(); try { log.debug("读取" ); sleep(1 ); return data; } finally { log.debug("释放读锁..." ); r.unlock(); } } public void write () { log.debug("获取写锁..." ); w.lock(); try { log.debug("写入" ); sleep(1 ); } finally { log.debug("释放写锁..." ); w.unlock(); } } }
测试 读锁-读锁 可以并发
1 2 3 4 5 6 7 DataContainer dataContainer = new DataContainer ();new Thread (() -> { dataContainer.read(); }, "t1" ).start(); new Thread (() -> { dataContainer.read(); }, "t2" ).start()
输出结果,从这里可以看到 Thread-0 锁定期间,Thread-1 的读操作不受影响
1 2 3 4 5 6 14 : 05 : 14.341 c.DataContainer [t2] - 获取读锁...14 : 05 : 14.341 c.DataContainer [t1] - 获取读锁...14 : 05 : 14.345 c.DataContainer [t1] - 读取14 : 05 : 14.345 c.DataContainer [t2] - 读取14 : 05 : 15.365 c.DataContainer [t2] - 释放读锁...14 : 05 : 15.386 c.DataContainer [t1] - 释放读锁...
测试 读锁-写锁 相互阻塞
1 2 3 4 5 6 7 8 DataContainer dataContainer = new DataContainer ();new Thread (() -> { dataContainer.read(); }, "t1" ).start(); Thread.sleep(100 ); new Thread (() -> { dataContainer.write(); }, "t2" ).start();
输出结果
1 2 3 4 5 6 14 : 04 : 21.838 c.DataContainer [t1] - 获取读锁...14 : 04 : 21.838 c.DataContainer [t2] - 获取写锁...14 : 04 : 21.841 c.DataContainer [t2] - 写入14 : 04 : 22.843 c.DataContainer [t2] - 释放写锁...14 : 04 : 22.843 c.DataContainer [t1] - 读取14 : 04 : 23.843 c.DataContainer [t1] - 释放读锁...
写锁-写锁 也是相互阻塞的,这里就不测试了
注意事项
读锁不支持条件变量
重入时升级不支持:即持有读锁的情况下去获取写锁,会导致获取写锁永久等待
1 2 3 4 5 6 7 8 9 10 11 12 r.lock(); try {w.lock(); try {} finally { w.unlock(); } } finally { r.unlock(); }
1 2 3 4 5 6 7 8 9 10 11 12 13 14 15 16 17 18 19 20 21 22 23 24 25 26 27 28 29 30 31 class CachedData { Object data; volatile boolean cacheValid; final ReentrantReadWriteLock rwl = new ReentrantReadWriteLock (); void processCachedData () { rwl.readLock().lock(); if (!cacheValid) { rwl.readLock().unlock(); rwl.writeLock().lock(); try { if (!cacheValid) { data = ... cacheValid = true ; } rwl.readLock().lock(); } finally { rwl.writeLock().unlock(); } } try { use(data); } finally { rwl.readLock().unlock(); } } }
应用之缓存 缓存更新策略 更新时,是先清缓存还是先更新数据库
先清缓存
先更新数据库
补充一种情况,假设查询线程 A 查询数据时恰好缓存数据由于时间到期失效,或是第一次查询
这种情况的出现几率非常小,见 facebook 论文
读写锁一致性缓存 使用读写锁实现一个简单的按需加载缓存
1 2 3 4 5 6 7 8 9 10 11 12 13 14 15 16 17 18 19 20 21 22 23 24 25 26 27 28 29 30 31 32 33 34 35 36 37 38 39 40 41 42 43 44 45 46 47 48 49 50 51 52 53 54 55 56 57 58 59 60 61 62 63 64 65 66 67 68 69 70 71 72 73 class GenericCachedDao <T> { HashMap<SqlPair, T> map = new HashMap <>(); ReentrantReadWriteLock lock = new ReentrantReadWriteLock (); GenericDao genericDao = new GenericDao (); public int update (String sql, Object... params) { SqlPair key = new SqlPair (sql, params); lock.writeLock().lock(); try { int rows = genericDao.update(sql, params); map.clear(); return rows; } finally { lock.writeLock().unlock(); } } public T queryOne (Class<T> beanClass, String sql, Object... params) { SqlPair key = new SqlPair (sql, params); lock.readLock().lock(); try { T value = map.get(key); if (value != null ) { return value; } } finally { lock.readLock().unlock(); } lock.writeLock().lock(); try { T value = map.get(key); if (value == null ) { value = genericDao.queryOne(beanClass, sql, params); map.put(key, value); } return value; } finally { lock.writeLock().unlock(); } } class SqlPair { private String sql; private Object[] params; public SqlPair (String sql, Object[] params) { this .sql = sql; this .params = params; } @Override public boolean equals (Object o) { if (this == o) { return true ; } if (o == null || getClass() != o.getClass()) { return false ; } SqlPair sqlPair = (SqlPair) o; return sql.equals(sqlPair.sql) && Arrays.equals(params, sqlPair.params); } @Override public int hashCode () { int result = Objects.hash(sql); result = 31 * result + Arrays.hashCode(params); return result; } } }
注意
以上实现体现的是读写锁的应用,保证缓存和数据库的一致性,但有下面的问题没有考虑
适合读多写少,如果写操作比较频繁,以上实现性能低
没有考虑缓存容量
没有考虑缓存过期
只适合单机
并发性还是低,目前只会用一把锁
更新方法太过简单粗暴,清空了所有 key(考虑按类型分区或重新设计 key)
乐观锁实现:用 CAS 去更新
读写锁原理 (1) 图解流程 读写锁用的是同一个 Sycn 同步器,因此等待队列、state 等也是同一个
t1 w.lock,t2 r.lock (1) t1 成功上锁,流程与 ReentrantLock 加锁相比没有特殊之处,不同是写锁状态占了 state 的低 16 位,而读锁使用的是 state 的高 16 位
(2) t2 执行 r.lock,这时进入读锁的 sync.acquireShared(1) 流程,首先会进入 tryAcquireShared 流程。如果有写
tryAcquireShared 返回值表示
-1 表示失败
0 表示成功,但后继节点不会继续唤醒
正数表示成功,而且数值是还有几个后继节点需要唤醒,读写锁返回 1
(3) 这时会进入 sync.doAcquireShared(1) 流程,首先也是调用 addWaiter 添加节点,不同之处在于节点被设置为 Node.SHARED 模式而非 Node.EXCLUSIVE 模式,注意此时 t2 仍处于活跃状态
(4) t2 会看看自己的节点是不是老二,如果是,还会再次调用 tryAcquireShared(1) 来尝试获取锁
(5) 如果没有成功,在 doAcquireShared 内 for (;;) 循环一次,把前驱节点的 waitStatus 改为 -1,再 for (;;) 循环一次尝试 tryAcquireShared(1) 如果还不成功,(总共尝试了三次tryAcquireShared) 那么在 parkAndCheckInterrupt() 处 park
t3 r.lock,t4 w.lock 这种状态下,假设又有 t3 加读锁和 t4 加写锁,这期间 t1 仍然持有锁,就变成了下面的样子
1 w.unlock 这时会走到写锁的 sync.release(1) 流程,调用 sync.tryRelease(1) 成功,变成下面的样子
接下来执行唤醒流程 sync.unparkSuccessor,即让老二恢复运行,这时 t2 在 doAcquireShared 内 parkAndCheckInterrupt() 处恢复运行
这回再来一次 for (;;) 执行 tryAcquireShared 成功则让读锁计数加一
这时 t2 已经恢复运行,接下来 t2 调用 setHeadAndPropagate(node, 1),它原本所在节点被置为头节点
事情还没完,在 setHeadAndPropagate 方法内还会检查下一个节点是否是 shared,如果是则调用 doReleaseShared() 将 head 的状态从 -1 改为 0 并唤醒老二,这时 t3 在 doAcquireShared 内 parkAndCheckInterrupt() 处恢复运行
这回再来一次 for (;;) 执行 tryAcquireShared 成功则让读锁计数加一
这时 t3 已经恢复运行,接下来 t3 调用 setHeadAndPropagate(node, 1),它原本所在节点被置为头节点
下一个节点不是 shared 了,因此不会继续唤醒 t4 所在节点
t2 r.unlock,t3 r.unlock t2 进入 sync.releaseShared(1) 中,调用 tryReleaseShared(1) 让计数减一,但由于计数还不为零
t3 进入 sync.releaseShared(1) 中,调用 tryReleaseShared(1) 让计数减一,这回计数为零了,进入 doReleaseShared() 将头节点从 -1 改为 0 并唤醒老二,即
之后 t4 在 acquireQueued 中 parkAndCheckInterrupt 处恢复运行,再次 for (;;) 这次自己是老二,并且没有其他竞争,tryAcquire(1) 成功,修改头结点,流程结束
(2) 源码分析 写锁上锁流程 1 2 3 4 5 6 7 8 9 10 11 12 13 14 15 16 17 18 19 20 21 22 23 24 25 26 27 28 29 30 31 32 33 34 35 36 37 38 39 40 41 42 43 44 45 46 47 48 49 50 51 52 53 54 55 56 57 58 59 static final class NonfairSync extends Sync { public void lock () { sync.acquire(1 ); } public final void acquire (int arg) { if ( !tryAcquire(arg) && acquireQueued(addWaiter(Node.EXCLUSIVE), arg) ) { selfInterrupt(); } } protected final boolean tryAcquire (int acquires) { Thread current = Thread.currentThread(); int c = getState(); int w = exclusiveCount(c); if (c != 0 ) { if ( w == 0 || current != getExclusiveOwnerThread() ) { return false ; } if (w + exclusiveCount(acquires) > MAX_COUNT) throw new Error ("Maximum lock count exceeded" ); setState(c + acquires); return true ; } if ( writerShouldBlock() || !compareAndSetState(c, c + acquires) ) { return false ; } setExclusiveOwnerThread(current); return true ; } final boolean writerShouldBlock () { return false ; } }
写锁释放流程 1 2 3 4 5 6 7 8 9 10 11 12 13 14 15 16 17 18 19 20 21 22 23 24 25 26 27 28 29 30 31 32 static final class NonfairSync extends Sync { public void unlock () { sync.release(1 ); } public final boolean release (int arg) { if (tryRelease(arg)) { Node h = head; if (h != null && h.waitStatus != 0 ) unparkSuccessor(h); return true ; } return false ; } protected final boolean tryRelease (int releases) { if (!isHeldExclusively()) throw new IllegalMonitorStateException (); int nextc = getState() - releases; boolean free = exclusiveCount(nextc) == 0 ; if (free) { setExclusiveOwnerThread(null ); } setState(nextc); return free; } }
读锁上锁流程 1 2 3 4 5 6 7 8 9 10 11 12 13 14 15 16 17 18 19 20 21 22 23 24 25 26 27 28 29 30 31 32 33 34 35 36 37 38 39 40 41 42 43 44 45 46 47 48 49 50 51 52 53 54 55 56 57 58 59 60 61 62 63 64 65 66 67 68 69 70 71 72 73 74 75 76 77 78 79 80 81 82 83 84 85 86 87 88 89 90 91 92 93 94 95 96 97 98 99 100 101 102 103 104 105 106 107 108 109 110 111 112 113 114 115 116 117 118 119 120 121 122 123 124 125 126 127 128 129 130 131 132 133 134 135 136 137 138 139 140 141 142 143 144 static final class NonfairSync extends Sync { public void lock () { sync.acquireShared(1 ); } public final void acquireShared (int arg) { if (tryAcquireShared(arg) < 0 ) { doAcquireShared(arg); } } protected final int tryAcquireShared (int unused) { Thread current = Thread.currentThread(); int c = getState(); if ( exclusiveCount(c) != 0 && getExclusiveOwnerThread() != current ) { return -1 ; } int r = sharedCount(c); if ( !readerShouldBlock() && r < MAX_COUNT && compareAndSetState(c, c + SHARED_UNIT) ) { return 1 ; } return fullTryAcquireShared(current); } final boolean readerShouldBlock () { return apparentlyFirstQueuedIsExclusive(); } final int fullTryAcquireShared (Thread current) { HoldCounter rh = null ; for (;;) { int c = getState(); if (exclusiveCount(c) != 0 ) { if (getExclusiveOwnerThread() != current) return -1 ; } else if (readerShouldBlock()) { } if (sharedCount(c) == MAX_COUNT) throw new Error ("Maximum lock count exceeded" ); if (compareAndSetState(c, c + SHARED_UNIT)) { return 1 ; } } } private void doAcquireShared (int arg) { final Node node = addWaiter(Node.SHARED); boolean failed = true ; try { boolean interrupted = false ; for (;;) { final Node p = node.predecessor(); if (p == head) { int r = tryAcquireShared(arg); if (r >= 0 ) { setHeadAndPropagate(node, r); p.next = null ; if (interrupted) selfInterrupt(); failed = false ; return ; } } if ( shouldParkAfterFailedAcquire(p, node) && parkAndCheckInterrupt() ) { interrupted = true ; } } } finally { if (failed) cancelAcquire(node); } } private void setHeadAndPropagate (Node node, int propagate) { Node h = head; setHead(node); if (propagate > 0 || h == null || h.waitStatus < 0 || (h = head) == null || h.waitStatus < 0 ) { Node s = node.next; if (s == null || s.isShared()) { doReleaseShared(); } } } private void doReleaseShared () { for (;;) { Node h = head; if (h != null && h != tail) { int ws = h.waitStatus; if (ws == Node.SIGNAL) { if (!compareAndSetWaitStatus(h, Node.SIGNAL, 0 )) continue ; unparkSuccessor(h); } else if (ws == 0 && !compareAndSetWaitStatus(h, 0 , Node.PROPAGATE)) continue ; } if (h == head) break ; } } }
读锁释放流程 1 2 3 4 5 6 7 8 9 10 11 12 13 14 15 16 17 18 19 20 21 22 23 24 25 26 27 28 29 30 31 32 33 34 35 36 37 38 39 40 41 42 43 44 45 46 47 48 49 50 51 static final class NonfairSync extends Sync { public void unlock () { sync.releaseShared(1 ); } public final boolean releaseShared (int arg) { if (tryReleaseShared(arg)) { doReleaseShared(); return true ; } return false ; } protected final boolean tryReleaseShared (int unused) { for (;;) { int c = getState(); int nextc = c - SHARED_UNIT; if (compareAndSetState(c, nextc)) { return nextc = = 0 ; } } } private void doReleaseShared () { for (;;) { Node h = head; if (h != null && h != tail) { int ws = h.waitStatus; if (ws == Node.SIGNAL) { if (!compareAndSetWaitStatus(h, Node.SIGNAL, 0 )) continue ; unparkSuccessor(h); } else if (ws == 0 && !compareAndSetWaitStatus(h, 0 , Node.PROPAGATE)) continue ; } if (h == head) break ; } } }
StampedLock 该类自 JDK 8 加入,是为了进一步优化读性能,它的特点是在使用读锁、写锁时都必须配合【戳】使用加解读锁
1 2 long stamp = lock.readLock();lock.unlockRead(stamp);
加解写锁
1 2 long stamp = lock.writeLock();lock.unlockWrite(stamp);
乐观读,StampedLock 支持 tryOptimisticRead() 方法(乐观读),读取完毕后需要做一次 戳校验 如果校验通过,表示这期间确实没有写操作,数据可以安全使用,如果校验没通过,需要重新获取读锁,保证数据安全。
1 2 3 4 5 long stamp = lock.tryOptimisticRead();if (!lock.validate(stamp)){ }
提供一个 数据容器类 内部分别使用读锁保护数据的 read() 方法,写锁保护数据的 write() 方法
1 2 3 4 5 6 7 8 9 10 11 12 13 14 15 16 17 18 19 20 21 22 23 24 25 26 27 28 29 30 31 32 33 34 35 36 37 38 39 class DataContainerStamped { private int data; private final StampedLock lock = new StampedLock (); public DataContainerStamped (int data) { this .data = data; } public int read (int readTime) { long stamp = lock.tryOptimisticRead(); log.debug("optimistic read locking...{}" , stamp); sleep(readTime); if (lock.validate(stamp)) { log.debug("read finish...{}, data:{}" , stamp, data); return data; } log.debug("updating to read lock... {}" , stamp); try { stamp = lock.readLock(); log.debug("read lock {}" , stamp); sleep(readTime); log.debug("read finish...{}, data:{}" , stamp, data); return data; } finally { log.debug("read unlock {}" , stamp); lock.unlockRead(stamp); } } public void write (int newData) { long stamp = lock.writeLock(); log.debug("write lock {}" , stamp); try { sleep(2 ); this .data = newData; } finally { log.debug("write unlock {}" , stamp); lock.unlockWrite(stamp); } } }
测试 读-读 可以优化
1 2 3 4 5 6 7 8 9 10 public static void main (String[] args) { DataContainerStamped dataContainer = new DataContainerStamped (1 ); new Thread (() -> { dataContainer.read(1 ); }, "t1" ).start(); sleep(0.5 ); new Thread (() -> { dataContainer.read(0 ); }, "t2" ).start(); }
输出结果,可以看到实际没有加读锁
1 2 3 4 15 : 58 : 50.217 c.DataContainerStamped [t1] - optimistic read locking...256 15 : 58 : 50.717 c.DataContainerStamped [t2] - optimistic read locking...256 15 : 58 : 50.717 c.DataContainerStamped [t2] - read finish...256 , data: 1 15 : 58 : 51.220 c.DataContainerStamped [t1] - read finish...256 , data: 1
测试 读-写 时优化读补加读锁
1 2 3 4 5 6 7 8 9 10 public static void main (String[] args) { DataContainerStamped dataContainer = new DataContainerStamped (1 ); new Thread (() -> { dataContainer.read(1 ); }, "t1" ).start(); sleep(0.5 ); new Thread (() -> { dataContainer.write(100 ); }, "t2" ).start(); }
输出结果
1 2 3 4 5 6 7 15 : 57 : 00 .219 c.DataContainerStamped [t1] - optimistic read locking...256 15 : 57 : 00 .717 c.DataContainerStamped [t2] - write lock 384 15 : 57 : 01 .225 c.DataContainerStamped [t1] - updating to read lock... 256 15 : 57 : 02 .719 c.DataContainerStamped [t2] - write unlock 384 15 : 57 : 02 .719 c.DataContainerStamped [t1] - read lock 513 15 : 57 : 03 .719 c.DataContainerStamped [t1] - read finish...513 , data: 1000 15 : 57 : 03 .719 c.DataContainerStamped [t1] - read unlock 513
注意
StampedLock 不支持条件变量
StampedLock 不支持可重入
2.4 Semaphore 基本使用 [ˈsɛməˌfɔr] 信号量,用来限制能同时访问共享资源的线程上限
1 2 3 4 5 6 7 8 9 10 11 12 13 14 15 16 17 18 19 20 21 22 23 public static void main (String[] args) { Semaphore semaphore = new Semaphore (3 ); for (int i = 0 ; i < 10 ; i++) { new Thread (() -> { try { semaphore.acquire(); } catch (InterruptedException e) { e.printStackTrace(); } try { log.debug("running..." ); sleep(1 ); log.debug("end..." ); } finally { semaphore.release(); } }).start(); } }
输出
1 2 3 4 5 6 7 8 9 10 11 12 13 14 15 16 17 18 19 20 07 : 35 : 15.485 c.TestSemaphore [Thread-2 ] - running...07 : 35 : 15.485 c.TestSemaphore [Thread-1 ] - running...07 : 35 : 15.485 c.TestSemaphore [Thread-0 ] - running...07 : 35 : 16.490 c.TestSemaphore [Thread-2 ] - end ...07 : 35 : 16.490 c.TestSemaphore [Thread-0 ] - end ...07 : 35 : 16.490 c.TestSemaphore [Thread-1 ] - end ...07 : 35 : 16.490 c.TestSemaphore [Thread-3 ] - running...07 : 35 : 16.490 c.TestSemaphore [Thread-5 ] - running...07 : 35 : 16.490 c.TestSemaphore [Thread-4 ] - running...07 : 35 : 17.490 c.TestSemaphore [Thread-5 ] - end ...07 : 35 : 17.490 c.TestSemaphore [Thread-4 ] - end ...07 : 35 : 17.490 c.TestSemaphore [Thread-3 ] - end ...07 : 35 : 17.490 c.TestSemaphore [Thread-6 ] - running...07 : 35 : 17.490 c.TestSemaphore [Thread-7 ] - running...07 : 35 : 17.490 c.TestSemaphore [Thread-9 ] - running...07 : 35 : 18.491 c.TestSemaphore [Thread-6 ] - end ...07 : 35 : 18.491 c.TestSemaphore [Thread-7 ] - end ...07 : 35 : 18.491 c.TestSemaphore [Thread-9 ] - end ...07 : 35 : 18.491 c.TestSemaphore [Thread-8 ] - running...07 : 35 : 19.492 c.TestSemaphore [Thread-8 ] - end ...
应用 限制对共享资源的使用 semaphore 实现
使用 Semaphore 限流,在访问高峰期时,让请求线程阻塞,高峰期过去再释放许可,当然它只适合限制单机线程数量,并且仅是限制线程数,而不是限制资源数(例如连接数,请对比 Tomcat LimitLatch 的实现)
用 Semaphore 实现简单连接池,对比『享元模式』下的实现(用wait notify),性能和可读性显然更好,注意下面的实现中线程数和数据库连接数是相等的
1 2 3 4 5 6 7 8 9 10 11 12 13 14 15 16 17 18 19 20 21 22 23 24 25 26 27 28 29 30 31 32 33 34 35 36 37 38 39 40 41 42 43 44 45 46 47 48 49 50 51 52 @Slf4j(topic = "c.Pool") class Pool { private final int poolSize; private Connection[] connections; private AtomicIntegerArray states; private Semaphore semaphore; public Pool (int poolSize) { this .poolSize = poolSize; this .semaphore = new Semaphore (poolSize); this .connections = new Connection [poolSize]; this .states = new AtomicIntegerArray (new int [poolSize]); for (int i = 0 ; i < poolSize; i++) { connections[i] = new MockConnection ("连接" + (i+1 )); } } public Connection borrow () { try { semaphore.acquire(); } catch (InterruptedException e) { e.printStackTrace(); } for (int i = 0 ; i < poolSize; i++) { if (states.get(i) == 0 ) { if (states.compareAndSet(i, 0 , 1 )) { log.debug("borrow {}" , connections[i]); return connections[i]; } } } return null ; } public void free (Connection conn) { for (int i = 0 ; i < poolSize; i++) { if (connections[i] == conn) { states.set(i, 0 ); log.debug("free {}" , conn); semaphore.release(); break ; } } } }
原理 加锁解锁流程 Semaphore 有点像一个停车场,permits 就好像停车位数量,当线程获得了 permits 就像是获得了停车位,然后停车场显示空余车位减
刚开始,permits(state)为 3,这时 5 个线程来获取资源
假设其中 Thread-1,Thread-2,Thread-4 cas 竞争成功,而 Thread-0 和 Thread-3 竞争失败,进入 AQS 队列 park 阻塞
这时 Thread-4 释放了 permits,状态如下
接下来 Thread-0 竞争成功,permits 再次设置为 0,设置自己为 head 节点,断开原来的 head 节点,unpark 接下来的 Thread-3 节点,但由于 permits 是 0,因此 Thread-3 在尝试不成功后再次进入 park 状态
被唤醒的节点会去唤醒它接下来的节点
队列中有些节点因为被用户中断而节点状态被设置为了1,中断后的节点自己会除去该节点(可中断模式)
被唤醒的节点,不会存在被用户中断的可能(取消还没完成,节点还没去除),因为唤醒 (release) 是找到离head最近的一个 状态为-1,被中断为1 的不会去唤醒(unpark)
源码分析 1 2 3 4 5 6 7 8 9 10 11 12 13 14 15 16 17 18 19 20 21 22 23 24 25 26 27 28 29 30 31 32 33 34 35 36 37 38 39 40 41 42 43 44 45 46 47 48 49 50 51 52 53 54 55 56 57 58 59 60 61 62 63 64 65 66 67 68 69 70 71 72 73 74 75 76 77 78 79 80 81 82 83 84 85 86 87 88 89 90 91 92 static final class NonfairSync extends Sync { private static final long serialVersionUID = -2694183684443567898L ; NonfairSync(int permits) { super (permits); } public void acquire () throws InterruptedException { sync.acquireSharedInterruptibly(1 ); } public final void acquireSharedInterruptibly (int arg) throws InterruptedException { if (Thread.interrupted()) throw new InterruptedException (); if (tryAcquireShared(arg) < 0 ) doAcquireSharedInterruptibly(arg); } protected int tryAcquireShared (int acquires) { return nonfairTryAcquireShared(acquires); } final int nonfairTryAcquireShared (int acquires) { for (;;) { int available = getState(); int remaining = available - acquires; if ( remaining < 0 || compareAndSetState(available, remaining) ) { return remaining; } } } private void doAcquireSharedInterruptibly (int arg) throws InterruptedException { final Node node = addWaiter(Node.SHARED); boolean failed = true ; try { for (;;) { final Node p = node.predecessor(); if (p == head) { int r = tryAcquireShared(arg); if (r >= 0 ) { setHeadAndPropagate(node, r); p.next = null ; failed = false ; return ; } } if (shouldParkAfterFailedAcquire(p, node) && parkAndCheckInterrupt()) throw new InterruptedException (); } } finally { if (failed) cancelAcquire(node); } } public void release () { sync.releaseShared(1 ); } public final boolean releaseShared (int arg) { if (tryReleaseShared(arg)) { doReleaseShared(); return true ; } return false ; } protected final boolean tryReleaseShared (int releases) { for (;;) { int current = getState(); int next = current + releases; if (next < current) throw new Error ("Maximum permit count exceeded" ); if (compareAndSetState(current, next)) return true ; } } }
为什么要有 PROPAGATE 早期有 bug
1 2 3 4 5 6 7 8 9 public final boolean releaseShared (int arg) { if (tryReleaseShared(arg)) { Node h = head; if (h != null && h.waitStatus != 0 ) unparkSuccessor(h); return true ; } return false ; }
1 2 3 4 5 6 7 8 9 10 11 12 13 14 15 16 17 18 19 20 21 22 23 24 25 26 27 28 private void doAcquireShared (int arg) { final Node node = addWaiter(Node.SHARED); boolean failed = true ; try { boolean interrupted = false ; for (;;) { final Node p = node.predecessor(); if (p == head) { int r = tryAcquireShared(arg); if (r >= 0 ) { setHeadAndPropagate(node, r); p.next = null ; if (interrupted) selfInterrupt(); failed = false ; return ; } } if (shouldParkAfterFailedAcquire(p, node) && parkAndCheckInterrupt()) interrupted = true ; } } finally { if (failed) cancelAcquire(node); } }
1 2 3 4 5 6 7 8 9 10 11 12 13 14 15 16 17 18 19 20 21 22 23 24 25 26 27 28 private void doAcquireShared (int arg) { final Node node = addWaiter(Node.SHARED); boolean failed = true ; try { boolean interrupted = false ; for (;;) { final Node p = node.predecessor(); if (p == head) { int r = tryAcquireShared(arg); if (r >= 0 ) { setHeadAndPropagate(node, r); p.next = null ; if (interrupted) selfInterrupt(); failed = false ; return ; } } if (shouldParkAfterFailedAcquire(p, node) && parkAndCheckInterrupt()) interrupted = true ; } } finally { if (failed) cancelAcquire(node); } }
1 2 3 4 5 6 7 8 9 10 private void setHeadAndPropagate (Node node, int propagate) { setHead(node); if (propagate > 0 && node.waitStatus != 0 ) { Node s = node.next; if (s == null || s.isShared()) unparkSuccessor(node); } }
假设存在某次循环中队列里排队的结点情况为 head(-1)->t1(-1)->t2(-1)
假设存在将要信号量释放的 T3 和 T4,释放顺序为先 T3 后 T4
(1) 正常流程
(2) 产生 bug 的情况
修复前版本执行流程
(2) T1 由于 T3 释放信号量被唤醒,调用 tryAcquireShared,假设返回值为 0(获取锁成功,但没有剩余资源量)
(3) T4 调用 releaseShared(1),此时 head.waitStatus 为 0(此时读到的 head 和 1 中为同一个head),不满足条件,因此不调用 unpark-Successor(head)
(4) T1 获取信号量成功,调用 setHeadAndPropagate 时,因为不满足 propagate > 0(2 的返回值也就是 propagate(剩余资源量)== 0),从而不会唤醒后继结点, T2 线程得不到唤醒
(3) bug 修复后 1 2 3 4 5 6 7 8 9 10 11 12 13 14 15 16 17 18 19 20 21 22 23 24 25 26 27 28 29 30 31 32 33 34 35 36 private void setHeadAndPropagate (Node node, int propagate) { Node h = head; setHead(node); if (propagate > 0 || h == null || h.waitStatus < 0 || (h = head) == null || h.waitStatus < 0 ) { Node s = node.next; if (s == null || s.isShared()) { doReleaseShared(); } } } private void doReleaseShared () { for (;;) { Node h = head; if (h != null && h != tail) { int ws = h.waitStatus; if (ws == Node.SIGNAL) { if (!compareAndSetWaitStatus(h, Node.SIGNAL, 0 )) continue ; unparkSuccessor(h); } else if (ws == 0 && !compareAndSetWaitStatus(h, 0 , Node.PROPAGATE)) continue ; } if (h == head) break ; } }
(1) T3 调用 releaseShared(),直接调用了 unparkSuccessor(head),head 的等待状态从 -1 变为 0
(2) T1 由于 T3 释放信号量被唤醒,调用 tryAcquireShared,假设返回值为 0(获取锁成功,但没有剩余资源量)
(3) T4 调用 releaseShared(),此时 head.waitStatus 为 0(此时读到的 head 和 1 中为同一个 head),调用 doReleaseShared() 将等待状态置为 *PROPAGATE ***(-3)
(4) T1 获取信号量成功,调用 setHeadAndPropagate 时,读到 h.waitStatus < 0,从而调用 doReleaseShared() 唤醒 T2
2.5 CountdownLatch 用来进行线程同步协作,等待所有线程完成倒计时。
其中构造参数用来初始化等待计数值,await() 用来等待计数归零,countDown() 用来让计数减一
1 2 3 4 5 6 7 8 9 10 11 12 13 14 15 16 17 18 19 20 21 22 23 24 public static void main (String[] args) throws InterruptedException { CountDownLatch latch = new CountDownLatch (3 ); new Thread (() -> { log.debug("begin..." ); sleep(1 ); latch.countDown(); log.debug("end...{}" , latch.getCount()); }).start(); new Thread (() -> { log.debug("begin..." ); sleep(2 ); latch.countDown(); log.debug("end...{}" , latch.getCount()); }).start(); new Thread (() -> { log.debug("begin..." ); sleep(1.5 ); latch.countDown(); log.debug("end...{}" , latch.getCount()); }).start(); log.debug("waiting..." ); latch.await(); log.debug("wait end..." ); }
输出
1 2 3 4 5 6 7 8 18 : 44 : 00 .778 c.TestCountDownLatch [main] - waiting...18 : 44 : 00 .778 c.TestCountDownLatch [Thread-2 ] - begin ...18 : 44 : 00 .778 c.TestCountDownLatch [Thread-0 ] - begin ...18 : 44 : 00 .778 c.TestCountDownLatch [Thread-1 ] - begin ...18 : 44 : 01 .782 c.TestCountDownLatch [Thread-0 ] - end ...2 18 : 44 : 02 .283 c.TestCountDownLatch [Thread-2 ] - end ...1 18 : 44 : 02 .782 c.TestCountDownLatch [Thread-1 ] - end ...0 18 : 44 : 02 .782 c.TestCountDownLatch [main] - wait end ...
可以配合线程池使用,改进如下
1 2 3 4 5 6 7 8 9 10 11 12 13 14 15 16 17 18 19 20 21 22 23 24 25 26 27 28 29 30 31 public static void main (String[] args) throws InterruptedException { CountDownLatch latch = new CountDownLatch (3 ); ExecutorService service = Executors.newFixedThreadPool(4 ); service.submit(() -> { log.debug("begin..." ); sleep(1 ); latch.countDown(); log.debug("end...{}" , latch.getCount()); }); service.submit(() -> { log.debug("begin..." ); sleep(1.5 ); latch.countDown(); log.debug("end...{}" , latch.getCount()); }); service.submit(() -> { log.debug("begin..." ); sleep(2 ); latch.countDown(); log.debug("end...{}" , latch.getCount()); }); service.submit(()->{ try { log.debug("waiting..." ); latch.await(); log.debug("wait end..." ); } catch (InterruptedException e) { e.printStackTrace(); } }); }
输出
1 2 3 4 5 6 7 8 18 : 52 : 25.831 c.TestCountDownLatch [pool-1 -thread-3 ] - begin ...18 : 52 : 25.831 c.TestCountDownLatch [pool-1 -thread-1 ] - begin ...18 : 52 : 25.831 c.TestCountDownLatch [pool-1 -thread-2 ] - begin ...18 : 52 : 25.831 c.TestCountDownLatch [pool-1 -thread-4 ] - waiting...18 : 52 : 26.835 c.TestCountDownLatch [pool-1 -thread-1 ] - end ...2 18 : 52 : 27.335 c.TestCountDownLatch [pool-1 -thread-2 ] - end ...1 18 : 52 : 27.835 c.TestCountDownLatch [pool-1 -thread-3 ] - end ...0 18 : 52 : 27.835 c.TestCountDownLatch [pool-1 -thread-4 ] - wait end ...
应用之同步等待多线程准备完毕 1 2 3 4 5 6 7 8 9 10 11 12 13 14 15 16 17 18 19 20 21 22 23 24 AtomicInteger num = new AtomicInteger (0 );ExecutorService service = Executors.newFixedThreadPool(10 , (r) -> { return new Thread (r, "t" + num.getAndIncrement()); }); CountDownLatch latch = new CountDownLatch (10 );String[] all = new String [10 ]; Random r = new Random ();for (int j = 0 ; j < 10 ; j++) { int x = j; service.submit(() -> { for (int i = 0 ; i <= 100 ; i++) { try { Thread.sleep(r.nextInt(100 )); } catch (InterruptedException e) { } all[x] = Thread.currentThread().getName() + "(" + (i + "%" ) + ")" ; System.out.print("\r" + Arrays.toString(all)); } latch.countDown(); }); } latch.await(); System.out.println("\n游戏开始..." ); service.shutdown();
中间输出
1 [t0(52 %), t1(47 %), t2(51 %), t3(40 %), t4(49 %), t5(44 %), t6(49 %), t7(52 %), t8(46 %), t9(46 %)]
最后输出
1 2 3 [t0(100 %), t1(100 %), t2(100 %), t3(100 %), t4(100 %), t5(100 %), t6(100 %), t7(100 %), t8(100 %), t9(100 %)] 游戏开始...
应用之同步等待多个远程调用结束 1 2 3 4 5 6 7 8 9 10 11 12 13 14 15 16 17 18 19 20 21 22 23 24 25 26 27 28 29 30 31 32 33 34 35 36 37 38 39 40 @RestController public class TestCountDownlatchController { @GetMapping("/order/{id}") public Map<String, Object> order (@PathVariable int id) { HashMap<String, Object> map = new HashMap <>(); map.put("id" , id); map.put("total" , "2300.00" ); sleep(2000 ); return map; } @GetMapping("/product/{id}") public Map<String, Object> product (@PathVariable int id) { HashMap<String, Object> map = new HashMap <>(); if (id == 1 ) { map.put("name" , "小爱音箱" ); map.put("price" , 300 ); } else if (id == 2 ) { map.put("name" , "小米手机" ); map.put("price" , 2000 ); } map.put("id" , id); sleep(1000 ); return map; } @GetMapping("/logistics/{id}") public Map<String, Object> logistics (@PathVariable int id) { HashMap<String, Object> map = new HashMap <>(); map.put("id" , id); map.put("name" , "中通快递" ); sleep(2500 ); return map; } private void sleep (int millis) { try { Thread.sleep(millis); } catch (InterruptedException e) { e.printStackTrace(); } } }
rest 远程调用
1 2 3 4 5 6 7 8 9 10 11 12 13 14 15 16 17 18 19 20 21 22 23 24 25 26 27 28 29 30 RestTemplate restTemplate = new RestTemplate ();log.debug("begin" ); ExecutorService service = Executors.newCachedThreadPool();CountDownLatch latch = new CountDownLatch (4 );Future<Map<String,Object>> f1 = service.submit(() -> { Map<String, Object> r = restTemplate.getForObject("http://localhost:8080/order/{1}" , Map.class, 1 ); return r; }); Future<Map<String, Object>> f2 = service.submit(() -> { Map<String, Object> r = restTemplate.getForObject("http://localhost:8080/product/{1}" , Map.class, 1 ); return r; }); Future<Map<String, Object>> f3 = service.submit(() -> { Map<String, Object> r = restTemplate.getForObject("http://localhost:8080/product/{1}" , Map.class, 2 ); return r; }); Future<Map<String, Object>> f4 = service.submit(() -> { Map<String, Object> r = restTemplate.getForObject("http://localhost:8080/logistics/{1}" , Map.class, 1 ); return r; }); System.out.println(f1.get()); System.out.println(f2.get()); System.out.println(f3.get()); System.out.println(f4.get()); log.debug("执行完毕" ); service.shutdown();
执行结果
1 2 3 4 5 6 19 :51 :39.711 c.TestCountDownLatch [main] - begin{total=2300.00 , id=1 } {price=300 , name=小爱音箱, id=1 } {price=2000 , name=小米手机, id=2 } {name=中通快递, id=1 } 19 :51 :42.407 c.TestCountDownLatch [main] - 执行完毕
2.6 CydicBarrier [ˈsaɪklɪk ˈbæriɚ] 循环栅栏,用来进行线程协作,等待线程满足某个计数。构造时设置『计数个数』,每个线程执行到某个需要“同步”的时刻调用 await() 方法进行等待,当等待的线程数满足『计数个数』时,继续执行
1 2 3 4 5 6 7 8 9 10 11 12 13 14 15 16 17 18 19 20 CyclicBarrier cb = new CyclicBarrier (2 ); new Thread (()->{ System.out.println("线程1开始.." +new Date ()); try { cb.await(); } catch (InterruptedException | BrokenBarrierException e) { e.printStackTrace(); } System.out.println("线程1继续向下运行..." +new Date ()); }).start(); new Thread (()->{ System.out.println("线程2开始.." +new Date ()); try { Thread.sleep(2000 ); } catch (InterruptedException e) { } try { cb.await(); } catch (InterruptedException | BrokenBarrierException e) { e.printStackTrace(); } System.out.println("线程2继续向下运行..." +new Date ()); }).start();
注意 CyclicBarrier 与 CountDownLatch 的主要区别在于 CyclicBarrier 是可以重用的 CyclicBarrier 可以被比喻为『人满发车』
2.7 线程安全集合类概述
线程安全集合类可以分为三大类:
遗留的线程安全集合如 Hashtable , Vector
使用 Collections 装饰的线程安全集合,如:
Collections.synchronizedCollectionCollections.synchronizedListCollections.synchronizedMapCollections.synchronizedSetCollections.synchronizedNavigableMapCollections.synchronizedNavigableSetCollections.synchronizedSortedMapCollections.synchronizedSortedSet
java.util.concurrent.*Blocking、CopyOnWrite、ConcurrentBlocking 大部分实现基于锁,并提供用来阻塞的方法CopyOnWrite 之类容器修改开销相对较重Concurrent 类型的容器
内部很多操作使用 cas 优化,一般可以提供较高吞吐量
弱一致性
遍历时弱一致性,例如,当利用迭代器遍历时,如果容器发生修改,迭代器仍然可以继续进行遍历,这时内容是旧的
求大小弱一致性,size 操作未必是 100% 准确
读取弱一致性
遍历时如果发生了修改,对于非安全容器来讲,使用 fail-fast 机制也就是让遍历立刻失败,抛出ConcurrentModificationException,不再继续遍历
2.8 ConcurrentHashMap 练习:单词计数 生成测试数据
1 2 3 4 5 6 7 8 9 10 11 12 13 14 15 16 17 18 19 20 21 22 23 static final String ALPHA = "abcedfghijklmnopqrstuvwxyz" ;public static void main (String[] args) { int length = ALPHA.length(); int count = 200 ; List<String> list = new ArrayList <>(length * count); for (int i = 0 ; i < length; i++) { char ch = ALPHA.charAt(i); for (int j = 0 ; j < count; j++) { list.add(String.valueOf(ch)); } } Collections.shuffle(list); for (int i = 0 ; i < 26 ; i++) { try (PrintWriter out = new PrintWriter ( new OutputStreamWriter ( new FileOutputStream ("tmp/" + (i+1 ) + ".txt" )))) { String collect = list.subList(i * count, (i + 1 ) * count).stream() .collect(Collectors.joining("\n" )); out.print(collect); } catch (IOException e) { } } }
模版代码,模版代码中封装了多线程读取文件的代码
1 2 3 4 5 6 7 8 9 10 11 12 13 14 15 16 17 18 19 20 21 22 23 24 25 26 27 28 29 30 31 32 33 34 35 36 37 38 private static <V> void demo (Supplier<Map<String,V>> supplier, BiConsumer<Map<String,V>,List<String>> consumer) { Map<String, V> counterMap = supplier.get(); List<Thread> ts = new ArrayList <>(); for (int i = 1 ; i <= 26 ; i++) { int idx = i; Thread thread = new Thread (() -> { List<String> words = readFromFile(idx); consumer.accept(counterMap, words); }); ts.add(thread); } ts.forEach(t->t.start()); ts.forEach(t-> { try { t.join(); } catch (InterruptedException e) { e.printStackTrace(); } }); System.out.println(counterMap); } public static List<String> readFromFile (int i) { ArrayList<String> words = new ArrayList <>(); try (BufferedReader in = new BufferedReader (new InputStreamReader (new FileInputStream ("tmp/" + i +".txt" )))) { while (true ) { String word = in.readLine(); if (word == null ) { break ; } words.add(word); } return words; } catch (IOException e) { throw new RuntimeException (e); } }
你要做的是实现两个参数
一是提供一个 map 集合,用来存放每个单词的计数结果,key 为单词,value 为计数
二是提供一组操作,保证计数的安全性,会传递 map 集合以及 单词 List
正确结果输出应该是每个单词出现 200 次
1 2 {a=200 , b=200 , c=200 , d=200 , e=200 , f=200 , g=200 , h=200 , i=200 , j=200 , k=200 , l=200 , m=200 , n=200 , o=200 , p=200 , q=200 , r=200 , s=200 , t=200 , u=200 , v=200 , w=200 , x=200 , y=200 , z=200 }
下面的实现为:
1 2 3 4 5 6 7 8 9 10 11 12 13 demo( () -> new HashMap <String, Integer>(), (map, words) -> { for (String word : words) { Integer counter = map.get(word); int newValue = counter == null ? 1 : counter + 1 ; map.put(word, newValue); } } );
有没有问题?请改进
参考解答1
1 2 3 4 5 6 7 8 9 demo( () -> new ConcurrentHashMap <String, LongAdder>(), (map, words) -> { for (String word : words) { map.computeIfAbsent(word, (key) -> new LongAdder ()).increment(); } } );
参考解答2
1 2 3 4 5 6 7 8 9 demo( () -> new ConcurrentHashMap <String, Integer>(), (map, words) -> { for (String word : words) { map.merge(word, 1 , Integer::sum); } } );
ConcurrentHashMap 原理 JDK 7 HashMap 并发死链 (1) 测试代码 注意
要在 JDK 7 下运行,否则扩容机制和 hash 的计算方法都变了
以下测试代码是精心准备的,不要随便改动
1 2 3 4 5 6 7 8 9 10 11 12 13 14 15 16 17 18 19 20 21 22 23 24 25 26 27 28 29 30 31 32 33 34 35 36 37 38 39 40 41 42 43 44 45 46 47 48 49 50 51 52 53 54 55 56 public static void main (String[] args) { System.out.println("长度为16时,桶下标为1的key" ); for (int i = 0 ; i < 64 ; i++) { if (hash(i) % 16 == 1 ) { System.out.println(i); } } System.out.println("长度为32时,桶下标为1的key" ); for (int i = 0 ; i < 64 ; i++) { if (hash(i) % 32 == 1 ) { System.out.println(i); } } final HashMap<Integer, Integer> map = new HashMap <Integer, Integer>(); map.put(2 , null ); map.put(3 , null ); map.put(4 , null ); map.put(5 , null ); map.put(6 , null ); map.put(7 , null ); map.put(8 , null ); map.put(9 , null ); map.put(10 , null ); map.put(16 , null ); map.put(35 , null ); map.put(1 , null ); System.out.println("扩容前大小[main]:" +map.size()); new Thread () { @Override public void run () { map.put(50 , null ); System.out.println("扩容后大小[Thread-0]:" +map.size()); } }.start(); new Thread () { @Override public void run () { map.put(50 , null ); System.out.println("扩容后大小[Thread-1]:" +map.size()); } }.start(); } final static int hash (Object k) { int h = 0 ; if (0 != h && k instanceof String) { return sun.misc.Hashing.stringHash32((String) k); } h ^= k.hashCode(); h ^= (h >>> 20 ) ^ (h >>> 12 ); return h ^ (h >>> 7 ) ^ (h >>> 4 ); }
(2) 死锁复现 调试工具使用 idea
在 HashMap 源码 590 行加断点
1 int newCapacity = newTable.length;
断点的条件如下,目的是让 HashMap 在扩容为 32 时,并且线程为 Thread-0 或 Thread-1 时停下来
1 2 3 4 5 newTable.length==32 && ( Thread.currentThread().getName().equals("Thread-0" )|| Thread.currentThread().getName().equals("Thread-1" ) )
断点暂停方式选择 Thread,否则在调试 Thread-0 时,Thread-1 无法恢复运行
运行代码,程序在预料的断点位置停了下来,输出
1 2 3 4 5 6 7 8 9 长度为16 时,桶下标为1 的key 1 16 35 50 长度为32 时,桶下标为1 的key 1 35 扩容前大小[main]: 12
接下来进入扩容流程调试
在 HashMap 源码 594 行加断点
1 2 3 Entry<K,V> next = e.next; if (rehash)
这是为了观察 e 节点和 next 节点的状态,Thread-0 单步执行到 594 行,再 594 处再添加一个断点(条件
这时可以在 Variables 面板观察到 e 和 next 变量,使用 view as -> Object 查看节点状态
1 2 e (1 )->(35 )->(16 )->null next (35 )->(16 )->null
在 Threads 面板选中 Thread-1 恢复运行,可以看到控制台输出新的内容如下,Thread-1 扩容已完成
1 2 newTable[1 ] (35 )->(1 )->null 扩容后大小: 13
这时 Thread-0 还停在 594 处, Variables 面板变量的状态已经变化为
1 2 e (1 )->null next (35 )->(1 )->null
为什么呢,因为 Thread-1 扩容时链表也是后加入的元素放入链表头,因此链表就倒过来了,但 Thread-1 虽然结果正确,但它结束后 Thread-0 还要继续运行
接下来就可以单步调试(F8)观察死链的产生了
下一轮循环到 594,将 e 搬迁到 newTable 链表头
1 2 3 newTable[1 ] (1 )->null e (35 )->(1 )->null next (1 )->null
下一轮循环到 594,将 e 搬迁到 newTable 链表头
1 2 3 newTable[1 ] (35 )->(1 )->null e (1 )->null next null
再看看源码
1 2 3 4 5 6 7 e.next = newTable[1 ]; newTable[1 ] = e; e = next;
(3) 源码分析 HashMap 的并发死链发生在扩容时
1 2 3 4 5 6 7 8 9 10 11 12 13 14 15 16 17 18 19 void transfer (Entry[] newTable, boolean rehash) { int newCapacity = newTable.length; for (Entry<K,V> e : table) { while (null != e) { Entry<K,V> next = e.next; if (rehash) { e.hash = null == e.key ? 0 : hash(e.key); } int i = indexFor(e.hash, newCapacity); e.next = newTable[i]; newTable[i] = e; e = next; } } }
假设 map 中初始元素是
1 2 3 4 5 6 7 8 9 10 11 12 13 14 15 16 17 18 19 20 原始链表,格式:[下标] (key,next ) [1 ] (1 ,35 )->(35 ,16 )->(16 ,null) 线程 a 执行到 1 处 ,此时局部变量 e 为 (1 ,35 ),而局部变量 next 为 (35 ,16 ) 线程 a 挂起 线程 b 开始执行 第一次循环 [1 ] (1 ,null) 第二次循环 [1 ] (35 ,1 )->(1 ,null) 第三次循环 [1 ] (35 ,1 )->(1 ,null) [17 ] (16 ,null) 切换回线程 a,此时局部变量 e 和 next 被恢复,引用没变但内容变了:e 的内容被改为 (1 ,null),而 next 的内 容被改为 (35 ,1 ) 并链向 (1 ,null) 第一次循环 [1 ] (1 ,null) 第二次循环,注意这时 e 是 (35 ,1 ) 并链向 (1 ,null) 所以 next 又是 (1 ,null) [1 ] (35 ,1 )->(1 ,null) 第三次循环,e 是 (1 ,null),而 next 是 null,但 e 被放入链表头,这样 e.next 变成了 35 (2 处) [1 ] (1 ,35 )->(35 ,1 )->(1 ,35 ) 已经是死链了
(4) 小结
究其原因,是因为在多线程环境下使用了非线程安全的 map 集合
JDK 8 虽然将扩容算法做了调整,不再将元素加入链表头(而是保持与扩容前一样的顺序),但仍不意味着能够在多线程环境下能够安全扩容,还会出现其它问题(如扩容丢数据)
JDK 8 ConcurrentHashMap (1) 重要属性和内部类 1 2 3 4 5 6 7 8 9 10 11 12 13 14 15 16 17 18 19 private transient volatile int sizeCtl;static class Node <K,V> implements Map .Entry<K,V> {}transient volatile Node<K,V>[] table;private transient volatile Node<K,V>[] nextTable;static final class ForwardingNode <K,V> extends Node <K,V> {}static final class ReservationNode <K,V> extends Node <K,V> {}static final class TreeBin <K,V> extends Node <K,V> {}static final class TreeNode <K,V> extends Node <K,V> {}
(2) 重要方法 1 2 3 4 5 6 static final <K,V> Node<K,V> tabAt (Node<K,V>[] tab, int i) static final <K,V> boolean casTabAt (Node<K,V>[] tab, int i, Node<K,V> c, Node<K,V> v) static final <K,V> void setTabAt (Node<K,V>[] tab, int i, Node<K,V> v)
(3) 构造器分析 可以看到实现了懒惰初始化,在构造方法中仅仅计算了 table 的大小,以后在第一次使用时才会真正创建
1 2 3 4 5 6 7 8 9 10 11 public ConcurrentHashMap (int initialCapacity, float loadFactor, int concurrencyLevel) { if (!(loadFactor > 0.0f ) || initialCapacity < 0 || concurrencyLevel <= 0 ) throw new IllegalArgumentException (); if (initialCapacity < concurrencyLevel) initialCapacity = concurrencyLevel; long size = (long )(1.0 + (long )initialCapacity / loadFactor); int cap = (size >= (long )MAXIMUM_CAPACITY) ? MAXIMUM_CAPACITY : tableSizeFor((int )size); this .sizeCtl = cap; }
(4) get流程 1 2 3 4 5 6 7 8 9 10 11 12 13 14 15 16 17 18 19 20 21 22 23 public V get (Object key) { Node<K,V>[] tab; Node<K,V> e, p; int n, eh; K ek; int h = spread(key.hashCode()); if ((tab = table) != null && (n = tab.length) > 0 && (e = tabAt(tab, (n - 1 ) & h)) != null ) { if ((eh = e.hash) == h) { if ((ek = e.key) == key || (ek != null && key.equals(ek))) return e.val; } else if (eh < 0 ) return (p = e.find(h, key)) != null ? p.val : null ; while ((e = e.next) != null ) { if (e.hash == h && ((ek = e.key) == key || (ek != null && key.equals(ek)))) return e.val; } } return null ; }
(5) put流程 以下数组简称(table),链表简称(bin)
1 2 3 4 5 6 7 8 9 10 11 12 13 14 15 16 17 18 19 20 21 22 23 24 25 26 27 28 29 30 31 32 33 34 35 36 37 38 39 40 41 42 43 44 45 46 47 48 49 50 51 52 53 54 55 56 57 58 59 60 61 62 63 64 65 66 67 68 69 70 71 72 73 74 75 76 77 78 79 80 81 82 83 84 85 86 87 88 89 90 91 92 93 94 95 96 97 98 99 100 101 102 103 104 105 106 107 108 109 110 111 112 113 114 115 116 117 118 119 120 121 122 123 124 125 126 127 128 129 130 131 132 133 134 135 136 137 138 139 140 141 142 143 144 145 146 147 148 149 150 151 152 153 154 155 156 157 158 159 160 161 public V put (K key, V value) { return putVal(key, value, false ); } final V putVal (K key, V value, boolean onlyIfAbsent) { if (key == null || value == null ) throw new NullPointerException (); int hash = spread(key.hashCode()); int binCount = 0 ; for (Node<K,V>[] tab = table;;) { Node<K,V> f; int n, i, fh; if (tab == null || (n = tab.length) == 0 ) tab = initTable(); else if ((f = tabAt(tab, i = (n - 1 ) & hash)) == null ) { if (casTabAt(tab, i, null , new Node <K,V>(hash, key, value, null ))) break ; } else if ((fh = f.hash) == MOVED) tab = helpTransfer(tab, f); else { V oldVal = null ; synchronized (f) { if (tabAt(tab, i) == f) { if (fh >= 0 ) { binCount = 1 ; for (Node<K,V> e = f;; ++binCount) { K ek; if (e.hash == hash && ((ek = e.key) == key || (ek != null && key.equals(ek)))) { oldVal = e.val; if (!onlyIfAbsent) e.val = value; break ; } Node<K,V> pred = e; if ((e = e.next) == null ) { pred.next = new Node <K,V>(hash, key, value, null ); break ; } } } else if (f instanceof TreeBin) { Node<K,V> p; binCount = 2 ; if ((p = ((TreeBin<K,V>)f).putTreeVal(hash, key, value)) != null ) { oldVal = p.val; if (!onlyIfAbsent) p.val = value; } } } } if (binCount != 0 ) { if (binCount >= TREEIFY_THRESHOLD) treeifyBin(tab, i); if (oldVal != null ) return oldVal; break ; } } } addCount(1L , binCount); return null ; } private final Node<K,V>[] initTable() { Node<K,V>[] tab; int sc; while ((tab = table) == null || tab.length == 0 ) { if ((sc = sizeCtl) < 0 ) Thread.yield(); else if (U.compareAndSwapInt(this , SIZECTL, sc, -1 )) { try { if ((tab = table) == null || tab.length == 0 ) { int n = (sc > 0 ) ? sc : DEFAULT_CAPACITY; Node<K,V>[] nt = (Node<K,V>[])new Node <?,?>[n]; table = tab = nt; sc = n - (n >>> 2 ); } } finally { sizeCtl = sc; } break ; } } return tab; } private final void addCount (long x, int check) { CounterCell[] as; long b, s; if ( (as = counterCells) != null || !U.compareAndSwapLong(this , BASECOUNT, b = baseCount, s = b + x) ) { CounterCell a; long v; int m; boolean uncontended = true ; if ( as == null || (m = as.length - 1 ) < 0 || (a = as[ThreadLocalRandom.getProbe() & m]) == null || !(uncontended = U.compareAndSwapLong(a, CELLVALUE, v = a.value, v + x)) ) { fullAddCount(x, uncontended); return ; } if (check <= 1 ) return ; s = sumCount(); } if (check >= 0 ) { Node<K,V>[] tab, nt; int n, sc; while (s >= (long )(sc = sizeCtl) && (tab = table) != null && (n = tab.length) < MAXIMUM_CAPACITY) { int rs = resizeStamp(n); if (sc < 0 ) { if ((sc >>> RESIZE_STAMP_SHIFT) != rs || sc == rs + 1 || sc == rs + MAX_RESIZERS || (nt = nextTable) == null || transferIndex <= 0 ) break ; if (U.compareAndSwapInt(this , SIZECTL, sc, sc + 1 )) transfer(tab, nt); } else if (U.compareAndSwapInt(this , SIZECTL, sc, (rs << RESIZE_STAMP_SHIFT) + 2 )) transfer(tab, null ); s = sumCount(); } } }
(6) size 计算流程 size 计算实际发生在 put,remove 改变集合元素的操作之中
没有竞争发生,向 baseCount 累加计数
有竞争发生,新建 counterCells,向其中的一个 cell 累加计数
counterCells 初始有两个 cell
如果计数竞争比较激烈,会创建新的 cell 来累加计数
1 2 3 4 5 6 7 8 9 10 11 12 13 14 15 16 17 18 public int size () { long n = sumCount(); return ((n < 0L ) ? 0 : (n > (long )Integer.MAX_VALUE) ? Integer.MAX_VALUE : (int )n); } final long sumCount () { CounterCell[] as = counterCells; CounterCell a; long sum = baseCount; if (as != null ) { for (int i = 0 ; i < as.length; ++i) { if ((a = as[i]) != null ) sum += a.value; } } return sum; }
Java 8 数组(Node) +( 链表 Node | 红黑树 TreeNode ) 以下数组简称(table),链表简称(bin)
初始化,使用 cas 来保证并发安全,懒惰初始化 table
树化,当 table.length < 64 时,先尝试扩容,超过 64 时,并且 bin.length > 8 时,会将链表树化,树化过程会用 synchronized 锁住链表头
put,如果该 bin 尚未创建,只需要使用 cas 创建 bin;如果已经有了,锁住链表头进行后续 put 操作,元素添加至 bin 的尾部
get,无锁操作仅需要保证可见性,扩容过程中 get 操作拿到的是 ForwardingNode 它会让 get 操作在新table 进行搜索
扩容,扩容时以 bin 为单位进行,需要对 bin 进行 synchronized,但这时妙的是其它竞争线程也不是无事可做,它们会帮助把其它 bin 进行扩容,扩容时平均只有 1/6 的节点会把复制到新 table 中
size,元素个数保存在 baseCount 中,并发时的个数变动保存在 CounterCell[] 当中。最后统计数量时累加
源码分析 http://www.importnew.com/28263.html
其它实现 Cliff Click’s high scale lib
JDK 7 ConcurrentHashMap 它维护了一个 segment 数组,每个 segment 对应一把锁
优点:如果多个线程访问不同的 segment,实际是没有冲突的,这与 jdk8 中是类似的
缺点:Segments 数组默认大小为16,这个容量初始化指定后就不能改变了,并且不是懒惰初始化
(1) 构造器分析 1 2 3 4 5 6 7 8 9 10 11 12 13 14 15 16 17 18 19 20 21 22 23 24 25 26 27 28 29 30 31 32 public ConcurrentHashMap (int initialCapacity, float loadFactor, int concurrencyLevel) { if (!(loadFactor > 0 ) || initialCapacity < 0 || concurrencyLevel <= 0 ) throw new IllegalArgumentException (); if (concurrencyLevel > MAX_SEGMENTS) concurrencyLevel = MAX_SEGMENTS; int sshift = 0 ; int ssize = 1 ; while (ssize < concurrencyLevel) { ++sshift; ssize <<= 1 ; } this .segmentShift = 32 - sshift; this .segmentMask = ssize - 1 ; if (initialCapacity > MAXIMUM_CAPACITY) initialCapacity = MAXIMUM_CAPACITY; int c = initialCapacity / ssize; if (c * ssize < initialCapacity) ++c; int cap = MIN_SEGMENT_TABLE_CAPACITY; while (cap < c) cap <<= 1 ; Segment<K,V> s0 = new Segment <K,V>(loadFactor, (int )(cap * loadFactor), (HashEntry<K,V>[])new HashEntry [cap]); Segment<K,V>[] ss = (Segment<K,V>[])new Segment [ssize]; UNSAFE.putOrderedObject(ss, SBASE, s0); this .segments = ss; }
构造完成,如下图所示
可以看到 ConcurrentHashMap 没有实现懒惰初始化,空间占用不友好
其中 this.segmentShift 和 this.segmentMask 的作用是决定将 key 的 hash 结果匹配到哪个 segment
例如,根据某一 hash 值求 segment 位置,先将高位向低位移动 this.segmentShift 位
(2) put流程 1 2 3 4 5 6 7 8 9 10 11 12 13 14 15 16 17 public V put (K key, V value) { Segment<K,V> s; if (value == null ) throw new NullPointerException (); int hash = hash(key); int j = (hash >>> segmentShift) & segmentMask; if ((s = (Segment<K,V>)UNSAFE.getObject (segments, (j << SSHIFT) + SBASE)) == null ) { s = ensureSegment(j); } return s.put(key, hash, value, false ); }
segment 继承了可重入锁(ReentrantLock),它的 put 方法为
1 2 3 4 5 6 7 8 9 10 11 12 13 14 15 16 17 18 19 20 21 22 23 24 25 26 27 28 29 30 31 32 33 34 35 36 37 38 39 40 41 42 43 44 45 46 47 48 49 50 51 52 53 54 final V put (K key, int hash, V value, boolean onlyIfAbsent) { HashEntry<K,V> node = tryLock() ? null : scanAndLockForPut(key, hash, value); V oldValue; try { HashEntry<K,V>[] tab = table; int index = (tab.length - 1 ) & hash; HashEntry<K,V> first = entryAt(tab, index); for (HashEntry<K,V> e = first;;) { if (e != null ) { K k; if ((k = e.key) == key || (e.hash == hash && key.equals(k))) { oldValue = e.value; if (!onlyIfAbsent) { e.value = value; ++modCount; } break ; } e = e.next; } else { if (node != null ) node.setNext(first); else node = new HashEntry <K,V>(hash, key, value, first); int c = count + 1 ; if (c > threshold && tab.length < MAXIMUM_CAPACITY) rehash(node); else setEntryAt(tab, index, node); ++modCount; count = c; oldValue = null ; break ; } } } finally { unlock(); } return oldValue; }
(3) rehash流程 发生在 put 中,因为此时已经获得了锁,因此 rehash 时不需要考虑线程安全
1 2 3 4 5 6 7 8 9 10 11 12 13 14 15 16 17 18 19 20 21 22 23 24 25 26 27 28 29 30 31 32 33 34 35 36 37 38 39 40 41 42 43 44 45 46 47 private void rehash (HashEntry<K,V> node) { HashEntry<K,V>[] oldTable = table; int oldCapacity = oldTable.length; int newCapacity = oldCapacity << 1 ; threshold = (int )(newCapacity * loadFactor); HashEntry<K,V>[] newTable = (HashEntry<K,V>[]) new HashEntry [newCapacity]; int sizeMask = newCapacity - 1 ; for (int i = 0 ; i < oldCapacity ; i++) { HashEntry<K,V> e = oldTable[i]; if (e != null ) { HashEntry<K,V> next = e.next; int idx = e.hash & sizeMask; if (next == null ) newTable[idx] = e; else { HashEntry<K,V> lastRun = e; int lastIdx = idx; for (HashEntry<K,V> last = next; last != null ; last = last.next) { int k = last.hash & sizeMask; if (k != lastIdx) { lastIdx = k; lastRun = last; } } newTable[lastIdx] = lastRun; for (HashEntry<K,V> p = e; p != lastRun; p = p.next) { V v = p.value; int h = p.hash; int k = h & sizeMask; HashEntry<K,V> n = newTable[k]; newTable[k] = new HashEntry <K,V>(h, p.key, v, n); } } } } int nodeIndex = node.hash & sizeMask; node.setNext(newTable[nodeIndex]); newTable[nodeIndex] = node; table = newTable; }
附,调试代码
1 2 3 4 5 6 7 8 9 10 11 12 13 14 15 16 17 18 19 20 21 22 23 24 25 26 27 28 29 30 31 32 33 34 35 36 37 public static void main (String[] args) { ConcurrentHashMap<Integer, String> map = new ConcurrentHashMap <>(); for (int i = 0 ; i < 1000 ; i++) { int hash = hash(i); int segmentIndex = (hash >>> 28 ) & 15 ; if (segmentIndex == 4 && hash % 8 == 2 ) { System.out.println(i + "\t" + segmentIndex + "\t" + hash % 2 + "\t" + hash % 4 + "\t" + hash % 8 ); } } map.put(1 , "value" ); map.put(15 , "value" ); map.put(169 , "value" ); map.put(197 , "value" ); map.put(341 , "value" ); map.put(484 , "value" ); map.put(545 , "value" ); map.put(912 , "value" ); map.put(941 , "value" ); System.out.println("ok" ); } private static int hash (Object k) { int h = 0 ; if ((0 != h) && (k instanceof String)) { return sun.misc.Hashing.stringHash32((String) k); } h ^= k.hashCode(); h += (h << 15 ) ^ 0xffffcd7d ; h ^= (h >>> 10 ); h += (h << 3 ); h ^= (h >>> 6 ); h += (h << 2 ) + (h << 14 ); int v = h ^ (h >>> 16 ); return v; }
(4) get流程 get 时并未加锁,用了 UNSAFE 方法保证了可见性,扩容过程中,get 先发生就从旧表取内容,get 后发生就从新表取内容
1 2 3 4 5 6 7 8 9 10 11 12 13 14 15 16 17 18 19 public V get (Object key) { Segment<K,V> s; HashEntry<K,V>[] tab; int h = hash(key); long u = (((h >>> segmentShift) & segmentMask) << SSHIFT) + SBASE; if ((s = (Segment<K,V>)UNSAFE.getObjectVolatile(segments, u)) != null && (tab = s.table) != null ) { for (HashEntry<K,V> e = (HashEntry<K,V>) UNSAFE.getObjectVolatile (tab, ((long )(((tab.length - 1 ) & h)) << TSHIFT) + TBASE); e != null ; e = e.next) { K k; if ((k = e.key) == key || (e.hash == h && key.equals(k))) return e.value; } } return null ; }
(5) size 计算流程
计算元素个数前,先不加锁计算两次,如果前后两次结果如一样,认为个数正确返回
如果不一样,进行重试,重试次数超过 3,将所有 segment 锁住,重新计算个数返回
1 2 3 4 5 6 7 8 9 10 11 12 13 14 15 16 17 18 19 20 21 22 23 24 25 26 27 28 29 30 31 32 33 34 35 36 37 38 39 40 public int size () { final Segment<K,V>[] segments = this .segments; int size; boolean overflow; long sum; long last = 0L ; int retries = -1 ; try { for (;;) { if (retries++ == RETRIES_BEFORE_LOCK) { for (int j = 0 ; j < segments.length; ++j) ensureSegment(j).lock(); } sum = 0L ; size = 0 ; overflow = false ; for (int j = 0 ; j < segments.length; ++j) { Segment<K,V> seg = segmentAt(segments, j); if (seg != null ) { sum += seg.modCount; int c = seg.count; if (c < 0 || (size += c) < 0 ) overflow = true ; } } if (sum == last) break ; last = sum; } } finally { if (retries > RETRIES_BEFORE_LOCK) { for (int j = 0 ; j < segments.length; ++j) segmentAt(segments, j).unlock(); } } return overflow ? Integer.MAX_VALUE : size; }
2.9 BlockingQueue 基本的入队出队 1 2 3 4 5 6 7 8 9 10 11 12 13 14 public class LinkedBlockingQueue <E> extends AbstractQueue <E> implements BlockingQueue <E>, java.io.Serializable { static class Node <E> { E item; Node<E> next; Node(E x) { item = x; } } }
初始化链表 last = head = new Node<E>(null); Dummy 节点用来占位,item 为 null
当一个节点入队 `last = last.next = node;
再来一个节点入队 last = last.next = node;
出队
1 2 3 4 5 6 Node<E> h = head; Node<E> first = h.next; h.next = h; E x = first.item;first.item = null ; return x;
h = head
first = h.next
h.next = h
head = first
1 2 3 E x = first.item;first.item = null ; return x;
加锁分析 ==高明之处==在于用了两把锁和 dummy 节点
用一把锁,同一时刻,最多只允许有一个线程(生产者或消费者,二选一)执行
用两把锁,同一时刻,可以允许两个线程同时(一个生产者与一个消费者)执行
消费者与消费者线程仍然串行
生产者与生产者线程仍然串行
线程安全分析
当节点总数大于 2 时(包括 dummy 节点),putLock 保证的是 last 节点的线程安全,takeLock 保证的是 head 节点的线程安全。两把锁保证了入队和出队没有竞争
当节点总数等于 2 时(即一个 dummy 节点,一个正常节点)这时候,仍然是两把锁锁两个对象,不会竞争
当节点总数等于 1 时(就一个 dummy 节点)这时 take 线程会被 notEmpty 条件阻塞,有竞争,会阻塞
1 2 3 4 private final ReentrantLock putLock = new ReentrantLock ();private final ReentrantLock takeLock = new ReentrantLock ();
put 操作
1 2 3 4 5 6 7 8 9 10 11 12 13 14 15 16 17 18 19 20 21 22 23 24 25 26 27 28 public void put (E e) throws InterruptedException { if (e == null ) throw new NullPointerException (); int c = -1 ; Node<E> node = new Node <E>(e); final ReentrantLock putLock = this .putLock; final AtomicInteger count = this .count; putLock.lockInterruptibly(); try { while (count.get() == capacity) { notFull.await(); } enqueue(node); c = count.getAndIncrement(); if (c + 1 < capacity) notFull.signal(); } finally { putLock.unlock(); } if (c == 0 ) signalNotEmpty(); }
take 操作
1 2 3 4 5 6 7 8 9 10 11 12 13 14 15 16 17 18 19 20 21 22 23 24 public E take () throws InterruptedException { E x; int c = -1 ; final AtomicInteger count = this .count; final ReentrantLock takeLock = this .takeLock; takeLock.lockInterruptibly(); try { while (count.get() == 0 ) { notEmpty.await(); } x = dequeue(); c = count.getAndDecrement(); if (c > 1 ) notEmpty.signal(); } finally { takeLock.unlock(); } if (c == capacity) signalNotFull(); return x; }
由 put 唤醒 put 是为了避免信号不足
性能比较 主要列举 LinkedBlockingQueue 与 ArrayBlockingQueue 的性能比较
Linked 支持有界,Array 强制有界
Linked 实现是链表,Array 实现是数组
Linked 是懒惰的,而 Array 需要提前初始化 Node 数组
Linked 每次入队会生成新 Node,而 Array 的 Node 是提前创建好的
Linked 两把锁,Array 一把锁
2.10 ConcurrentLinkQueue ConcurrentLinkedQueue 的设计与 LinkedBlockingQueue 非常像,也是
两把【锁】,同一时刻,可以允许两个线程同时(一个生产者与一个消费者)执行
dummy 节点的引入让两把【锁】将来锁住的是不同对象,避免竞争
只是这【锁】使用了 cas 来实现
事实上,ConcurrentLinkedQueue 应用还是非常广泛的
例如之前讲的 Tomcat 的 Connector 结构时,Acceptor 作为生产者向 Poller 消费者传递事件信息时,正是采用了 ConcurrentLinkedQueue 将 SocketChannel 给 Poller 使用
模仿 ConcurrentLinkedQueue 初始代码
1 2 3 4 5 6 7 8 9 10 11 12 13 14 15 16 17 18 19 20 21 22 23 24 25 26 27 28 29 30 31 32 33 34 35 36 37 38 39 40 41 42 43 44 45 46 47 48 49 50 51 52 53 54 55 56 57 58 59 60 61 62 63 64 65 66 67 68 69 70 71 72 73 74 75 76 77 78 79 80 81 82 83 84 85 86 87 88 89 90 91 92 93 94 95 96 97 98 99 100 101 102 103 104 105 106 107 108 109 110 111 112 113 114 115 116 117 118 119 120 121 122 package cn.itcast.concurrent.thirdpart.test;import java.util.Collection;import java.util.Iterator;import java.util.Queue;import java.util.concurrent.atomic.AtomicReference;public class Test3 { public static void main (String[] args) { MyQueue<String> queue = new MyQueue <>(); queue.offer("1" ); queue.offer("2" ); queue.offer("3" ); System.out.println(queue); } } class MyQueue <E> implements Queue <E> { @Override public String toString () { StringBuilder sb = new StringBuilder (); for (Node<E> p = head; p != null ; p = p.next.get()) { E item = p.item; if (item != null ) { sb.append(item).append("->" ); } } sb.append("null" ); return sb.toString(); } @Override public int size () { return 0 ; } @Override public boolean isEmpty () { return false ; } @Override public boolean contains (Object o) { return false ; } @Override public Iterator<E> iterator () { return null ; } @Override public Object[] toArray() { return new Object [0 ]; } @Override public <T> T[] toArray(T[] a) { return null ; } @Override public boolean add (E e) { return false ; } @Override public boolean remove (Object o) { return false ; } @Override public boolean containsAll (Collection<?> c) { return false ; } @Override public boolean addAll (Collection<? extends E> c) { return false ; } @Override public boolean removeAll (Collection<?> c) { return false ; } @Override public boolean retainAll (Collection<?> c) { return false ; } @Override public void clear () { } @Override public E remove () { return null ; } @Override public E element () { return null ; } @Override public E peek () { return null ; } public MyQueue () { head = last = new Node <>(null , null ); } private volatile Node<E> last; private volatile Node<E> head; private E dequeue () { return null ; } @Override public E poll () { return null ; } @Override public boolean offer (E e) { return true ; } static class Node <E> { volatile E item; public Node (E item, Node<E> next) { this .item = item; this .next = new AtomicReference <>(next); } AtomicReference<Node<E>> next; } }
offer
1 2 3 4 5 6 7 8 9 10 11 12 13 14 public boolean offer (E e) { Node<E> n = new Node <>(e, null ); while (true ) { AtomicReference<Node<E>> next = last.next; if (next.compareAndSet(null , n)) { last = n; return true ; } } }
2.11 CopyOnWriteArrayList CopyOnWriteArraySet 是它的马甲 底层实现采用了 写入时拷贝 的思想,增删改操作会将底层数组拷贝一份,更改操作在新数组上执行,这时不影响其它线程的并发读 ,读写分离 。 以新增为例:
1 2 3 4 5 6 7 8 9 10 11 12 13 14 public boolean add (E e) { synchronized (lock) { Object[] es = getArray(); int len = es.length; es = Arrays.copyOf(es, len + 1 ); es[len] = e; setArray(es); return true ; } }
这里的源码版本是 Java 11,在 Java 1.8 中使用的是可重入锁而不是 synchronized
其它读操作并未加锁,例如:
get 弱一致性
时间点
操作
1
Thread-0 getArray()
2
Thread-1 getArray()
3
Thread-1 setArray(arrayCopy)
4
Thread-0 array[index]
不容易测试,但问题确实存在
迭代器弱一致性 1 2 3 4 5 6 7 8 9 10 11 12 13 CopyOnWriteArrayList<Integer> list = new CopyOnWriteArrayList <>(); list.add(1 ); list.add(2 ); list.add(3 ); Iterator<Integer> iter = list.iterator(); new Thread (() -> { list.remove(0 ); System.out.println(list); }).start(); sleep1s(); while (iter.hasNext()) { System.out.println(iter.next()); }
不要觉得弱一致性就不好
数据库的 MVCC 都是弱一致性的表现
并发高和一致性是矛盾的,需要权衡