1. 声明和配置 1.1 自定义容器配置文件
1 2 3 4 5 6 7 8 9 10 11 12 13 14 15 16 <servlet > <servlet-name > springmvc</servlet-name > <servlet-class > org.springframework.web.servlet.DispatcherServlet</servlet-class > <load-on-startup > 1</load-on-startup > <init-param > <param-name > contextConfigLocation</param-name > <param-value > classpath:springmvc.xml</param-value > </init-param > </servlet >
1 2 <param-value > classpath:springmvc.xml</param-value >
则会找默认路径:WebContent/WEB-INF/lib/
要求:
声明类org.springframework.web.servlet.DispatcherServlet的servlet-name时,其对应的配置文件名称也应为servlet-name的值 + "-servlet".xml
pom.xml中加入两个依赖包:
1 2 3 4 5 6 7 8 9 10 11 12 13 14 <dependency > <groupId > javax.servlet</groupId > <artifactId > javax.servlet-api</artifactId > <version > 3.1.0</version > <scope > provided</scope > </dependency > <dependency > <groupId > org.springframework</groupId > <artifactId > spring-webmvc</artifactId > <version > 5.2.5.RELEASE</version > </dependency >
步骤:
由于tomcat服务器每次启动会重新加载web.xml配置文件,从而在里面配置启动springmvc.xml,使它自动初始化
由index.jsp通过链接发起,再用MyController处理转发给show.jsp
注意:
MyController通过注解实现控制器,需要在springmvc.xml配置文件中配置扫描器
srpingmvc.xml
1
2
3
4
5
6
7
8
9
<?xml version="1.0" encoding="UTF-8" ?> <beans xmlns ="http://www.springframework.org/schema/beans" xmlns:xsi ="http://www.w3.org/2001/XMLSchema-instance" xmlns:context ="http://www.springframework.org/schema/context" xsi:schemaLocation ="http://www.springframework.org/schema/beans http://www.springframework.org/schema/beans/spring-beans.xsd http://www.springframework.org/schema/context https://www.springframework.org/schema/context/spring-context.xsd" > <context:component-scan base-package ="org.zhkucst.controller" /> </beans >
1.2 过滤器编码 服务器启动时自动初始化过滤器web.xml中加入
1 2 3 4 5 6 7 8 9 10 11 12 13 14 15 16 17 18 19 20 21 22 23 24 <filter > <filter-name > characterEncodingFilter</filter-name > <init-param > <param-name > encoding</param-name > <param-value > utf-8</param-value > </init-param > <init-param > <param-name > forceRequestEncoding</param-name > <param-value > true</param-value > </init-param > <init-param > <param-name > forceResponseEncoding</param-name > <param-value > true</param-value > </init-param > </filter > <filter-mapping > <filter-name > characterEncodingFilter</filter-name > <url-pattern > /*</url-pattern > </filter-mapping >
1.3 DispatcherServlet执行源码 springmvc执行过程源代码分析
tomcat启动,创建容器的过程
通过load-on-start标签指定的1,创建DispatcherServlet对象,
DispatcherServlet的父类是继承HttpServlet的,它是一个servlet,在被创建是,会执行init()方法
在init()方法中
1 2 3 4 getServletContext().getAttribute(key, ctx); getServletContext().setAttribute(key, ctx);
上面创建容器作用:创建@controller注解所在的类的对象,创建MyController对象,
这个对象放入到springmvc的容器,容器时map,类似map.put("myController", MyController对象)
请求的处理过程
执行servlet的service()
1
2
3
4
5
protected void service (HttpServletRequest request, HttpServletResponse response) protected void doService (HttpServletRequest request, HttpServletResponse response) DispatcherServlet.doDispatch(request, response){ }
2. 注解式开发 2.1 文件上传 和Servlet方式的本质一样,都是通过导入两个jar包(commons-io.jar和commons-fileupload.jar)
具体步骤:(直接使用CommonsMultipartResolver实现上传)
commons-fileupload.jar、commons-io.jar
配置CommonsMultipartResolver
将其加入SpringMVC容器中
1 2 3 4 5 6 7 <bean id ="multipartResolver" class ="org.springframework.web.multipart.commons.CommonsMultipartResolver" > <property name ="defaultEncoding" value ="utf-8" > </property > <property name ="maxUploadSize" value ="102400" > </property > </bean >
1
2
3
4
5
6
7
8
9
10
11
12
13
14
15
16
17
18
19
20
21
22
23
24
25
26
27
28
@RequestMapping(value = "testUpload") public String testUpload (String desc, MultipartFile file) { System.out.println("文件描述信息:" + desc); try { InputStream input = file.getInputStream(); String fileName = file.getOriginalFilename(); OutputStream out = new FileOutputStream ("d:\\" + fileName); byte [] bs = new byte [1024 ]; int len = -1 ; while ((len = input.read(bs)) != -1 ){ out.write(bs, 0 , len); } out.close(); input.close(); } catch (IOException e) { e.printStackTrace(); } System.out.println("上传成功" ); return "success" ; }
1 2 3 4 5 <form action ="handler/testUpload" method ="post" enctype ="multipart/form-data" > <input type ="file" name ="file" /> <br /> <input name ="desc" type ="text" /> <br /> <input type ="submit" value ="上传" /> <br /> </form >
2.2 配置视图解析器 在springmvc.xml中增加bean来实例并自动配置jsp文件的前缀和后缀
框架会使用视图解析器的前缀 + 逻辑名称(文件名) + 后缀 组成完成路径
1 2 3 4 5 6 <bean class ="org.springframework.web.servlet.view.InternalResourceViewResolver" > <property name ="prefix" value ="/WEB-INF/view/" > </property > <property name ="Suffix" value =".jsp" > </property > </bean >
1
2
3
4
5
6
7
8
9
10
11
@RequestMapping(value = "/some.do") public ModelAndView doSome () { ModelAndView mv = new ModelAndView (); mv.addObject("msg" , "欢迎使用springmvc做web开发" ); mv.addObject("fun" , "执行的是doSome方法" ); mv.setViewName("show" ); return mv; }
控制器不变,跟之前的写法一样
1
2
3
4
5
6
7
8
9
10
11
12
13
14
15
16
17
18
19
20
21
22
23
@RequestMapping(value = {"/some.do", "first.do"}) public ModelAndView doSome () { ModelAndView mv = new ModelAndView (); mv.addObject("msg" , "欢迎使用springmvc做web开发" ); mv.addObject("fun" , "执行的是doSome方法" ); mv.setViewName("show" ); return mv; } @RequestMapping(value = {"/other.do", "second.do"}) public ModelAndView doOther () { ModelAndView mv = new ModelAndView (); mv.addObject("msg" , "欢迎使用springmvc做web开发" ); mv.addObject("fun" , "执行的是doOther方法" ); mv.setViewName("other" ); return mv; }
类也可以注解公共路径
1
2
3
@Controller @RequestMapping("/test") public class MyController {
InternalResourceView、InternalResourceViewResolver
1 2 3 public class JstlView exteds InternalResourceView {}
JstlViw 可以解析jstl 从而实现国际化操作
2.3 国际化 国际化:针对不同地区、不同国家,进行不同的显示
中国:(大陆、香港) 欢迎
美国:welcome
具体实现国际化的步骤:
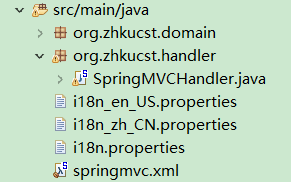
基名_语言_地区.properties
基名_语言.properties
1 2 3 <bean id ="messageSource" class ="org.springframework.context.support.ResourceBundleMessageSource" > <property name ="basename" value ="i18n" > </property > </bean >
需要两个依赖包:jstl.jar和 standar.jar
1 <%@ taglib uri="http://java.sun.com/jsp/jstl/fmt" prefix="fmt" %>
index.jsp
1 <a href="handler/testI18n" >test i18n</a>
success.jsp
1
2
<fmt:message key="resource.welcome" ></fmt:message> <fmt:message key="resource.exist" ></fmt:message>
处理器:
1
2
3
4
@RequestMapping(value = "testI18n") public String testModelAttribute () { return "success" ; }
不能直接访问success来国际化,必须通过服务器响应才能实现
i18n_en_US.propeities
1
2
resource.welcome=WELCOME resource.exist=EXIST
i18n_zh_CN.properties
1
2
resource.welcome=\u4F60\u597D resource.exist=\u9000\u51FA
i18n.properties
一般上面的找不到会自动找父类
2.4 处理器接收参数
1
2
3
4
5
6
7
8
9
10
11
12
13
14
@RequestMapping(value = "receiveobject.do") public ModelAndView receiveParam (Student myStudent) { ModelAndView mv = new ModelAndView (); mv.addObject("myname" , myStudent.getName()); mv.addObject("myage" , myStudent.getAge()); mv.addObject("mystudent" , myStudent); System.out.println(myStudent); mv.setViewName("show" ); return mv; }
请求中所携带的请求参数
get方式–通过url拼接,比如localhost:8080/MyProject?name=zs
或者通过form标签输入input然后传回
注意:
请求参数必须要与处理器中的形参一致
1
2
3
4
5
<form action="receiveparam.do" > 姓名:<input type="text" name="name" > <br/> 年龄:<input type="text" name="age" > <br/> <input type="submit" value="other的post请求" > </form>
1
2
3
@RequestMapping(value = "receiveparam.do") public ModelAndView doSome (String name, int age) {}
额外:
get方法的编码默认是utf-8,如用get出现中文乱码,则使用的tomcat可能是tomcat7,使用8即以上,默认是utf-8,也可以到apache-tomcat-8.5.63\conf中的server.xml的
1 2 <Connector URIEncoding ="UTF-8" connectionTimeout ="20000" port ="8888" protocol ="HTTP/1.1" redirectPort ="8443" /> 增加属性:URIEncoding="UTF-8"
2.5 静态处理 2.5.1 第一种静态处理 交由 tomcat 本身的默认处理
在路径下:apache-tomcat-9.0.43\conf
1.访问静态资源
2.访问没有被请求映射的servlet
满足以上任意一点的,访问会默认交由default的servlet处理
1 2 3 4 5 6 7 8 9 10 11 12 13 <servlet > <servlet-name > default</servlet-name > <servlet-class > org.apache.catalina.servlets.DefaultServlet</servlet-class > <init-param > <param-name > debug</param-name > <param-value > 0</param-value > </init-param > <init-param > <param-name > listings</param-name > <param-value > false</param-value > </init-param > <load-on-startup > 1</load-on-startup > </servlet >
接着在web.xml使用servlet-name来指定默认的处理器和对要默认处理的路径
1 2 3 4 <servlet-mapping > <servlet-name > default</servlet-name > <url-pattern > /</url-pattern > </servlet-mapping >
2.5.2 第二种静态处理 如果将所有页面交由中央调度器处理,即,web.xml中加入
1 2 3 4 5 6 7 8 9 10 11 12 13 14 15 16 17 18 19 20 <servlet > <servlet-name > springmvc</servlet-name > <servlet-class > org.springframework.web.servlet.DispatcherServlet</servlet-class > <init-param > <param-name > contextConfigLocation</param-name > <param-value > classpath:springmvc.xml</param-value > </init-param > <load-on-startup > 1</load-on-startup > </servlet > <servlet-mapping > <servlet-name > springmvc</servlet-name > <url-pattern > /</url-pattern > </servlet-mapping >
会由于中央调度器没有对静态页面的默认处理器
springMvc可以处理没有被请求映射的处理器
导致页面转发异常,出现404,资源访问不了或不存在
需要在springmvc.xml(dispatcherServlet.xml)中添加以下配置
1 <mvc:default-servlet-handler />
等同于在web.xml中配置:
1 2 3 4 5 6 7 8 9 10 11 12 13 14 <servlet-mapping > <servlet-name > default</servlet-name > <url-pattern > *.jpg</url-pattern > </servlet-mapping > <servlet-mapping > <servlet-name > default</servlet-name > <url-pattern > *.js</url-pattern > </servlet-mapping > <servlet-mapping > <servlet-name > default</servlet-name > <url-pattern > *.html</url-pattern > </servlet-mapping >
注意:
对于web.xml、spring.xml配置文件的修改,需要对服务器进行热部署,即redeloy或者restart
这种方式会导致只能处理静态资源,而中央调度器本身是没有处理静态资源的能力,上面其实是转发给了tomcat处理的,所以第三种处理静态资源出现了
2.5.3 第三种静态处理 1 <mvc:default-servlet-handler />
1 <mvc:annotation-driven />
就只能处理静态资源,其他动态资源无法访问了,为了协调两者需要加入以上两个注解
上面第二种是转发给tomcat处理的,处理的还是tomcat,下面第二种处理静态资源是
spring专门用于处理静态资源访问请求的处理器ResourceHttpRequestHandler
好处是不用再交给tomcat处理了,完全交给spring
需要spring3.0以上
改写成
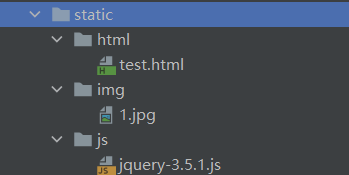
1 2 3 4 5 6 7 8 <mvc:resources mapping ="/img/**" location ="/img/" /> <mvc:resources mapping ="/js/**" location ="/js/" /> <mvc:resources mapping ="/html/**" location ="/html/" />
再改进:
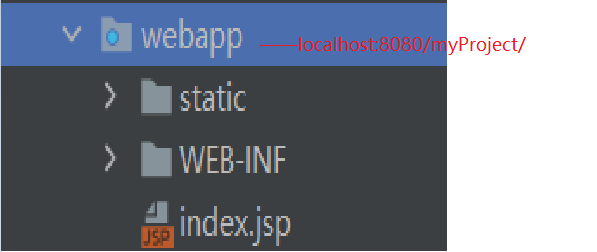
1 <mvc:resources mapping ="/static/**" location ="/static/" />
2.6 类型转换器
public String testDelete(@PathVariable("id") String id) ,即可以接受int 类型数据id也可以接受String 类型数据id
编写 自定义类型转换器的类(实现Converter)
1 2 3 4 5 6 7 8 9 10 11 public class MyConverter implements Converter <String, Object>{ @Override public Object convert (String source) { String[] studentStrArr = source.split("-" ); Student student = new Student (); student.setId(Integer.parseInt(studentStrArr[0 ])); student.setName(studentStrArr[1 ]); return student; } }
控制器:
1 2 3 4 5 6 @RequestMapping(value = "testConverter") public String testConverter (@RequestParam(value = "studentInfo") Student student) { System.out.println(student.getId() + "," + student.getName()); return "success" ; }
其中@RequestParam(value = "studentInfo") 是触发转换器的桥梁
@RequestParam(value = "studentInfo")接收的数据 是前端传过来的:2-zs,但是需要将该数据复制给 修饰的 目的对象Student
因此SpringMVC可以发现接收的数据和 目标数据的不一致,并且这两种数据分别是String,Student,正好符合转化器
1 public Student convert (String source) {
从而触发
配置:将MyConverter加入到springmvc中
1 2 3 4 5 6 7 8 9 10 11 12 13 14 15 <bean id ="myConverter" class ="org.zhkucst.converty.MyConverter" > </bean > <bean id ="conversionService" class ="org.springframework.context.support.ConversionServiceFactoryBean" > <property name ="converters" > <set > <ref bean ="myConverter" /> </set > </property > </bean > <mvc:annotation-driven conversion-service ="conversionService" />
2.7 数据格式化 1 SimpleDateFormat sdf = new SimpleDateFormat ("yyyy-MM hh:mm:ss" );
SpringMVC提供了很多注解,方便我们数据格式化
实现步骤:
1 2 3 4 <mvc:annotation-driven conversion-service ="conversionService" /> <bean id ="conversionService" class ="org.springframework.format.support.FormattingConversionServiceFactoryBean" > </bean >
1 2 3 4 5 6 7 public class Student { @NumberFormat(pattern = "###,#") private int id; private String name; @DateTimeFormat(pattern = "yyyy-MM-dd") private Date birthday;
处理器:
1 2 3 4 5 6 7 8 9 10 11 12 13 @RequestMapping(value = "testDateFormat") public String testDateFormat (Student student, BindingResult result) { System.out.println(student.getId() + "," + student.getName() + "," + student.getBirthday()); if (result.getErrorCount() > 0 ) { for (FieldError error : result.getFieldErrors()) { System.out.println(error.getDefaultMessage()); } } return "success" ; }
BindingResult result传的参数相当于捕获异常,try{}
catch(){},因此不会抛异常了
包中,数据格式化的bean类FormattingConversionServiceFactoryBean包含了转换器的bean类ConversionServiceFactoryBean
1 2 3 <bean id ="conversionService" class ="org.springframework.format.support.FormattingConversionServiceFactoryBean" >
1 2 3 <bean id ="conversionService" class ="org.springframework.context.support.ConversionServiceFactoryBean" > </bean >
2.7.1 错误信息 1 public String testDateTimeFormat(Student student, BindingResult result, Map<String,Object> map)
需要验证的数据是 Student中的birthday, SpringMVC要求 如果校验失败 则将错误信息 自动放入 该对象之后 的参数中,
即Student student, BindingResult result之间 不能有其他参数
如果要将控制台的错误信息传到jsp中显示,则可以将 错误信息对象放入request域中然后在jsp中 从 request取出
2.7.2数据校验 JSR-303 是JAVA EE6 中的一项子规范,叫做Bean Validation,Hibernate Validator 是 Bean Validation 的参考实现,提供了 JSR 303 规范中所有内置 constraint 的实现,除此之外还有一些附加的 constraint。
数据校验
1.JSR303
2.Hibernate Validator
使用Hibernate Validator步骤:
classmate-1.5.1.jar
hibernate-validator-5.4.1.Final.jar
hibernate-validator-annotation-processor-5.4.1.Final.jar
jboss-logging-3.3.0.Final.jar
validation-api-1.1.0.Final.jar
此时mvc:annotation-driven的作用,要实现Hibernate Validator/JSR303校验(或者其他各种校验) 必须实现SpringMVC提供的一个接口:
ValidatorFactory
LocalValidatorFactoryBean是ValidatorFactory的一个实现类
<mvc:annotation-driven></mvc:annotation-driven>会在springmvc容器中 自动加载一个LocalValidatorFactoryBean
所以配置只需要配置
1 <mvc:annotation-driven />
1 2 3 4 5 6 7 8 9 10 11 public class Student { @NumberFormat(pattern = "###,#") private int id; private String name; @Past @DateTimeFormat(pattern = "yyyy-MM-dd") private Date birthday; @Email private String email;
要求:在属性上使用注解后,需要在控制器中的参数Student前使用注解@Valid,标明上是要有合法性的参数
1 2 @RequestMapping(value = "testDateFormat") public String testDateFormat (@Valid Student student, BindingResult result) {
2.8 路径 2.8.1 绝对路径和相对路径 jsp请求路径:
1 2 3 4 5 <form action="some.do" method="post" > 姓名:<input type="text" name="name" > <br/> 年龄:<input type="text" name="age" > <br/> <input type="submit" value="other的post请求" > </form>
参考的地址为 http://localhost:8888/ch06-path/
即 http://localhost:8888/ch06-path/ + some.do
隐患:
由于多次请求导致路径发生变化,从而请求不到资源,原因:使用了相对路径
常见例子:
index.jsp访问 user/some.do
http://localhost:8080/project/user/some.do 中返回到index.jsp
http://localhost:8080/project/user/some.do (是因为是由处理器发起了转发,因而地址没有改变)
再次访问some.do就会出现 http://localhost:8080/project/user/user/some.do
解决方法:
使用base标签
1 <base href="http://localhost:8888/${pageContext.request.ContextPath}/" >
则form表单或a标签每次请求的基地址都是以http://localhost:8888/${pageContext.request.ContextPath}/开头 + some.do
更加动态、灵活的方式
1 2 3 4 5 6 7 <% String basePath = request.getScheme() + "://" + request.getServerName() + ":" + request.getServerPort() + request.getContextPath() + "/" ; %> <base href="<%=basePath%>" >
参考的地址为 http://localhost:8888/
即 http://localhost:8888/ + some.do
处理方法:
1 2 3 4 5 <form action="/ch06-path/some.do" method="post" > 姓名:<input type="text" name="name" > <br/> 年龄:<input type="text" name="age" > <br/> <input type="submit" value="other的post请求" > </form>
不够灵活:
解决方法:
加上${pageContext.request.ContextPath}
${pageContext.request.ContextPath}表示项目根
即http://localhost:8888/ + ch06_path
即
1 2 3 4 5 <form action="${pageContext.request.ContextPath}/some.do" method="post" > 姓名:<input type="text" name="name" > <br/> 年龄:<input type="text" name="age" > <br/> <input type="submit" value="other的post请求" > </form>
扩展:
ant风格的请求路径:
?:单字符
* :任意字符(0或多个)
**:任意目录
2.8.2 路径访问问题 web项目中,WEB-INF是受保护的,通过url路径访问会出现404,不允许访问
WEB-INF目录中的文件只能通过转发来实现
2.9 RequestMapping 2.9.1 @RequestParam注解 如果表单的传值和控制器中的形参变量不一致,则需要通过在变量名前加上注RequestParam
表单提交:
1 2 3 4 5 <form action="receiveparam.do" method="post" > 姓名:<input type="text" name="rname" > <br/> 年龄:<input type="text" name="rage" > <br/> <input type="submit" value="other的post请求" > </form>
控制器:
添加注解:@RequestParam(value = "rname")
@RequestParam(value = "rage")
表示请求中的参数,例如url:localhost:8080/MyProject?rname=&rage=
value值与表单的传值一致
1 2 3 4 5 6 7 8 9 10 11 @RequestMapping(value = "receiveparam.do") public ModelAndView receiveParam (@RequestParam(value = "rname") String name, @RequestParam(value = "rage") Integer age) { ModelAndView mv = new ModelAndView (); mv.addObject("myname" , name); mv.addObject("myage" , age); mv.setViewName("show" ); return mv; }
注意: 不能直接访问servlet地址,必须先通过表单传参或地址栏传参
出错400
所以,需要在方法前再加另外一个注解表明是否表示请求中必须包含此参数
1 2 @RequestParam(value = "rname", required = false) String name,@RequestParam(value = "rage", required = false) Integer age)
默认require为true,即包含的参数是必须的
localhost:8080/MyProject?rname=&rage=
false则非必须,可以有,也可以没有
2.9.2 @RequestMapping属性
1 2 @RequestMapping(value="welcome",method="RequestMethod.Post", params={"name=zs","age!=23","!height"})
说明:
age可以为空,不传值
height不能传值
设置请求头信息:
1 2 @RequestMapping(value="welcome",method="RequestMethod.Post", headers ={"Accept=text/html,application/xhtml....","...."}
获取请求头信息:
1 2 3 4 @RequestMapping(value = "testRest/{id}", method = RequestMethod.GET) public String welcome4 (@PathVariable("id") Integer id, @RequestHeader("Accept-Language") String al) {}
说明:需要支持或兼容该请求头的浏览器
表单:
1 <a href="" handler/welcome/zs">路径传参</a>
后台接收:
1 2 3 @RequestMapping(value="welcome/{name}",method="RequestMethod.Post", public String welcome(@PathVariable("name") String name) { }
通过mvc获取cookie值(JESSIONID)
@CookieValue
(前置知识:服务端在接受客户端第一次请求时,会给客户端分配一个session(该session包含一个sessionId))
小结:
SpringMVC处理各种参数的流程、逻辑:
请求:前端发请求a->@RequestMapping("a");
处理请求中的参数:
@RequestMapping("a")
public String aa("@Xxx注解(xyz)" xyz)
2.9.3 指定请求方式Method属性 在方法名上标明注解
1 2 3 @RequestMapping(value = {"/some.do", "/first.do"}, method = RequestMethod.GET) public ModelAndView doSome () {
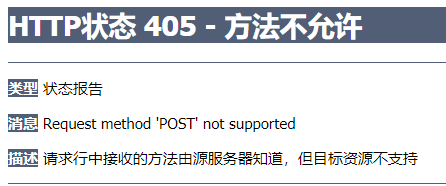
form标签指定get方法,控制器不能指定post方法
否则会出现405错误
1 2 3 <form action="test/some.do" method="post" > <input type="submit" value="other的post请求" > </form>
2.10 处理模型数据
数据模型 :ModelAndView、Model、ModelMap、Map
1 2 3 4 5 6 7 8 9 10 11 12 13 14 15 16 17 18 19 20 21 22 23 24 25 26 27 28 29 30 31 32 33 34 35 36 37 38 39 40 41 42 43 44 45 46 47 48 49 50 51 @RequestMapping(value = "testMap") public String testMap (Map<String,Object> map) { Student student = new Student (); student.setId(3 ); student.setName("zs" ); map.put("student" , student); return "success" ; } @RequestMapping(value = "testModelMap") public String testModelMap (ModelMap modelMap) { Student student = new Student (); student.setId(3 ); student.setName("zs" ); modelMap.put("student" , student); return "success" ; } @RequestMapping(value = "testModel") public String testModel (Model model) { Student student = new Student (); student.setId(3 ); student.setName("zs" ); model.addAttribute("student" , student); return "success" ; } @RequestMapping(value = "testModelAndView") public ModelAndView testModelAndView () { ModelAndView modelAndView = new ModelAndView (); Student student = new Student (); student.setId(3 ); student.setName("zs" ); modelAndView.addObject("student" , student); modelAndView.setViewName("success" ); return modelAndView; }
类名上添加
@SessionAttributes("student4") : 静态写法
参数名与requesst域的key值相同,表示指定哪一个k-v对
@SessionAttributes(types = Student.class) : 动态代理写法
具体是以调用哪个方法中的student来动态同步到session
有该注解的方法在会在每次请求前先执行
并且该方法的参数map.put()可以将对象 放入即将查询的参数中
必须满足的约定:
map.put(k,v)其中的k必须是即将查询方法参数的 首字母小写testModelAtribute(Student xxx) , 即student;
如果不一致,需要通过@ModelAttribute声明。
map.put("stu",student)
testModelAtribute( @ModelAttribute("stu") Student student )
示例:
1 2 3 4 <form action="handler/testModelAttribute" > name:<input type="text" name="name" ><br/> <input type="submit" value="testModelAttribute" > </form>
1 2 3 4 5 6 7 8 9 10 11 12 13 14 15 16 17 18 19 20 21 22 23 24 25 26 27 28 29 30 31 32 33 34 35 36 37 38 39 40 @ModelAttribute public void queryStudents (Map<String, Object> map) { Student student = new Student (); student.setId(5 ); student.setName("ww" ); System.out.println(student.getId()+"," + student.getName()); map.put("student" , student); } @RequestMapping(value = "testModelAttribute") public String testModelAttribute (Student student) { System.out.println(student.getId()+"," + student.getName()); return "success" ; }
2.11 返回值 2.11.1 返回 ModelAndView、String
前面已经演示过:返回数据 + 视图
可分为逻辑视图和完整视图
(1)逻辑视图需要配置视图解析器
1 2 3 4 5 6 7 @RequestMapping(value = "returnString-view.do") public String doReturnView (HttpServletRequest request, String name, int age) { request.setAttribute("myname" , name); request.setAttribute("myage" , age); return "show" ; }
(2)完整视图不能配置视图解析器,根目录是WebContent或者webapp
1 2 3 4 5 6 7 8 @RequestMapping(value = "returnString-view2.do") public String doReturnView2 (HttpServletRequest request, String name, int age) { request.setAttribute("myname" , name); request.setAttribute("myage" , age); return "/WEB-INF/view/show.jsp" ; }
2.11.2 返回 void、Object
需要使用ajax,导入jquery-3.5.1.js 以及 pom中加入依赖包(jackson-databind 和jackson-core)
1 2 3 4 5 6 7 8 9 10 11 <dependency > <groupId > com.fasterxml.jackson.core</groupId > <artifactId > jackson-databind</artifactId > <version > 2.9.0</version > </dependency > <dependency > <groupId > com.fasterxml.jackson.core</groupId > <artifactId > jackson-core</artifactId > <version > 2.9.0</version > </dependency >
前端:
1 2 3 4 5 6 7 8 9 10 11 12 13 14 15 16 17 18 19 <script type="text/javascript" src="js/jquery-3.5.1.js" ></script> <script type ="text/javascript" > function button_data ( $.ajax ({ url :"returnVoidAjax.do" , data :{ name :"张三" , age :"21" }, type :"post" , dataType :"json" , success :function (msg ){ alert (msg.name + "," + msg.age ); } }); }; </script >
但处理器中response没有设置响应头,则数据无法传到前端
1 <button id="btn" onclick="button_data()" >发起ajax请求</button>
控制器:
1 2 3 4 5 6 7 8 9 10 11 12 13 14 15 16 17 18 @RequestMapping(value = "returnVoidAjax.do") public void returnVoidAjax (HttpServletResponse response, String name, Integer age) throws IOException { Student student = new Student (); student.setName(name); student.setAge(age); String json = "" ; ObjectMapper om = new ObjectMapper (); json = om.writeValueAsString(student); response.setContentType("application/json;charset=utf-8" ); PrintWriter pw = response.getWriter(); pw.print(json); pw.close(); }
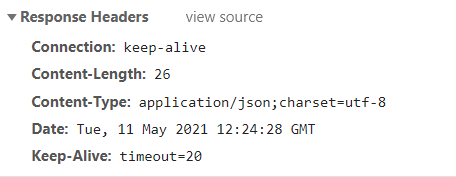
响应头:增加
1 2 response.setContentType("application/json;charset=utf-8" );
后显示:
json格式字符串转成json对象
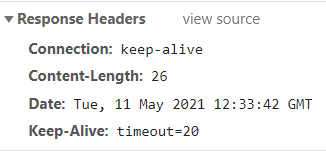
没有增加显示:
导致的乱码:
虽然前端显示出的数据正常,但F12控制台中response的json格式的字符串和preview的json对象
response从服务器返回的是json格式的字符串{name:”张三”, age: 21}
因为jquery可以把json格式字符串转换成json对象,并赋值给success中的形参msg
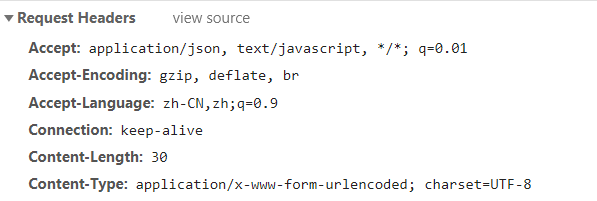
但是request的请求头是默认有的:
例如String, Integer, Map, List, Student等等都是对象
对象有属性, 属性就是数据,所以返回Object表示数据,和视图无关
可以使用对象表示的数据,响应ajax请求。
1 2 <mvc:annotation-driven > </mvc:annotation-driven >
1 2 3 4 5 6 7 8 9 @RequestMapping(value = "returnObjectAjax.do") @ResponseBody public Student returnStudentAjax (String name, Integer age) { Student student = new Student (); student.setName(name); student.setAge(age); return student; }
1 2 3 4 5 6 7 8 9 10 11 12 13 14 function button_data ( $.ajax ({ url :"returnObjectAjax.do" , data :{ name :"张三同学" , age :"21" }, type :"post" , dataType :"json" , success :function (resp ){ alert (msg.name + "," + msg.age ); } }); };
2.11.3 返回 List<Object> 与Object类似
控制器:
1 2 3 4 5 6 7 8 9 10 11 12 13 14 15 16 17 18 19 20 21 22 @RequestMapping(value = "returnObjectArrayAjax.do") @ResponseBody public List<Student> returnStudentArrayAjax (String name, Integer age) { List<Student> list = new ArrayList <>(); Student student = new Student (); student.setName("张三" ); student.setAge(21 ); list.add(student); student = new Student (); student.setName("李四" ); student.setAge(24 ); list.add(student); return list; }
前端:
1 2 3 4 5 6 7 8 9 10 11 12 13 14 15 16 17 18 function button_data ( $.ajax ({ url :"returnObjectArrayAjax.do" , data :{ name :"张三同学" , age :"21" }, type :"post" , dataType :"json" , success :function (resp ){ $.each (resp,function (i, n ){ alert (n.name + " , " + n.age + "/" ) }) } }); };
2.11.4 返回 String 文本数据 1 2 3 public String returnString (HttpServletResponse response) { return "返回String类型" ; }
1 2 3 4 5 6 7 8 9 10 11 12 13 14 15 16 17 18 19 20 $.ajax ({ url :"returnString.do" , data :{ name :"张三同学" , age :"21" }, type :"post" , dataType :"text" , success :function (resp ){ alert (resp); } });
2.11.5 json 数据手动处理 需要jackson-core的两个包
1 2 3 4 5 6 7 8 9 10 11 <dependency > <groupId > com.fasterxml.jackson.core</groupId > <artifactId > jackson-databind</artifactId > <version > 2.9.0</version > </dependency > <dependency > <groupId > com.fasterxml.jackson.core</groupId > <artifactId > jackson-core</artifactId > <version > 2.9.0</version > </dependency >
1 2 3 4 5 6 7 8 9 10 11 12 13 14 15 16 @RequestMapping(value = "returnVoidAjax.do") public void returnVoidAjax (HttpServletResponse response, String name, Integer age) throws IOException { Student student = new Student (); student.setName(name); student.setAge(age); String json = "" ; ObjectMapper om = new ObjectMapper (); json = om.writeValueAsString(student); response.setContentType("application/json;charset=utf-8" ); PrintWriter pw = response.getWriter(); pw.print(json); pw.close(); }
2.11.6 @ResponseBody的 json 数据处理原理
加入处理json的工具库的依赖
springmvc默认使用的jackson
在springmvc配置文件之间加入<mvc:annotation-driven> 注解驱动
1 json = om.writeValueAsString(student);
在处理器的方法的上面加入@ResponseBody注解
1 2 3 response.setContexType("application/json;charset=utf-8" ); PrintWriter pw = response.getWriter();pw.println(json);
springmvc处理器方法的返回Object,可以转为json输出到浏览器,响应ajax的内部原理
1.<mvc:annotation-driven>注解驱动
注解驱动实现的功能是完成java对象到json、xml、text、二进制等数据格式的转换的7个实现类对象,包括MappingJackson2HttpMessageConvertor(使用jackson工具库中的ObjectMapper实现java对象转为json对象 )
HttpMessageConveter接口:消息转换器
功能:定义了java转为json,xml等数据格式的方法。这个接口有很多实现类。
这些实现类完成java对象到json、java对象到xml、java对象到二进制数据的转换
下面有两个方法是控制器类把结果输出给浏览器时使用的:
1 2 boolean canWrite (Class<?> var1, @Nullable MediaType var2) ;void write (T var1, @Nullable MediaType var2, HttpOutputMessage var3)
1 2 3 4 5 6 7 8 9 @RequestMapping(value = "returnObject.do") public Student returnVoidAjax (HttpServletResponse response, String name, Integer age) throws IOException { Student student = new Student (); student.setName(name); student.setAge(age); return student; }
1 2 3 4 5 1 )canWrite: 作用检查处理器方法的返回值,能不能转为var2表示的数据格式。检查student(name, age)能不能转为var2表示的数据格式,如果检查能转成json,返回true MediaType:表示数据格式的,例如json、xml等等 StringHttpMessageConverter MappingJackson2HttpMessageConverter
1 2 2 )write: 把处理器方法的返回值对象,调用jackson中的ObjectMapper转为json字符串json = om.writeValueAsString(student);
未加入注解驱动时的状态:
1 2 <mvc:annotation-driven > </mvc:annotation-driven >
自动实例化MessageConverter4个实现类
1 2 org.springframework.http.converter.ByteArrayHttpMessageConverter, org.springframework.http.converter.StringHttpMessageConverter, org.springframework.http.converter.xml.SourceHttpMessageConverter, org.springframework.http.converter.support.AllEncompassingFormHttpMessageConverter
加入注解驱动时的状态:
自动实例化MessageConverter7个实现类
1 2 3 org.springframework.http.converter.ByteArrayHttpMessageConverter, org.springframework.http.converter.StringHttpMessageConverter, **org.springframework.http.converter.ResourceHttpMessageConverter,** **org.springframework.http.converter.ResourceRegionHttpMessageConverter,** org.springframework.http.converter.xml.SourceHttpMessageConverter, org.springframework.http.converter.support.AllEncompassingFormHttpMessageConverter, **org.springframework.http.converter.json.MappingJackson2HttpMessageConverter**
2.11.7 乱码问题 通过请求过来mapping设置响应头
1 @RequestMapping(value = "returnString.do", produces = "text/plain;charset=utf-8")
设置前(默认)
设置后:
2.12 RESTFul 风格 REST风格:软件编程风格
Springmvc:
GET : 查
POST: 增
DELETE : 删
PUT : 改
普通浏览器 只支持get / post 方式请求, 其他请求方式 如 delete / put 需借助过滤器
过滤器的约定:
如果value为delete 则将请求改为delete,如果为put,改为put
ant风格的请求路径:
?:单字符
*: 任意字符(0或多个)
**: 任意目录
2.12.1 Get 1 2 3 <form action="handler/testRest/1234" method="get" > <input type="submit" value="get" > </form>
1 2 3 4 5 6 @RequestMapping(value = "testRest/{id}", method = RequestMethod.GET) public String welcome4 (@PathVariable("id") Integer id) { System.out.println("get: 改" + id); return "success" ; }
2.12.2 Post 1 2 3 4 <form action="handler/testPost/1234" > <input type="hidden" name="_method" value="POST" > <input type="submit" value="post" > </form>
1 2 3 4 5 6 @RequestMapping(value = "testRest/{id}", method = RequestMethod.POST) public String welcome1 (@PathVariable("id") Integer id) { System.out.println("post: 增" + id); return "success" ; }
2.12.3 Delete 1 2 3 4 <form action="handler/testDelete/1234" > <input type="hidden" name="_method" value="DELETE" > <input type="submit" value="post" > </form>
1 2 3 4 5 6 @RequestMapping(value = "testRest/{id}", method = RequestMethod.DELETE) public String welcome2 (@PathVariable("id") Integer id) { System.out.println("delete: 删" + id); return "success" ; }
2.12.4 Put 1 2 3 4 <form action="handler/testPut/1234" > <input type="hidden" name="_method" value="PUT" > <input type="submit" value="post" > </form>
1 2 3 4 5 6 @RequestMapping(value = "testRest/{id}", method = RequestMethod.PUT) public String welcome3 (@PathVariable("id") Integer id) { System.out.println("put: 改" + id); return "success" ; }
2.12.5 声明隐藏域过滤器 1 2 3 4 5 6 7 8 <filter > <filter-name > hiddenHttpMethodFilter</filter-name > <filter-class > org.springframework.web.filter.HiddenHttpMethodFilter</filter-class > </filter > <filter-mapping > <filter-name > hiddenHttpMethodFilter</filter-name > <url-pattern > /*</url-pattern > </filter-mapping >
版本:
1.tomcat7版本及以下,tomcat默认不支持RESTful风格的DELETE和PUT, 配置过滤器后tomcat就可以访问了
2.tomcat8版本即以上,配置过滤器后,执行表单后会跳转到405页面,说明高版本的tomcat是不支持RESTful风格
方法:在跳转成功的jsp页面,添加错误页面参数isErrorPage=“true”
不配置过滤器默认是支持RESTful风格,也就是不用自己配置过滤器
3. SSM 整合开发 3.1 Spring 容器和SpringMVC 容器 依赖包:
1 2 3 4 5 6 7 8 9 10 11 12 13 14 15 16 17 18 19 20 21 22 23 24 25 26 27 28 29 30 31 32 33 34 35 36 37 38 39 40 41 42 43 44 45 46 47 48 49 50 51 52 53 54 55 56 57 58 59 60 61 62 63 64 65 66 67 68 69 70 71 72 73 74 75 76 77 78 79 80 81 <dependency > <groupId > javax.servlet</groupId > <artifactId > javax.servlet-api</artifactId > <version > 3.1.0</version > <scope > provided</scope > </dependency > <dependency > <groupId > javax.servlet.jsp</groupId > <artifactId > jsp-api</artifactId > <version > 2.2.1-b03</version > <scope > provided</scope > </dependency > <dependency > <groupId > org.springframework</groupId > <artifactId > spring-webmvc</artifactId > <version > 5.2.5.RELEASE</version > </dependency > <dependency > <groupId > org.springframework</groupId > <artifactId > spring-tx</artifactId > <version > 5.2.5.RELEASE</version > </dependency > <dependency > <groupId > org.springframework</groupId > <artifactId > spring-jdbc</artifactId > <version > 5.2.5.RELEASE</version > </dependency > <dependency > <groupId > com.fasterxml.jackson.core</groupId > <artifactId > jackson-core</artifactId > <version > 2.9.0</version > </dependency > <dependency > <groupId > com.fasterxml.jackson.core</groupId > <artifactId > jackson-databind</artifactId > <version > 2.9.0</version > </dependency > <dependency > <groupId > org.mybatis</groupId > <artifactId > mybatis-spring</artifactId > <version > 1.3.1</version > </dependency > <dependency > <groupId > org.mybatis</groupId > <artifactId > mybatis</artifactId > <version > 3.5.1</version > </dependency > <dependency > <groupId > mysql</groupId > <artifactId > mysql-connector-java</artifactId > <version > 5.1.9</version > </dependency > <dependency > <groupId > com.alibaba</groupId > <artifactId > druid</artifactId > <version > 1.1.12</version > </dependency >
另加:用于注解@Resource
1 2 3 4 5 <dependency > <groupId > javax.annotation</groupId > <artifactId > jsr250-api</artifactId > <version > 1.0</version > </dependency >
1 2 3 4 5 6 7 8 9 10 11 12 <build > <resources > <resource > <directory > src/main/java</directory > <includes > <include > **/*.xml</include > </includes > <filtering > false</filtering > </resource > </resources > </build >
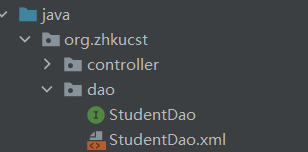
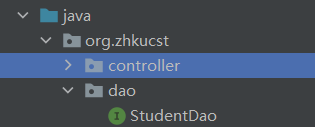
如果xml文件写在与dao同包名下的java资源中,则需要以上build指定xml到打包到target,否则--Request processing failed; nested exception is org.apache.ibatis.binding.BindingException:mybatis和mapper绑定失败
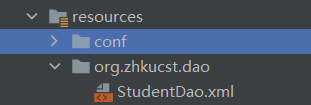
如果xml文件写在resources中,则只需新建同包名的xml即可
3.2 整合内置 tomcat 为什么要整合内置tomcat?
内置tomcat可以在别人部署项目时不用纠结到使用tomcat版本的问题
即可以在没有tomcat环境下使用
步骤:
1 2 3 4 5 6 7 8 9 10 11 12 13 14 15 <build > <plugins > <plugin > <groupId > org.apache.tomcat.maven</groupId > <artifactId > tomcat7-maven-plugin</artifactId > <configuration > <port > 8080</port > <server > tomcat7</server > <path > /</path > <useBodyEncodingForURI > true</useBodyEncodingForURI > <uriEncoding > UTF-8</uriEncoding > </configuration > </plugin > </plugins > </build >
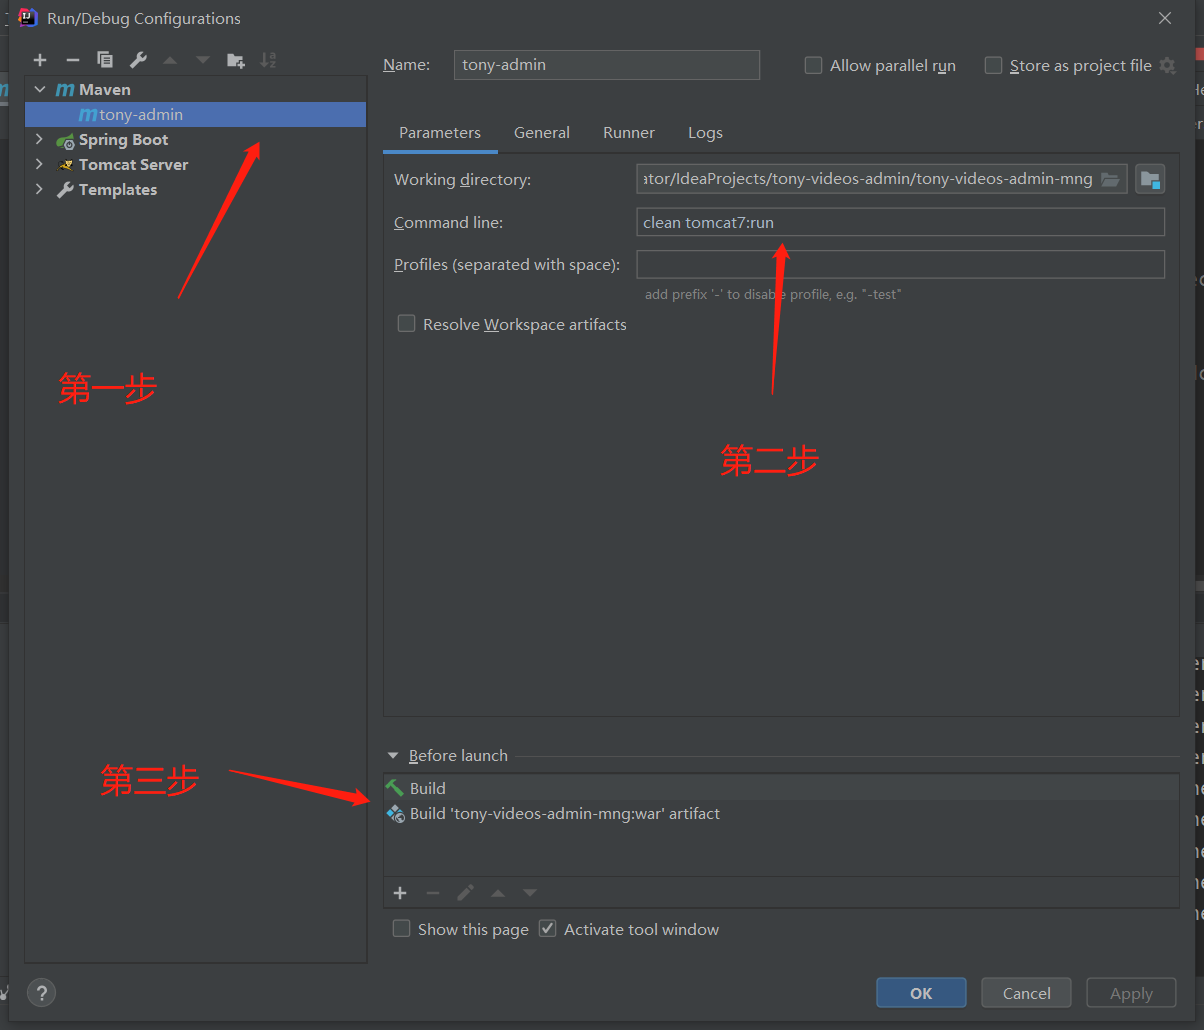
最后直接运行即可
3.3 xml 配置 1.dispatcherServlet.xml : 中央调度器
(1)声明注解@controller所在包的扫描器;
(2)内部资源视图解析器;
(3)声明mvc注解驱动;
2.applicationContext.xml : springIOC容器
(1)声明db.properties所在位置;
(2)声明数据源;
(3)声明SqlSessionFactoryBean,创建SqlSessionFactory;
(4)声明mapper所在包扫描器,自动创建dao对象;
(5)声明注解@Service所在包的扫描器
3.mybatiis.xml : mybatis容器
(1)声明别名
(2)挂载所有mapper配置文件,配置文件的路径默认在resources下(pom没有声明java中对xml文件的打包)
4.mapper.xml : mapper容器
(1)配置namespace,用于绑定Dao接口的,即面向接口编程
(2)增删查改标签
3.4 Ajax 请求 1 2 3 4 5 6 7 8 9 10 11 12 13 14 15 16 17 18 19 20 21 22 23 24 25 26 27 28 29 30 31 32 33 34 35 36 <script type="text/javascript" src="js/jquery-3.5.1.js" ></script> <script type ="text/javascript" > $(function ( loadStudentData (); $("#btnLoader" ).click (function ( loadStudentData (); }) }) function loadStudentData ( $.ajax ({ url :"student/queryStudents.do" , type :"post" , dataType :"json" , success :function (data ){ $("#info" ).html ("" ); $.each (data, function (i,n ){ $("#info" ).append ("<tr>" ) .append ("<td>" + n.id + "</td>" ) .append ("<td>" + n.name + "</td>" ) .append ("<td>" + n.age + "</td>" ) .append ("</tr>" ) }); } }); } </script >
3.5 三层整合 3.5.1 Controller 1 2 3 4 5 6 7 8 9 10 11 12 13 14 15 16 17 18 19 20 21 22 23 24 25 26 27 28 29 30 31 32 33 34 35 36 37 @Controller @RequestMapping(value = "/student") public class StudentController { @Resource private IStudentService studentService; @RequestMapping(value = "/addStudent.do") public ModelAndView addStudent (Student student) { ModelAndView mv = new ModelAndView (); String tips = "注册失败" ; int nums = studentService.addStudent(student); if (nums > 0 ){ tips = "学生【" + student.getName() + "】注册成功" ; } mv.addObject("tips" , tips); mv.setViewName("result" ); return mv; } @RequestMapping(value = "/queryStudents.do") @ResponseBody public List<Student> queryStudents () { List<Student> students = studentService.findStudents(); System.out.println(students); return students; } }
3.5.2 Service 1 2 3 4 5 6 7 8 9 10 11 12 13 14 15 16 17 18 19 20 21 22 23 24 25 26 27 28 29 30 31 32 33 34 35 36 37 @Controller @RequestMapping(value = "/student") public class StudentController { @Resource private IStudentService studentService; @RequestMapping(value = "/addStudent.do") public ModelAndView addStudent (Student student) { ModelAndView mv = new ModelAndView (); String tips = "注册失败" ; int nums = studentService.addStudent(student); if (nums > 0 ){ tips = "学生【" + student.getName() + "】注册成功" ; } mv.addObject("tips" , tips); mv.setViewName("result" ); return mv; } @RequestMapping(value = "/queryStudents.do") @ResponseBody public List<Student> queryStudents () { List<Student> students = studentService.findStudents(); System.out.println(students); return students; } }
3.5.3 Dao 1 2 3 4 5 6 7 public interface StudentDao { int insertStudent (Student student) ; List<Student> selectStudents () ; }
3.5.4 xml 1 2 3 4 5 6 7 8 9 10 11 12 13 14 15 16 17 18 19 20 21 22 <?xml version="1.0" encoding="UTF-8" ?> <!DOCTYPE mapper PUBLIC "-//mybatis.org//DTD Mapper 3.0//EN" "http://mybatis.org/dtd/mybatis-3-mapper.dtd" > <mapper namespace ="org.zhkucst.dao.StudentDao" > <select id ="selectStudents" resultType ="student" > select id, name, age from student </select > <insert id ="insertStudent" parameterType ="student" > insert into student(name,age) values(#{name},#{age}) </insert > </mapper >
3.5.5前端 index.jsp
1 2 3 4 5 6 7 8 9 10 11 12 13 14 15 16 17 18 19 20 21 22 23 24 25 26 27 28 29 30 31 32 <%@ page contentType="text/html;charset=UTF-8" language="java" %> <% String basePath = request.getScheme() + "://" + request.getServerName() + ":" + request.getServerPort() + request.getContextPath() + "/" ; %> <html> <head> <base href="<%=basePath%>/" > <title>功能入口</title> </head> <body> <div align="center" > <p>SSM整合</p> <img src="imges/ssm.jpg" /> <table> <tr> <td><a href="addStudent.jsp" >注册学生</a></td> </tr> <tr> <td><a href="listStudent.jsp" >浏览学生</a></td> </tr> </table> </div> </body> </html>
addStudent.jsp
1 2 3 4 5 6 7 8 9 10 11 12 13 14 15 16 17 18 19 20 21 22 23 24 25 26 27 28 29 30 31 32 33 <%@ page contentType="text/html;charset=UTF-8" language="java" %> <% String basePath = request.getScheme() + "://" + request.getServerName() + ":" + request.getServerPort() + request.getContextPath() + "/" ; %> <html> <head> <base href="<%=basePath%>/" > <title>Title</title> </head> <body> <div align="center" > <form action="student/addStudent.do" method="post" > <table> <tr> <td>姓名</td> <td><input type="text" name="name" ></td> </tr> <tr> <td>年龄</td> <td><input type="text" name="age" ></td> </tr> <tr> <td> </td> <td><input type="submit" value="注册" ></td> </tr> </table> </form> </div> </body> </html>
listStudent.jsp
1 2 3 4 5 6 7 8 9 10 11 12 13 14 15 16 17 18 19 20 21 22 23 24 25 26 27 28 29 30 31 32 33 34 35 36 37 38 39 40 41 42 43 44 45 46 47 48 49 50 51 52 53 54 55 56 57 58 59 60 61 62 63 64 65 66 67 68 <%@ page contentType="text/html;charset=UTF-8" language="java" %> <% String basePath = request.getScheme() + "://" + request.getServerName() + ":" + request.getServerPort() + request.getContextPath() + "/" ; %> <html> <head> <base href="<%=basePath%>/" > <script type="text/javascript" src="js/jquery-3.5.1.js" ></script> <script type="text/javascript" > $(function(){ loadStudentData(); $("#btnLoader" ).click(function (){ loadStudentData(); }) }) function loadStudentData () { $.ajax({ url:"student/queryStudents.do" , type:"post" , dataType:"json" , success:function (data){ $("#info" ).html("" ); $.each(data, function(i,n){ $("#info" ).append("<tr>" ) .append("<td>" + n.id + "</td>" ) .append("<td>" + n.name + "</td>" ) .append("<td>" + n.age + "</td>" ) .append("</tr>" ) }); } }); } </script> <title>Title</title> </head> <body> <div align="center" > <table style="border:1px solid" > <thead style="border:1px solid" > <tr> <td>学号</td> <td>姓名</td> <td>年龄</td> </tr> </thead> <tbody id="info" style="border:1px solid" > </tbody> </table> <input id="btnLoader" type="button" value="查询数据" > </div> </body> </html>
result.jsp
1 2 3 4 5 6 7 8 9 10 11 12 13 <%@ page contentType="text/html;charset=UTF-8" language="java" %> <html> <head> <title>Title</title> </head> <body> result.jps 结果页面 注册结果:${tips} </body> </html>
4. 转发和重定向 4.1 转发 转发和重定向是不受视图解析器影响的,就当没有视图解析器
controller
1 2 3 4 5 6 7 8 9 10 11 @RequestMapping(value = "doForward.do") public ModelAndView doForward () { ModelAndView mv = new ModelAndView (); mv.addObject("msg" , "欢迎使用springmvcweb开发" ); mv.addObject("fun" , "执行的是dodoForward方法" ); mv.setViewName("forward:/WEB-INF/view/show.jsp" ); return mv; }
总结:
1.转发可以访问/WEB-INF/目录下的视图以及其他文件
2.转发如果携带了数据(请求是实例化在服务器中,数据保存在该request中)
可以在其他视图中视图EL表达式${requestScope.name}获取属性值为“name”的值
3.也可以通过request.getAttribute("name")获取,两者等价
4.2 重定向 controller
1 2 3 4 5 6 7 8 9 10 11 @RequestMapping(value = "doRedirect.do") public ModelAndView doRedirect (String name, Integer age) { ModelAndView mv = new ModelAndView (); mv.addObject("myname" , name); mv.addObject("myage" , age); mv.setViewName("redirect:/hello.jsp" ); return mv; }
2.视图:
1 2 3 4 5 6 <body> <h3>hello.jsp</h3> <h3>myname数据1 :${param.myname}</h3> <h3>myage数据2 :${param.myage}</h3> <h3>myage数据2 :<%=request.getParameter("myname" )%></h3> </body>
总结:
1.重定向是第二次请求转发,请求的数据会丢失,不会保留在服务器的request中,是拿了一个新的请求
2.重定向如果携带了数据,携带的数据不是保存在服务器中,而是在新的请求的形参中,例如:http://locahost:8080/MyProject?name=zs
3.重定向到新的视图中,可以通过${param.name}获取形参中的变量值,注意,只能获取4个基本类型+String,
其他类型会以地址@***显示
4.也可以通过request.getParameter(“name”)获取属性值为“name”的值
5.注意,通过视图传到控制器,再重定向的,视图中的参数值是获取不到的,两个请求不一样,第一个请求
结束后已经自动销毁
4.3 e额外知识 1 2 3 4 ${param.name } == request.getParameter ("name" ) ${requestScope.name } == request.getAttribute ("name" ) ${sessionScope.name } == session.getAttribute ("name" ) ${applicationScope.name } == application.getAttribute ("name" )
session和applicaton如果要在同一个请求中,可以通过request.getSession()和 request.getSession().getServletContext()获取得到
如果在同一视图,直接appliction.setAttribute()、session.setAttribute()就可以了
5. 集中统一处理异常 5.1 理论 异常处理:
通过注解实现异常统一处理:@ExceptionHandler
springmvc框架采用的是统一、全局的异常处理。
把controller中的所有异常处理都集中到一个地方。采用的是aop的思想,把业务逻辑和异常处理代码分开,解耦合。
使用两个注解
@ExceptionHandler
@ControllerAdvice
1 2 3 4 5 6 7 8 9 10 11 12 异常处理步骤: 1 .新建maven web项目2 .加入依赖3 .新建一个自定义异常类 MyUserException , 再定义它的子类NameException, AgeException4 .在controller抛出NameException , AgeException5 .创建一个普通类,作用全局异常处理类 1 )在类的上面加入@controllerAdvice 2 )在类中定义方法,方法的上面加入@ExceptionHandle 6 .创建springmvc的配置文件 1 )组件扫描器,扫描@Controller 注解 2 )组件扫描器,扫描@ControllerAdvice 所在的包名 3 )声明注解驱动
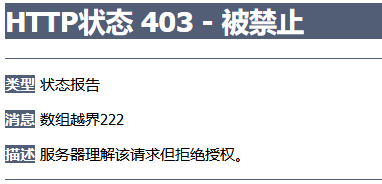
结果图:
原理:
自定义普通类,通过继承Exception使它成为异常类,然后再用注解让springmvc对它管理:
发生异常,有springmvc来抛异常,不交给jvm虚拟机
总结:
如果有方法抛出一个异常,对该异常的处理有两种方法,则优先级:最短优先
如果一个方法用于处理异常,并且只处理当前类中的异常:@ExceptionHandler
如果一个方法用于处理异常,并且处理所有类中的异常,类前加@ControllerAdvice, 处理异常的方法前加@ExceptionHandler
优先级:
使用@ExceptionHandler处理本Controller内部异常优先级最高;
使用@ExceptionHandler+@ControllerAdvice处理外部Controller异常优先级第二;
自定义实现HandlerExceptionResolver接口的类优先级第三;
spring-context.xml中配置SimpleMappingExceptionResolver优先级第四;web.xml配置error-page优先级第五;不做任何处理,会跳转到tomcat默认的异常页面;
自定义异常显示页面:@ResponseStatus
ResponseStatusExceptionResolver:自定义异常显示页面 @ResponseStatus
自定义异常显示页面:@ResponseStatus(value=HttpStatus.FORBIDDEN, reason="数组越界222")
1 2 3 @public class MyArrayIndexOutofBoundsException extends Exception {}
@ResponseStatus也可以标注在方法前:
自定义异常类:
1 2 3 4 @ResponseStatus(value = HttpStatus.FORBIDDEN, reason = "数组越界222") public class MyArrayIndexOutofBoundException extends Exception { }
异常处理的实现类:DefaultHandleExceptionResolver
DefaultHandleExceptionResolver:SpringMVC一些常见异常的基础上(300,500,405),新增一些异常,例如:
1 2 3 4 5 6 7 8 9 10 11 12 13 14 * @since 3.0 * @see org.springframework.web.servlet.mvc.method.annotation.ResponseEntityExceptionHandler * @see * @see * @see * @see * @see * @see * @see * @see * @see * @see * @see * @see
这些实现了框架已经实现了,只要出现该异常就会触发
通过配置实现异常处理:SimpleMappingExceptionResolver
配置:
1 2 3 4 5 6 7 8 9 10 11 <bean class ="org.springframework.web.servlet.handler.SimpleMappingExceptionResolver" > <property name ="exceptionAttribute" value ="ex" > </property > <property name ="exceptionMappings" > <props > <prop key ="java.lang.ArithmeticException" > error</prop > </props > </property > </bean >
控制器:
1 2 3 4 5 @RequestMapping(value = "testSimpleMappingException") public String testSimpleMappingException () { System.out.println(1 /0 ); return "success" ; }
两种方式异常总结:
1.通过继承+注解@ExceptionHandler统一处理异常
2.通过配置实现异常处理,与1无异
3.1和2同时实现,同种异常只由1捕获,即1优先级高于2
5.2 全局异常处理类 全局异常处理类相当于一个控制器,只是之前的控制器是控制用户输入数据处理,
而全局异常处理类是控制用户操作出错处理的控制器
1 2 3 4 5 6 7 8 9 10 11 12 13 14 15 16 17 18 19 20 21 22 23 24 25 26 27 28 29 30 31 32 33 34 35 36 37 38 39 40 41 42 43 44 45 46 47 48 49 50 51 52 53 package org.zhkucst.handle;import org.springframework.web.bind.annotation.ControllerAdvice;import org.springframework.web.bind.annotation.ExceptionHandler;import org.springframework.web.servlet.ModelAndView;import org.zhkucst.exception.AgeException;import org.zhkucst.exception.NameException;@ControllerAdvice public class GlobalExceptionHandler { @ExceptionHandler(value = NameException.class) public ModelAndView doNameException (Exception exception) { ModelAndView mv = new ModelAndView (); mv.addObject("msg" , "姓名必须是zs,其他用户不能访问" ); mv.addObject("ex" ,exception); mv.setViewName("nameError" ); return mv; } @ExceptionHandler(value = AgeException.class) public ModelAndView doAgeException (Exception exception) { ModelAndView mv = new ModelAndView (); mv.addObject("msg" , "你的年龄不能大雨80" ); mv.addObject("ex" ,exception); mv.setViewName("ageError" ); return mv; } @ExceptionHandler public ModelAndView doOtherException (Exception exception) { ModelAndView mv = new ModelAndView (); mv.addObject("msg" , "其他错误!!" ); mv.addObject("ex" ,exception); mv.setViewName("defaultError" ); return mv; } }
5.3 自定义具体处理类 步骤:
写一个自定义父类,继承Exception
再分别写具体的异常类
1.MyUserException
1 2 3 4 5 6 7 8 9 package org.zhkucst.exception;public class MyUserExcepton extends Exception { public MyUserExcepton () { super (); } public MyUserExcepton (String message) { super (message); } }
2.NameException
1 2 3 4 5 6 7 8 9 package org.zhkucst.exception;public class NameException extends MyUserExcepton { public NameException () { super (); } public NameException (String message) { super (message); } }
3.AgeException
1 2 3 4 5 6 7 8 package org.zhkucst.exception;public class AgeException extends MyUserExcepton { public AgeException () { } public AgeException (String message) { super (message); } }
5.4 前端 1.nameError
1 2 3 4 5 <body> <h3>nameError.jsp</h3> <h3>msg数据:${msg}</h3> <h3>message数据:${ex.message}</h3> </body>
2.ageError
1 2 3 4 5 <body> <h3>ageError.jsp</h3> <h3>msg数据:${msg}</h3> <h3>message数据:${ex.message}</h3> </body>
3.defaultError
1 2 3 4 5 6 </head> <body> <h3>defaultError.jsp</h3> <h3>msg数据:${msg}</h3> <h3>message数据:${ex.message}</h3> </body>
5.5 处理器 1 2 3 4 5 6 7 8 9 10 11 12 13 14 15 16 17 18 19 @RequestMapping(value = "some.do") public ModelAndView doSome (String name, Integer age) throws MyUserExcepton { ModelAndView mv = new ModelAndView (); if (!"zs" .equals(name)){ throw new NameException ("姓名不正确!!" ); } if (age == null || age > 80 ){ throw new AgeException ("年龄比较大!!" ); } mv.addObject("myname" , name); mv.addObject("myage" , age); mv.setViewName("show" ); return mv; }
6. 拦截器 6.1 *.do 和 *.action 的请求调度 规则不仅仅只有*.do和*.action,自定义也可以
1 2 3 4 5 6 7 8 9 10 11 12 13 14 15 16 <servlet > <servlet-name > tony-video-admin-mng</servlet-name > <servlet-class > org.springframework.web.servlet.DispatcherServlet</servlet-class > <init-param > <param-name > contextConfigLocation</param-name > <param-value > classpath:spring/springmvc.xml</param-value > </init-param > <load-on-startup > 1</load-on-startup > </servlet > <servlet-mapping > <servlet-name > tony-video-admin-mng</servlet-name > <url-pattern > *.action</url-pattern > </servlet-mapping >
请求方可以是视图也可以是控制器
通过<jsp:forward page="${base}/center.action"></jsp:forward>
或通过form表单请求,请求的表单action可以不写.action,但浏览器直接请求需要写后缀.action,base取当前页面所在的路径,经过中央调度器处理后,即上面在web.xml配置*.action的所有请求给中央调度器,解析完后如果控制器上有配置requestMapping会捕捉给控制器,控制器上的requestMapping的value属性可以不写.action后缀,这是中央调度器的解析协议。没有就会转给视图,最后才会报404
6.2 拦截器的介绍
拦截器:看做是多个Controller中公用的功能,集中到拦截器统一处理,使用的是aop的思想
6.3 拦截器三个方法 1 2 3 4 5 6 7 8 9 10 11 12 13 14 15 16 17 18 19 20 21 22 23 24 25 26 27 28 29 30 31 32 33 34 35 36 37 38 39 40 41 42 43 44 45 46 47 48 49 50 51 52 53 54 55 56 57 58 59 60 61 62 63 64 65 66 67 68 69 70 71 72 73 74 75 76 77 78 79 80 81 package org.zhkucst.handle;import org.springframework.web.servlet.HandlerInterceptor;import org.springframework.web.servlet.ModelAndView;import javax.servlet.http.HttpServletRequest;import javax.servlet.http.HttpServletResponse;import java.util.Date;public class MyInterceptor implements HandlerInterceptor { private long btime; @Override public boolean preHandle (HttpServletRequest request, HttpServletResponse response, Object handler) throws Exception { btime = System.currentTimeMillis(); System.out.println("拦截器的MyInterceptor的preHandle()" ); return true ; } @Override public void postHandle (HttpServletRequest request, HttpServletResponse response, Object handler, ModelAndView modelAndView) throws Exception { System.out.println("拦截器的MyInterceptor的postHandle()" ); if (modelAndView != null ){ System.out.println(11 ); modelAndView.addObject("mydata" , new Date ()); modelAndView.setViewName("other" ); } } @Override public void afterCompletion (HttpServletRequest request, HttpServletResponse response, Object handler, Exception ex) throws Exception { long etime = System.currentTimeMillis(); System.out.println("拦截器的MyInterceptor的afterCompletion()" ); System.out.println("计算机从preHandle到请求处理完成的时间:" + (etime - btime)); } }
6. 4 拦截器的声明 web.xml
1 2 3 4 5 6 7 8 9 10 11 12 <mvc:interceptors > <mvc:interceptor > <mvc:mapping path ="/**" /> <mvc:execlude-mapping path ="/handler/testUpload" /> <bean class ="org.zhkucst.handle.MyInterceptor" /> </mvc:interceptor > </mvc:interceptors >
6.5 处理步骤 1 2 3 4 5 6 7 8 9 10 11 拦截处理步骤: 1 .新建maven web项目2 .加入依赖3 .创建Controller类4 .创建一个普通类,作为拦截器使用 1 )实现HandlerInterceptor接口 2 )实现接口中的三个方法 5 .创建show.jsp6 .创建springmvc的配置文件 1 )组件扫描器,扫描@Controller 注解 2 )声明拦截器,并指定拦截的请求uri地址
6.6 多拦截器 多拦截器的初始化和执行顺序按照声明顺序,声明在前的先初始化
拦截器的初始化是存放在一个ArrayList数组中,数组的顺序跟先后添加是一致的
先初始化的拦截器先拦截,后初始化的后拦截
第一个拦截器preHandle:true ;第二个拦截器preHandle:false 执行结果:
1拦截器的MyInterceptor的preHandle()
2拦截器的MyInterceptor的preHandle()
1拦截器的MyInterceptor的afterCompletion()
原因:1.第二个拦截器没有放行,被拦截下来的处理器方法没有执行,postHandle()不会执行
2.第一个放行,故而会执行afterCompletion()
第一个拦截器preHandle:true ;第二个拦截器preHandle:true 执行结果:
1拦截器的MyInterceptor的preHandle()
2拦截器的MyInterceptor的preHandle()
===执行doSome===
2拦截器的MyInterceptor的postHandle()
1拦截器的MyInterceptor的postHandle()
2拦截器的MyInterceptor的afterCompletion()
1拦截器的MyInterceptor的afterCompletion()
第一个拦截器preHandle:false ;第二个拦截器preHandle:true | false 执行结果:
1拦截器的MyInterceptor的preHandle()
原因:第一个拦截器不放行,自然第二个拦截器也不会执行,处理器方法不会执行,后面的postHandle、afterCompletion都不会执行
6.7 拦截器和过滤器的区别 1.过滤器是servlet中的对象,拦截器是框架中的对象
2.过滤器实现Filter接口的对象,拦截器是实现HandleInterceptor接口
3.过滤器是用来设置request,response的参数,属性的,侧重对数据过滤的拦截器是用来验证请求的,能截断请求
4.过滤器是在拦截器之前先执行的
5.过滤器是tomcat服务器创建的对象,拦截器是springmvc容器中创建的对象
6.过滤器是一个执行时间点,拦截器有三个执行时间点
7.过滤器可以处理jsp,js,,html等等,拦截器是侧重拦截对Controller的对象,如果你的请求不能被DispatcherServlet接收,这个请求不会执行拦截器内容
8.拦截器拦截普通类方法执行,过滤器过滤servlet请求响应
7. 其他处理器 1 2 ApplicationContext ctx = new ClassPathXmlApplication ("beans.xml" );StudentService service = (StudentService) ctx.getBean("service" );
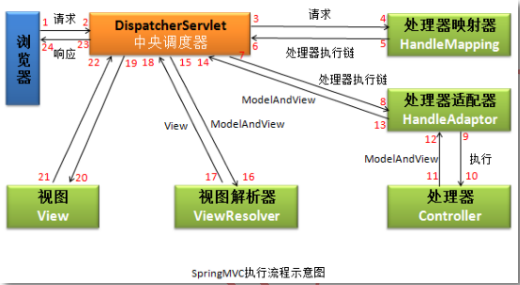
springmvc内部请求的处理流程:也就是springmvc接收请求,到处理完成的过程
1.用户发起请求some.do
2.DispatcherSerrvlet接收请求some.do,把请求转发给处理器映射
处理器映射器:springmvc框架中的一种对象,框架把实现了HandlerMapping接口的类都叫做映射器(多个)
处理器映射器作用:根据请求,从springmvc容器对象中获取处理器对象
1 MyController controller = ctx.getBean("some.do" )
框架把找到的处理器对象放到一个叫做处理器执行链(HandleExecutionChain)的类中保存
HandlerExecutionChain:类中保存着:
(1) 处理器对象(MyController);
(2) 项目中的所有的拦截器List<HandlerInterceptor> interceptorList
1 HandlerExecutionChain mapperHandler = getHandler(processedRequest)
3.DispatcherServlet把2中的HandlerExecutionChain中的处理器对象交给了处理器适配器对象(多个)
处理器适配器:springmvc框架中的对象,需要实现HandlerAdapter接口
处理器适配器作用:执行处理器方法(调用MyController.doSome() 得到返回值ModeAndView)
中央调度器调用适配器:
1 HandlerAdapter ha = getHandlerAdapter(mappedHandler.getHndler())
执行处理器方法:
1 mv = ha.handle(processedRequest, response, mapperHadler.getHandler())*
4.DispatherServlet把3中获取的ModeAndView交给了视图解析器对象
视图解析器:springmvc中的对象,需要实现ViewResolver接口(可以有多个)
视图解析器作用:组成视图完整路径,在框架中jsp, html不是string表示,而是使用View和他的实现类表示视图
InternalResourceView:视图类, 表示jsp文件,视图解析器会创建InternalResourceView类对象
5.DispatcherServlet把4步骤中创建的View对象获取到,调用View类自己的方法,把Model数据放入到requesst作用域
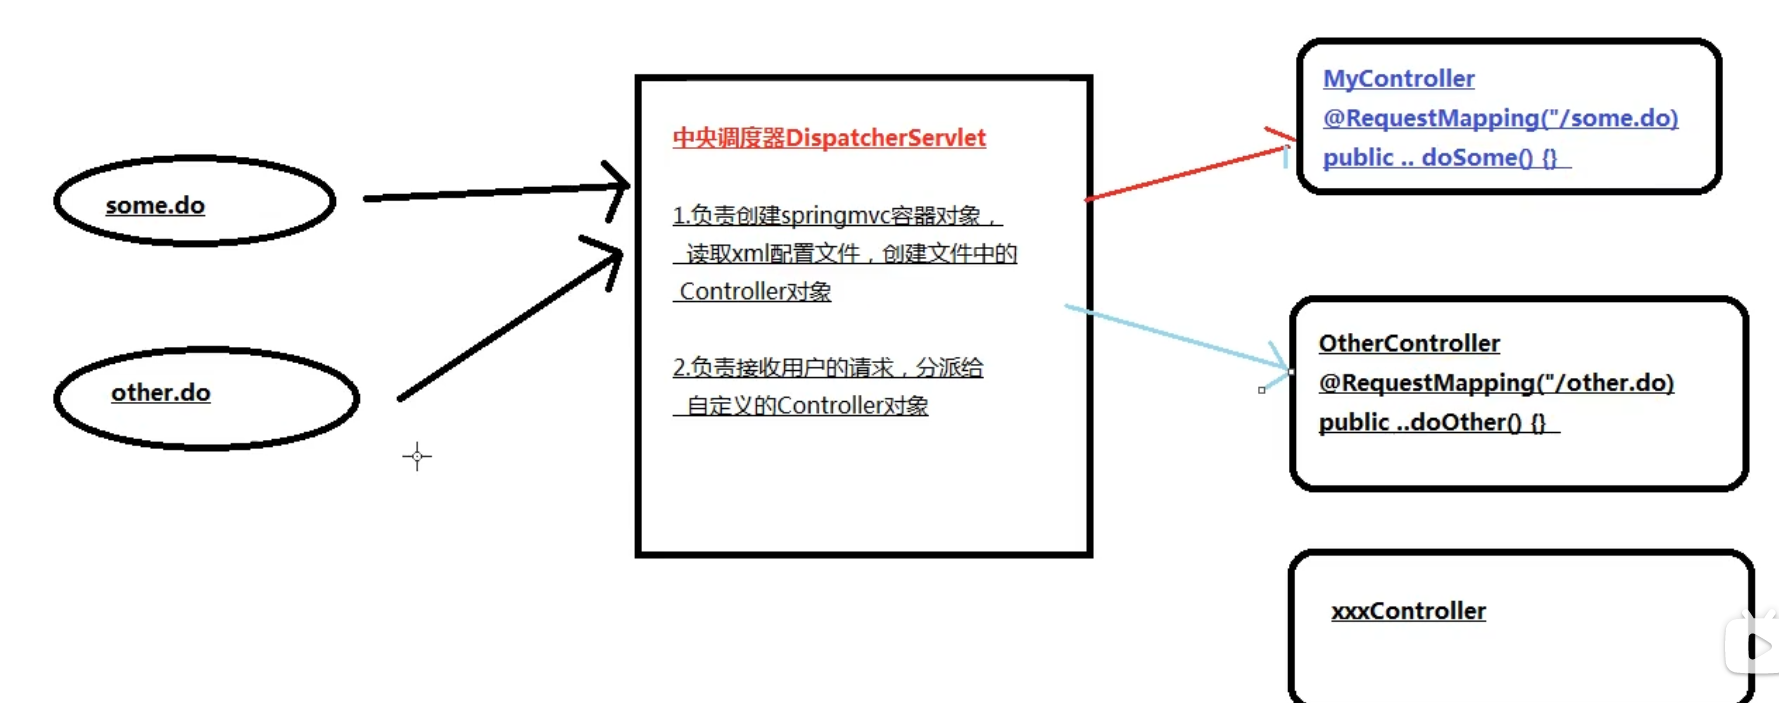
图解:
8. 表单标签 表单标签:
自定义标签:el、jstl
Spring EL:
1.支持各种类型的请求方式(查询doGet, 增加doPost, 删除doDelete,修改doPut)
(1)编写method="put|delete"
(2) 过滤器:为了让 浏览器能够支持put和delete请求
get post
put delete ->过滤器 HiddenHttpMethodFilter
HiddenHttpMethodFilter会将全部请求 名为 “_method“ 的隐藏域 进行 put | delete 处理
如果使用的是SpringMVC标签:
method="put | delete"
如果不是SpringMVC标签:是传统的html标签:
method="post"
1 <input type="hidden" name="_method" value="put | delete" >
1 2 3 4 5 6 7 8 9 10 11 12 13 14 15 16 17 18 <form:form action="controller/testMethod" method="get" > <input type="submit" value="查看" > </form:form> <form:form action="controller/testMethod" method="post" > <input type="submit" value="增加" > </form:form> <form:form action="controller/testMethod" method="delete" > <input type="submit" value="删除" > </form:form> <form:form action="controller/testMethod" method="put" > <input type="submit" value="修改" > </form:form>
优点:省略步骤:隐藏域
可参考原生态的RESTful风格
2.可以将对象和 表单绑定起来
SpringMVC项目:
1 2 3 1 . 环境搭建:2 . 引入标签库:<%@ taglib prefix="form" uri="http://www.springframework.org/tags/form" %>3 . 使用
input:
1 2 3 4 5 <form:form> 姓名:<form:input path="stuName" /><br/> 年龄:<form:input path="stuAge" /> <input type="submit" value="提交" > </form:form>
1.默认实例化bean标签的id值为command,map.put的k值必须为command
2.自定义,modelAttribute="person",通过form中该属性可以指定map.put的k值
3.path:绑定中对象的属性值
控制器:
1 2 3 4 5 6 7 8 9 10 11 12 13 14 15 16 17 18 19 20 21 @Controller @RequestMapping(value = "/controller") public class MyController { @Resource(name = "studentServiceImpl") IStudentService studentService; public IStudentService getStudentService () { return studentService; } @RequestMapping(value = "/testFormTag") public String testFormTag (Map<String, Object> map) { Student student = studentService.queryStudentByStuNo(1 ); map.put("command" ,student); return "success" ; } }
mapper:
1 2 3 <select id="selectStudents" resultType="student" > select stuno,stuname,stuage from student </select>
entity:
1 2 3 4 public class Student { private Integer stuNo; private String stuName; private Integer stuAge;
checkbox和checkboxes:
checkbox:
自动绑定request域中的值
a.通过boolean值绑定
1 2 3 4 <form:form modelAttribute="stu" > <form:checkbox path="stuSex" /> <input type="submit" > </form:form>
1 2 3 4 5 6 7 8 9 @RequestMapping(value = "testCheckBox") public String testCheckBox (Map<String,Object> map) { Student student = new Student (); student.setStuSex(true ); map.put("stu" ,student); return "success" ; }
b.绑定 集合(List、Set)、数组的中枢
checkboxes:多个checkbox的组合
path:选中的选项
items:所有的选项
1 2 3 4 5 6 <form:form modelAttribute="stu" > <form:checkbox path="hobbies" value="basketball" /> <form:checkbox path="hobbies" value="football" /> <form:checkbox path="hobbies" value="pingpong" /> <input type="submit" > </form:form>
1 2 3 4 5 6 7 8 9 10 11 12 13 @RequestMapping(value = "testCheckBoxes") public String testCheckBoxes (Map<String, Object> map) { Student student = new Student (); List<String> hobbies = new ArrayList <>(); hobbies.add("football" ); hobbies.add("basketball" ); student.setHobbies(hobbies); map.put("stu" ,student); return "success" ; }
等价于:
1 2 3 4 <form:form modelAttribute="stu" > <form:checkboxes path="hobbies" items="${allHobbies}" /> <input type="submit" > </form:form>
1 2 3 4 5 6 7 8 9 10 11 12 13 14 15 16 17 18 19 20 21 22 23 24 25 26 27 28 @RequestMapping(value = "testCheckBoxes") public String testCheckBoxes (Map<String, Object> map) { Student student = new Student (); List<String> hobbies = new ArrayList <>(); hobbies.add("football" ); hobbies.add("basketball" ); hobbies.add("pingpong" ); Map<String, String> allHobbies = new HashMap <>(); allHobbies.put("football" ,"足球" ); allHobbies.put("basketball" ,"篮球" ); allHobbies.put("pingpong" ,"乒乓球" ); allHobbies.put("d" ,"其他" ); student.setHobbies(hobbies); map.put("stu" ,student); map.put("allHobbies" ,allHobbies); return "success" ; }
radiobuttons:
同理
select:
方式一:
1 <form select path="默认的值" items="所有的可选项" >
方式二:
1 2 3 4 5 <form:select path="默认的值" > <form:option value="football" 足球></form:option> <form:option value="basketball" ></form:option> <form:option value="pingpong" ></form:option> </form:select>
方式三:
1 2 3 <form:select path="默认的值" > <form:options items="${allBallMap}" ></form:options> </form:select>
总结:
如果方式二、方式三同时存在,则使用方式二
如果方式一、方式二同时存在,则使用方式一
原生态优先级高于框架,而且最原生态的<option>没有绑定的功能
c.(了解)嵌套对象的toString()的返回值
1 2 3 4 5 6 7 8 public class Student { private Integer stuNo; private String stuName; private Integer stuAge; private boolean stuSex; private Other other; }
1 2 3 4 5 6 public class Other { @Override public String toString () { return "pingpong" ; } }
1 2 3 4 5 6 <form:form modelAttribute="stu" > <%--<form:checkbox path="other" value="basketball" /> <form:checkbox path="other" value="football" /> <form:checkbox path="other" value="pingpong" />--%> <input type="submit" > </form:form>
1 2 3 4 5 6 7 8 9 10 @RequestMapping(value = "testCheckBoxes") public String testCheckBoxes (Map<String, Object> map) { Student student = new Student (); Other other = new Other (); student.setOther(other); map.put("stu" ,student); return "success" ; }
